1.2.2 Add an Item to a Category
1.2.3 Remove an Item from a Category
1.4 Item Details on NTN website
1.4.1 Introducing the DVP Multi-Line Text Box
1.7.1 Change Staging Flag on Item
1.8.1 Create Master and Child Relationships
1.8.4 Master Item Pricing and Discounts
2.1.1 Changing your Catalog on the Website
2.1.2 Catalogs in a B2C Environment
2.1.3 Creating a Catalog in NAV
2.1.5 Catalog Highlighted Items
2.1.8 Catalog Assigned Customers and Groups
2.2 Copying Categories to Catalogs
2.3.1 Create New Catalog Group
2.3.2 Assign customer to Catalog Group
3.1 Add, Edit and Delete a Category
3.2 Associate Items with Categories
3.2.1 Access Web Category Items
3.2.3 Delete a Web Category Item
4.1 Introduction to Document Manager
4.3 Add Additional Images to Item
4.4 Add a Product Short Description
4.5 Add Product Specifications to Item
4.5.1 Order of Displaying Specifications on the Website
4.6 Add Product Reviews to Item
4.8 Copy Document (Grab as New/Link)
4.9 Add META Data and Search Engine Optimization Information on Item
4.11 Search Engine Optimization and URL Rewriting
4.12 Add a Category Primary Image
4.13 Adding a Category Extended Description
4.14 Add a Category Promotion Ad
4.17 Add and Manage Nav-to-Net Pages
5 Static Pages and Web Page Parts
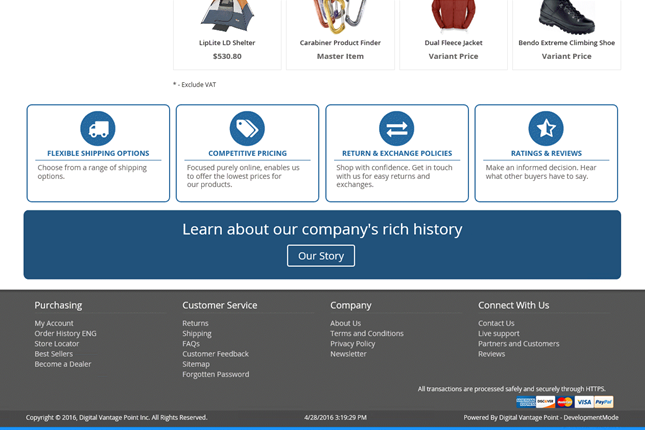
5.2 Out of the Box Web Page Parts
6 Website Friendly URLs (slugs)
6.1 Setup URL Rewrite Rules (Slugs)
7.2 Category Product listing page
7.5 Item added from Order History
7.6 Item added from a Saved Cart
8.1.3 Web Enable or Disable a Customer
8.2 Manage Web Customer Contacts
8.2.1 View the Web Customer Contact Card
8.2.2 Add a Web Customer Contact
8.2.3 Edit a Web Customer Contact
8.2.4 Delete a Web Customer Contact
8.3 Add, Edit and Delete a Salesperson
8.6 Countries and States/Provinces setup
8.7 Managing Head Office Locations
9.1 Create Roles & Permissions
9.2 Manage Roles from within Dynamics NAV
9.2.1 Assign Roles to a Web Contact
9.2.2 Add Permissions to Roles from within Navision
9.3 Manage Roles from the Website
9.3.1 Access the management of Roles on the website
9.3.3 Edit an Existing Web Role
9.3.5 View Web Roles created by other web contacts
9.3.6 View Roles that have been created in Navision
9.4 Manage Roles on the Website via the Customer Info web page
9.4.1 Create new Web Roles against a specific Contact
9.4.2 Editing Web Roles via the Contact Info web page
9.4.3 View Web Role created by other web contacts
13.2.2 General setup for all coupon types
13.2.3 Specific Setup for Percentage Off
13.2.4 Specific setup for Dollar Amount off
13.2.5 Specific setup for Buy x get y Free
13.2.6 Specific setup for Free Shipping
13.3 Using Coupons on the Website
15 Placing Orders on the Website
15.1 Salesperson Acting as Customer
15.2 Adding Items to the Shopping Cart
15.3.1 1-Step vs. 4-Step Checkout
15.3.3 Enter Billing and Shipping Information
15.3.4 Select Shipping and Billing Method
16 Managing Orders in Dynamics NAV
16.1.1 Web Holding Payment Tab
16.1.2 Web Holding Table's Errors Tab
16.2.1 To View the Web Customer Match Criteria
16.2.2 To Set up the Web Customer Match Criteria
16.2.3 To Match a Customer on a Web Order
16.2.4 To Create a new Customer on no match
16.4.1 Nav-to-Net Fields General Tab
16.4.2
Edit Nav-to-Net Credit Card fields on sales order
17.5 Adding Items to the Cart from the Order History Details Page
19.1 Viewing and Printing Reports on the Nav-to-Net Website
20.6 Viewing Submitted Form Data
20.7 Adding a Form Submission Automatically to an NTN Page
22.1 Inventory Status: Dynamics NAV User Interface
22.2 Inventory Status on Product Details page
22.3 Inventory Status in the Shopping Cart
22.4 Inventory Availability Synchronization
22.6 Configuring Inventory Availability
22.7 Inventory Status Validation Routine
22.8 Inventory Status Troubleshooting Date/Time
23.1 Nav-to-Net Store Location Document Management
23.2 Location Based Inventory Availability
29 Region and Language Selection Setup
29.1 Setting up and Enabling Languages
29.1.1 Language (DVPNTN) Setup
29.2 Setting up and Enabling Currencies
29.2.1 Currency Code (DVPNTN) Setup
29.2.2 Nav-to-Net Setup Defaults
29.3 Setting up and Enabling Countries
29.3.1 Assigning DVPNTN States / Provinces
29.4 Setting up and Enabling Regions
29.4.1 Building a Customer Template
29.5 Changing the Date format on the website
29.7.1 ISO 4217 Currency Codes
29.8.1 Table of Country/Region and State/Province Names
32.1 Editing Images for Responsiveness
33 Initial NTN data setup in a new database
33.1 Exporting the Data from an Existing Database
33.2 Importing the Data into the New Database
33.3 Modifying the Imported Data
33.4 Getting Started with Critical Data
34.2.1 Specific Setup for Redirection Type Off
34.2.2 Specific Setup for Redirection Type First Item
34.2.3 Specific Setup for Redirection Type Category
34.2.4 Specific Setup for Redirection Type Configurator
34.2.5 Specific Setup for Redirection Type Page
34.2.6 Specific Setup for Redirection Type External Link
34.2.7 Specific Setup for Redirection Type Internal Link
35 Shipping Agent and shipping Agent services
35.1 Specific Setup for Shipping agent and its Agent Service(s)
35.2 Setup Shipping Agent and Shipping Agent Service in NTN Web Shipment
35.3 View Shipping Agent and its Shipping Agent(s) on website
36.1 Force Synchronization of all records in a table
36.2 Force Synchronization of a specific record
37.2 Manage Approvers on website
37.3 Approving Order Submission
37.4 Approving Order status in web holding table
37.5 Approve Order email Alert
37.7 Approve, Deny or Re-submit order
37.9 Approved Order Status Update
38 Contract Item (Custom list)
40 Variant Items - Multi-Dim Setup
40.2 Web item Axis attributes Setup
40.4 NTN Attr. Variant Map List Setup
40.4.1 Setup from Implementation
40.5 Variant Items - Multi Dim on website
40.6 Populate Variant Series Report
41.2.3 Pervasive Parametric Search
41.2.4 Search Result/Item Listings
41.6.3 Website Reload Configuration
41.6.4 Website Upload File Configuration
41.6.7 Specific Actions to Track
41.7.1 Google Universal Analytics
41.7.3 Google Recaptcha Settings
41.8.2 PayPal Express Checkout
Introduction
Nav-to-Net features:
This manual describes features that are not included in every implementation of Nav-to-Net; such features may not be included in the edition of Nav-to-Net licensed to you. If you have any questions about the features included in your edition of Nav-to-Net, please refer to your Nav-to-Net implementation documentation or contact your Nav-to-Net Sales Representative.
Nav-to-Net is a comprehensive e-commerce solution designed specifically for Microsoft Dynamics NAV. Nav-to-Net is comprised of a .Net based web front end for online transactions and Microsoft Dynamics NAV as the back-end ERP. The web-based front-end continually synchronizes with Microsoft Dynamics NAV. Microsoft Dynamics NAV provides the ability to manage items, documents, categories, catalogs and customers in real-time.
In order to ensure the efficiency and consistent performance of the solution, Nav-to-Net was designed with leading edge Microsoft technologies; including .NET, MSMQ, MS SQL, and MS NAS. Nav-to-Net has been optimized by including Digital Vantage Point's ATO (Always Take Order) methodology. This means that multiple layers of redundancy have been built into Nav-to-Net and it has the ability to continue to operate even if Microsoft Dynamics NAV is unavailable in the back-end.
This document will describe and demonstrate the various functions of the latest Nav-to-Net Version.
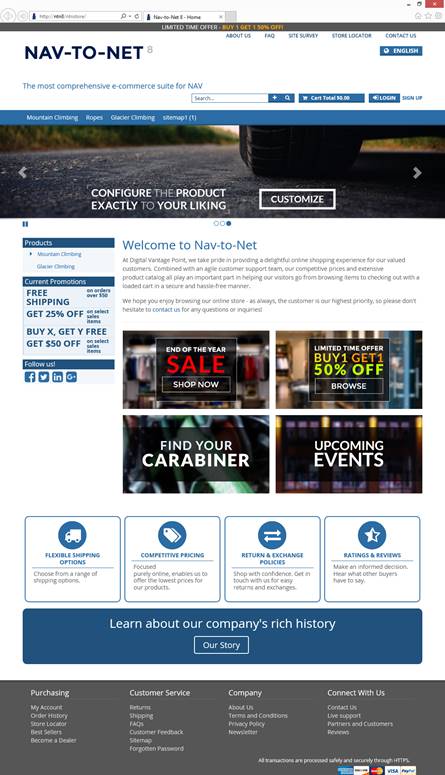
Figure
0
-
1
: Nav-to-Net Home Page
1 Items
1.1 Item Card
All items are managed through the Nav-to-Net Item Card in Dynamics NAV. To access it navigate to Departments } Nav-to-Net } Product Management } Setup } Items (NTN) .
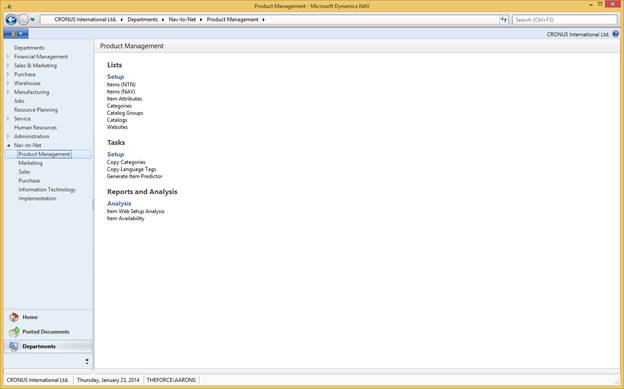
Figure 1 - 1 : Accessing the Nav-to-Net Item Card
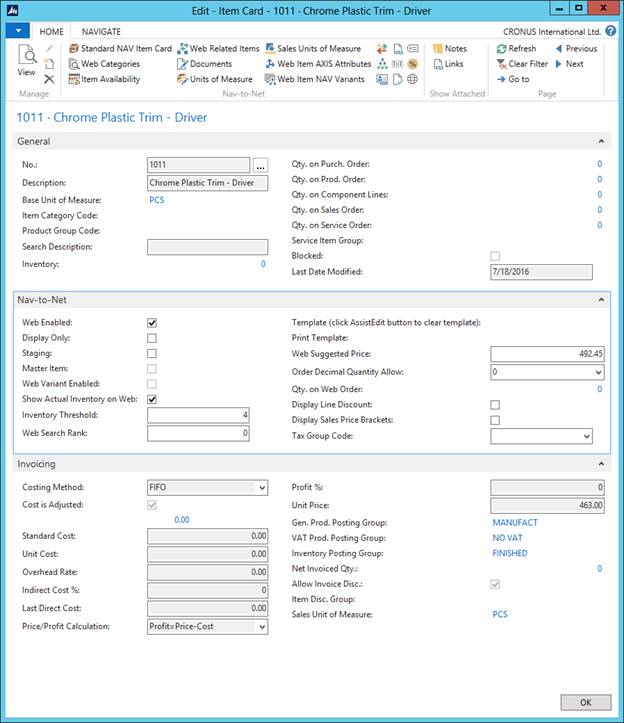 Figure
1
-
2
: Nav-to-Net Item Card
Figure
1
-
2
: Nav-to-Net Item Card
Web Enabled: This indicates whether the item will be available on the website.
Display Only: When this is checked, the item will be displayed on the website, but cannot be added to the shopping cart or wish list.
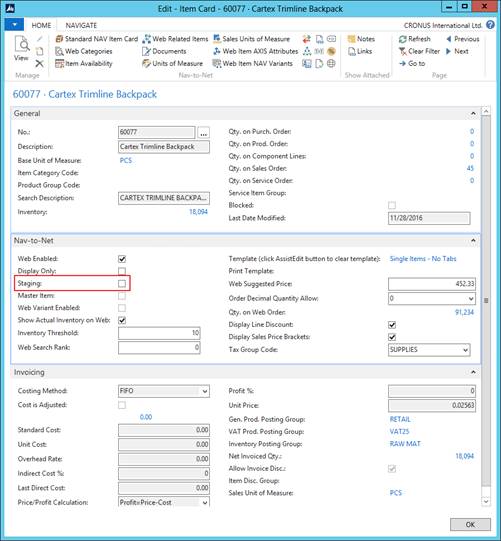
Staging: This function provides the user with the ability to define an item as staged only, so that its format on the website can be viewed by those with Staging permission (see Section 7 on Managing Roles), but will not be viewable by general users of the site.
Master Item: This indicates whether the item is a master item of children items. Detailed information about Master Items is in Section 1.8 on page 31 .
Web Variant Enabled: This indicates whether the item has variants. Detailed information about Web Variants is in Section 1.5 on page 26 . NOTE: Children for Master AND Web Variant Enabled can NOT be used on the same Master.
Show Actual Inventory: If this is checked, inventory availability will be displayed on the website (if the display inventory flag in Nav-to-Net Setup is also checked).
Inventory Threshold: If "Show Actual Inventory" is not checked but "Display Inventory" in Nav-to-Net setup is checked, the value in the "Inventory Threshold" field will be used to determine whether a status of "Available" or "Limited" is displayed on the Product Detail pages. See section 1.6 on page 29 for more information.
Web Suggested Price: This price displays as the web price on the product details page if populated and the unit price (on the invoicing tab) is crossed out. If the web price is zero, the retail price is displayed and not crossed out. The web suggested price is for display purposes only.
Web Search Rank: The number inserted in this field will designate the rank in which the item will be listed in a search result. For example, a Web Search Rank of 1 will place an item first in the listing of search results.
Template: This specifies a template to be used for the item when it is displayed on the website. If blank, the default template will be used. See section 1.9 on page 36 and section 3.3 on page 57 for further details on templates.
Print Template: This specifies a template to be used for the item when a user chooses to print it from the website. If blank, the default template will be used. See section 1.9 on page 36 and section 3.3 on page 57 for further details on templates.
Order Decimal Quantity Allow: The number of decimal places a user will be able to purchase an Item by. For example: 4. 5 feet of rope.
Qty. on Web Order: A non-editable field that displays the quantity of this Item allocated for in the Web Holding Table.
Display Line Discounts: This option will display a summary of the available standard NAV Line Discounts for the logged-in website shopper.
Display Sales Prices: This option will display a summary of the available standard NAV Sales Price quantity pricing for the logged-in website shopper.
1.2 Web Enabling Items
1.2.1 Web Enable an Item
1. Open the Nav-to-Net Item Card and navigate to the Item to be modified.
2. On the Nav-to-Net tab, click on the Web Enabled box.
3. Click OK and close the form in order to synchronize the changes to the website.
In order for the item to be displayed on the website, the item must be assigned to at least one category and the category must be web enabled. The item can be added to the category from either the item card or the category card.
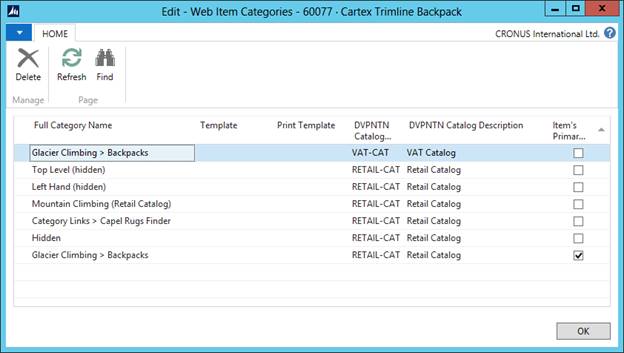
1.2.2 Add an Item to a Category
1. Click on Web Categories on the ribbon menu of the Item Card.
2. Click on an empty line in the form.
3.
Click on the dropdown arrow
![]() at the end of the line. This will bring up the
Web Category List
. Select a category and click
OK
.
at the end of the line. This will bring up the
Web Category List
. Select a category and click
OK
.
4. Verify that the new category has been added to the Web Categories and close the form. The remaining fields in the Web Item Categories screen will populate automatically.
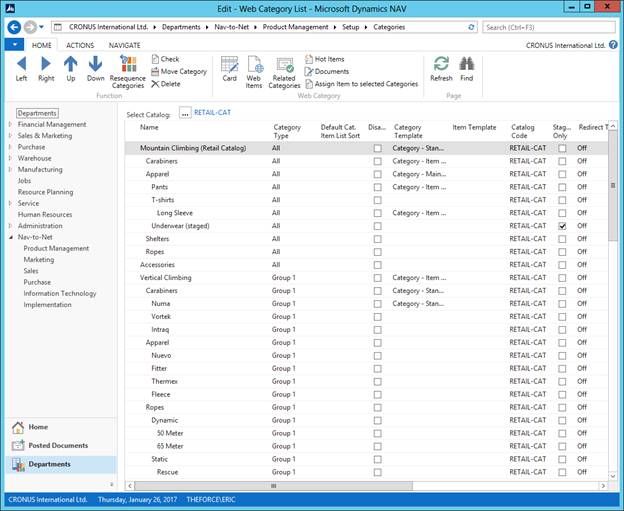
Figure 1 - 3 : Web Category List
1.2.3 Remove an Item from a Category
1. Open the Web Categories for the item.
2. Click on the line of the category to be deleted.
3. Select Delete from the Edit Menu.
4. Click Yes to confirm the Delete or No to cancel the command.
5. Close the Web Item Categories.
 Figure
1
-
4
: Web Item Categories
Figure
1
-
4
: Web Item Categories
1.3 Related Items
An item may be related to other items in the database and be presented to the user to take advantage of cross selling and up selling opportunities. There are three types of related items in Nav-to-Net: Accessories, What's Hot and Predictors.
![]()


![]()
![]()
![]()
![]()
![]()
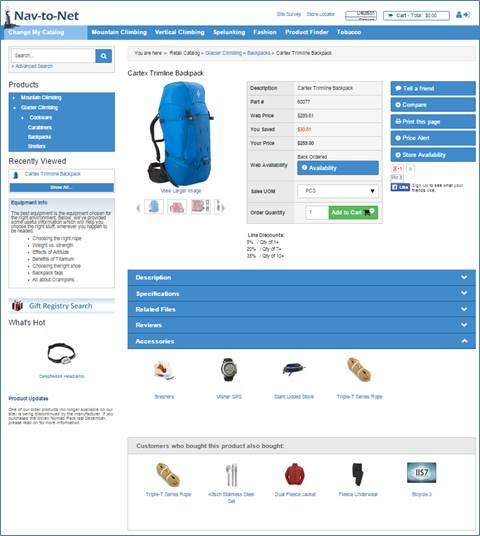
Figure 1 - 5 : Item Details Web Page, with What's Hot, Accessories, and Predictor Items Highlighted
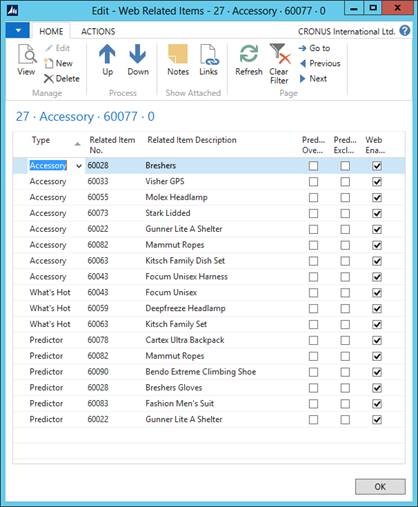
Figure 1 - 6 : Web Related Items
Accessories: Accessories appear in the tab section at the bottom of the Product Details page. A website user must click on the Accessories tab in order view these items.
What's Hot: What's Hot Items appear as thumbnail images in the left hand bar of the Product Details page. They are displayed whenever a user is on the Product Details page.
Predictor: Predictor Items are shown under the Customers who purchased this item also bought: section on the bottom of the Product Details page. There is a report in Nav-to-Net, found under the Reports section, which populates these items by looking at the sales history.
Note: There is a Web Predictor report that can be used to populate the predictor items.
To setup Related Items (Accessories, What's Hot or Predictor):
1. In the Item's List, select an Item and click on Web Related Items in the ribbon menu.
2. On a blank entry, select a Type (Accessories/What's Hot/Predictor) to associate with the item.
3.
Click on the dropdown arrow
![]() in the related item column. This will bring up an
Item List
. Select an item and click
OK
. The
Related Item Description
will now auto-populate.
in the related item column. This will bring up an
Item List
. Select an item and click
OK
. The
Related Item Description
will now auto-populate.
4. Make sure that the Web Enabled flag is on.
5. Continue adding related items until all of them are in the list.
6. Use the arrow buttons to move the accessories up or down the list until they appear in the order to be displayed on the website.
7. Items in this list will now appear in the Accessories section in the tabs displayed at the bottom of the product details page.
Delete Related Items:
1. Open the Web Related Items for the item.
2. Click on the entry to be deleted.
3. Select Delete from the Edit Menu.
4. Click Yes to confirm the Delete or No to cancel the command.
5. Click OK to close the Web Related Items card.
NOTE: Alternatively uncheck the Web Enabled box and the item will no longer display on the website.
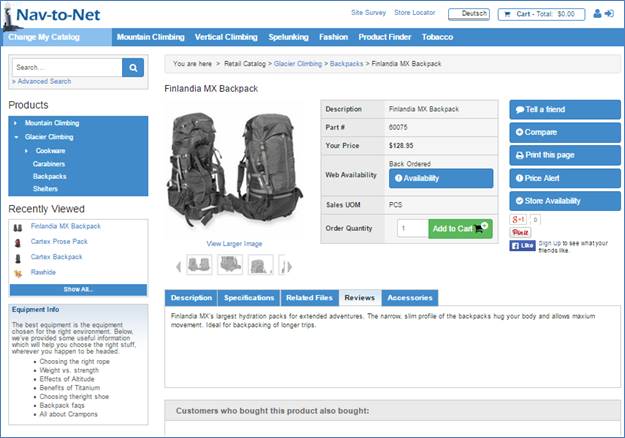
1.4 Item Details on NTN website
After the item has been set up in Dynamics NAV (including being assigned a category) the product details will be synchronized to the website. The item can be found on the web under the categories it belongs to. An example of an Item's Product Details page is shown below.
NOTE: Google Plus is no longer within Nav-to-Net, despite it currently showing on the screenshots.
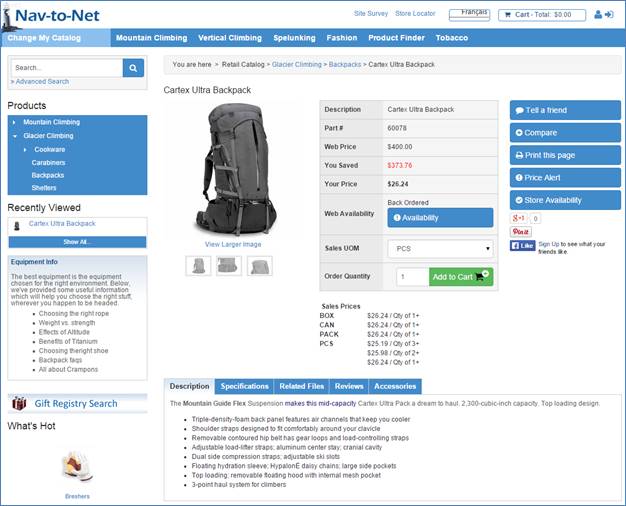
Figure 1 - 7 : Item Details Page
1.4.1 Introducing the DVP Multi-Line Text Box
In order to edit, manage and store complex styled HTML content in NAV, DVP has provided an integrated content management system as part of Nav-to-Net. One of the key applications to this system is the Multi-Line Text Box (MLTB). This tool allows for the creation and management of HTML content far beyond the abilities of Standard NAV.
The Multi-Line Text Box (MLTB) is a XHTML Compliant CMS Editor. This means that the MLTB requires all content (regardless of source: typed or pasted) to be XHTML Compliant.
When copying data from Microsoft Word (and other word processors, 3rd party content editors), there are extraneous, NON-XHTML compliant data that can be copied over. When this happens, the editor will NOT save the data, or save the data with format loss.
There are several solutions to using NON-XHTML Compliant Data Sources as follows:
- Create the content directly within the MLTB.
-
Use an XHTML Compliant Editor.
Examples: Notepad (part of Windows), Notepad ++, Dreamweaver
- Copy the content from the Non-compliant source to Notepad, then from Notepad to MLTB
-
Use a Doc to XHTML Convertor
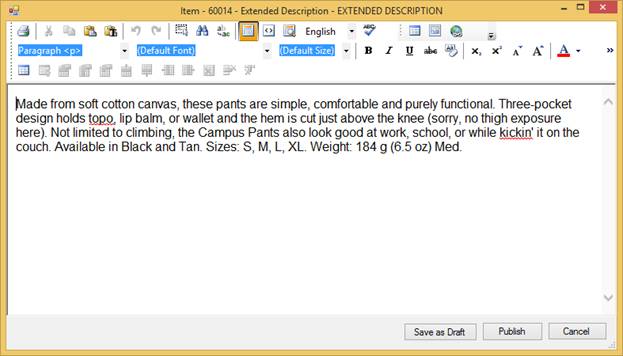
Figure 1 - 8 : The MLTB
1.4.2 Product Compare
In Nav-to-Net users of the website are able to compare Items side by side. This can be extremely useful to the shopper when the Items are similar and have comparable specification information (see section 0 for more information on adding specifications).
In order to compare Items, simply click the "compare" button on the Item Details page to add Items to the comparison list one -by-one.
![]()

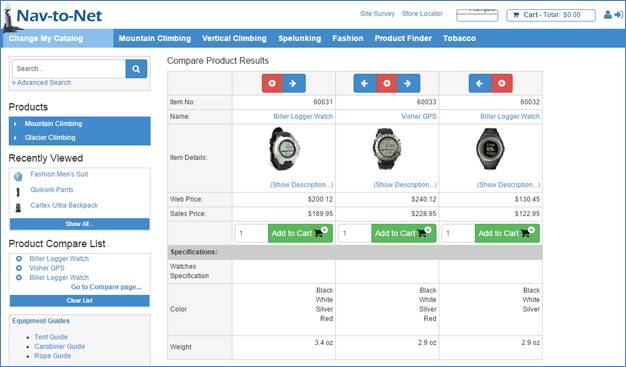
Figure 1 - 9 : Three Products in Comparison
Modifying the Product Comparison List:
- Remove items: Items can be removed from the list on the product compare list in the left navigation menu, by clicking on the x button of the corresponding Item. Alternatively, on the Product Comparison page, the x button can be clicked as well.
- Reorder items: Use the left and right arrows to shift the product details table in the Product Comparison page.
Comparing Items where children of Masters or Parametric Searches
- If a product that has been selected for a Product Compare then the set of attributes against the Master Item (or Parametric Search) will be used when showing the products attributes.
- If a product has multiple different sets of different attributes; each against a different masters (or Parametric Search), then the website will present only the first set of attributes initially. However, If another (subsequent) product is added to the product compare that has the second set of attributes, then both sets of attributes are shown for the first product. If some of the Attributes has no values assigned for that product, then the value will show as N/A.
1.4.3 Availability Alert
On the Item's Product Details page, the Web Availability of an item will list Back Ordered if it's been back ordered, and on clicking the Availability button, will prompt the shopper for an email address to notify of the item's availability .niaz

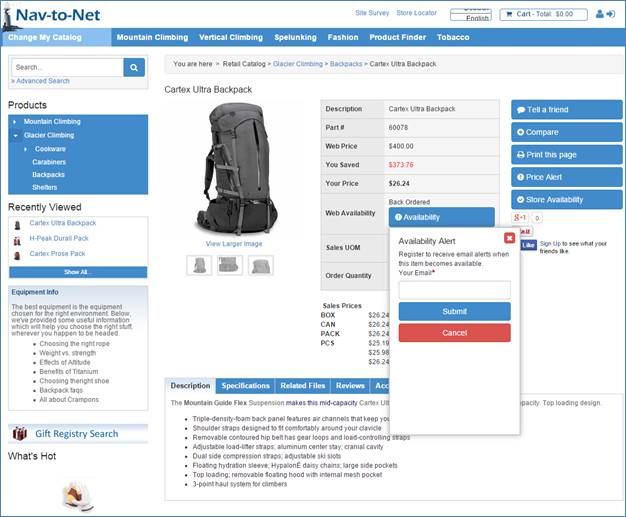
Figure 1 - 10 : Availability Alert prompts the shopper for an email address to be notified of stock when an item is back ordered
When the Availability for this Item is greater than 0 (see Section 1.6 for more information on Availability) the shopper will receive an email, sent to the entered address.
Note: The body of that email is defined as a Content Reference against the website found under Nav-to-Net ► Implementation ► Setup ► Websites and Documents in the ribbon menu (see Section 4 for information about working with the Document Manager).
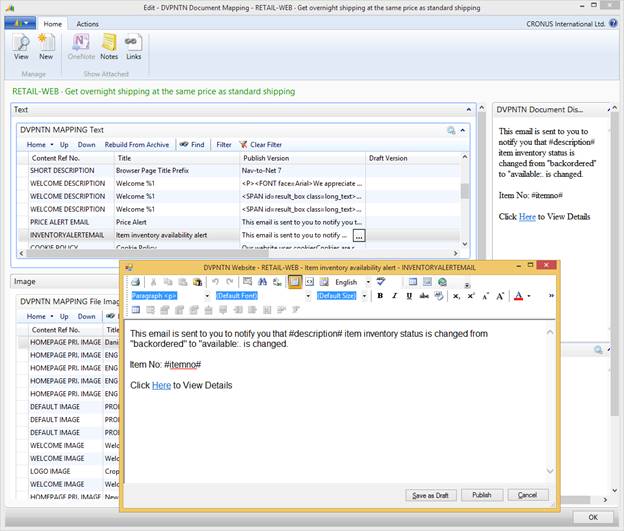
Figure 1 - 11 : Modifying the email sent to the Availability Alert requester
1.4.4 Tell a Friend
When browsing a Nav-to-Net website, a shopper has the ability to recommend an Item to a friend via the Tell a friend feature located on the Item Details Page, if it is web enabled on website.
In order to web enable "Tell a Friend", go to Departments > Nav-to-Net > Implementation> Setup> Website> Open website card> Cart/Financial Tab> Under Item/Category > Enable Tell a Friend field
Check the Enable Tell a Friend field, then reload website values by Admin on website OR reload from Navision and retry checkout and it is 2-Step Checkout now.
When the shopper clicks on the Tell a friend button on an Item Details Page, a pop-up will appear requesting the email address of the person to send a link to the current Item Details Page.
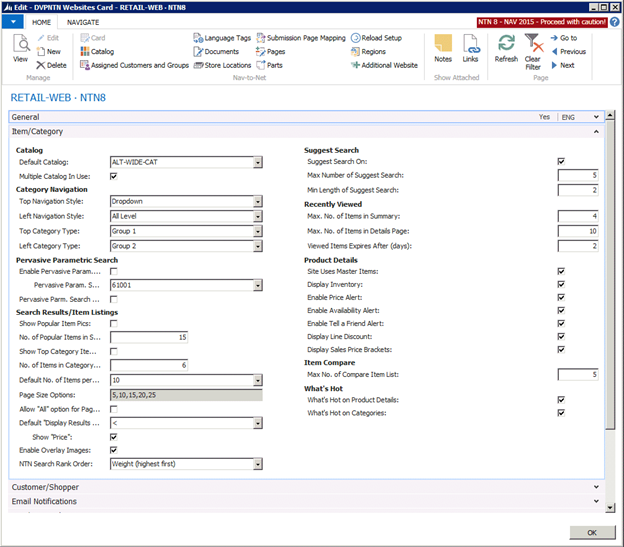

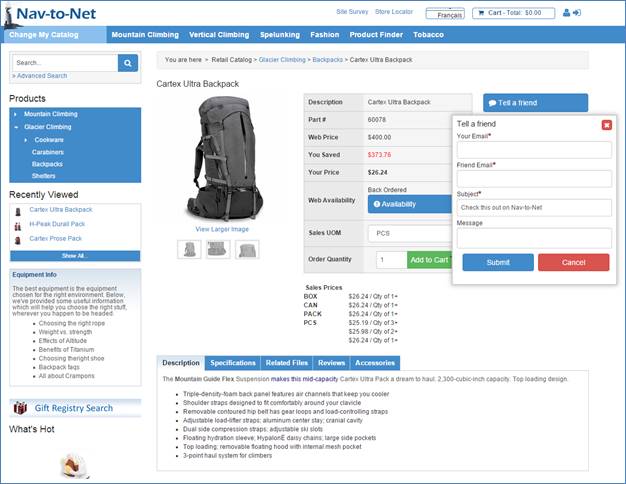
Figure 1 - 12 : Tell a friend request
Your Email: The email address of the person sending the link. If the website shopper is currently logged in, this field will be automatically populated with their email address. This email address will also be automatically used as the "Senders" email address on the email being sent. This allows the "Friend" to simply reply to the original Nav-to-Net website shopper.
Friend Email: This field is for the email address to send the link email to.
Subject: This field will be used for the "Subject" of the email with the link.
Message: Any text entered in this field will be included in the email being sent.
Note: The email body will begin with the personalized message, followed by the message in Nav-to-Net's Document Manager.
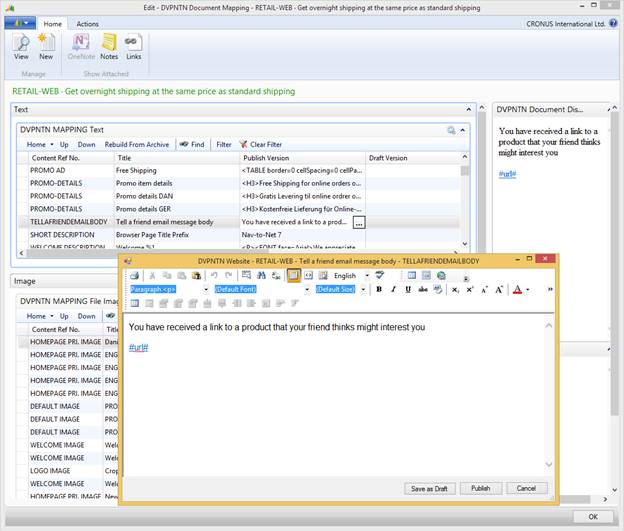
Figure 1 - 13 : Modifying the email sent to the friend from the "Tell a friend" feature
In order to modify the form email being sent, open the "TELLAFRIENDEMAILBODY" document against the website (see Section 4 for information about working with the Document Manager).
1.4.5 Price Alert
A user is now able to request an automated email be sent to them when the price of an item changes, if they are assigned "VIEW_PRICEALERT' permission. A Price Alert button on the Item's Product Details Page, when clicked, will request an email address to send a notification when the Sale Price of an Item alters.

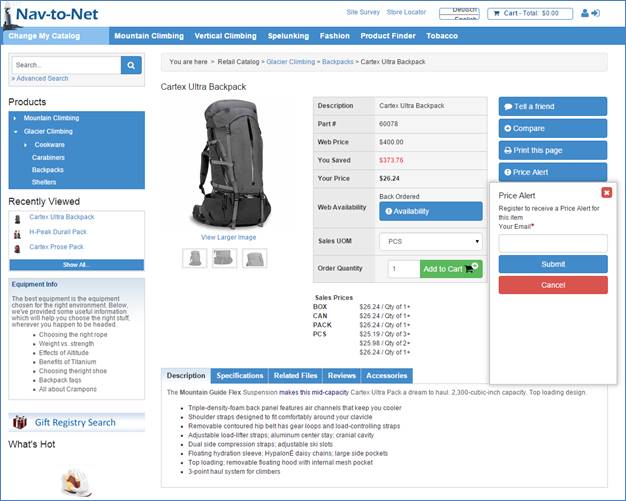
Figure 1 - 14 : Price Alert email address request
The body of the email being sent can be modified in a manner similar to the Tell a friend and Availability Alert emails (see Section 4 for information about working with the Document Manager).
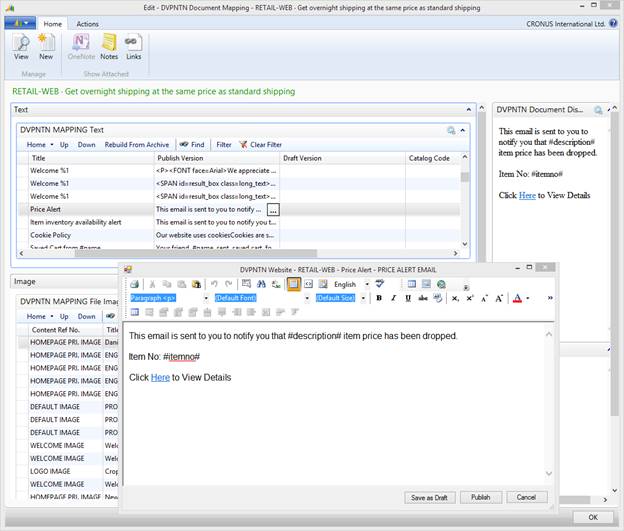 Figure
1
-
15
: Modify the Price Alert email body
Figure
1
-
15
: Modify the Price Alert email body
1.5 Item Variants
In some cases, an item may be offered in different forms such as color, for example.
To add Item Variants:
1. Navigate to the Items (NTN) List.
2. Select an item.
3. Click on Web Item NAV Variants in the ribbon menu.
4. Enter a code and description for each variant (example in Figure 1-16 ).
5. Make sure the Web Enabled box is checked.
6. Click OK to close the form.
![]()
![]()
![]()
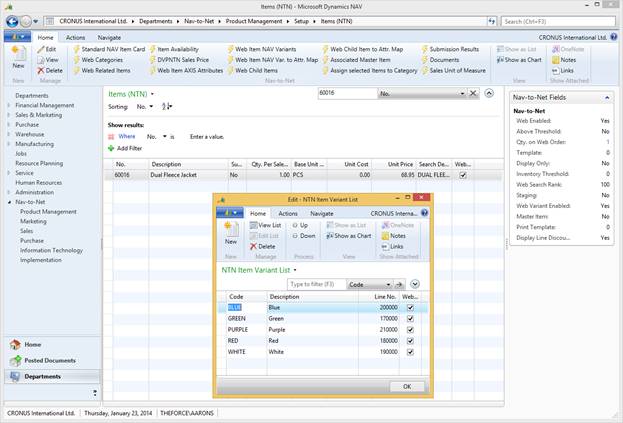
Figure 1 - 16 : Item Variants List
On the website, if an Item has Variants, there will be no price displayed on the Product Listing, Search Results, or My Favorite List pages. Also, there will be no Add to Cart button beside the Item. In order to add an Item with a Variant to the shopping cart, the user must go to the Item's Product Details page.
![]()
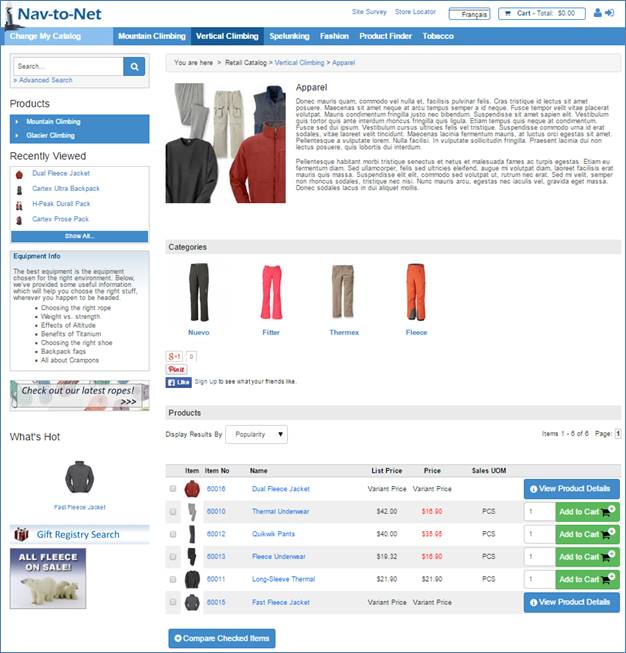
Figure 1 - 17 : Item List with a Variant Item Highlighted
Inventory availability is calculated for each item variant. In the example on Page 28 ( Figure 1-18 ), the inventory status for variant Green is Available while the inventory status for variant Red and White is Back Ordered .

Figure 1 - 18 : Product Details Web Page for Item with Variant List
1.6 Item Availability
Nav-to-Net website's Item Availability displays near real-time inventory levels for items in NAV. For detailed review of this behavior see the " Inventory Availability " section of this document.
The item availability feature affects the following areas of Nav-to-Net:
- Dynamics NAV Inventory - Dynamics NAV inventory availability is updated as the quantities in inventory are updated and synchronized to the website, based on the item's availability configuration.
- Product Details page - The item's Inventory Status is displayed in the item header of the Product Details page, based on the item's availability configuration.
- Shopping Cart - The item's availability status is displayed in the Shopping Cart pages using either a local inventory level lookup or by making a Dynamics NAV request.
Figure 1 - 19 : Item Availability Card
No.: Item Number
Variant No.: Variant Number
Location Code:
Web Inventory Status: Inventory on the website is displayed as a status (available, limited, backordered).
Web Inventory: The quantity of inventory available for sale on the website. It is pre-configured to be calculated as:
![]()
Show Actual Inventory on Web: Inventory on the website is displayed as a quantity. Each time the web inventory changes, the website inventory also changes.
Inventory Threshold: The quantity at which the inventory becomes low enough to present a limited availability status to the user. In combination with the web inventory, it also determines whether Dynamics NAV needs to be queried from the shopping cart.
1.7 Staging
This function provides the user with the ability to define an item as staging only, so that the item on the website can be viewed by those with the Staging permission (See Section 7 on Managing Roles), but will not be viewable by general users of the site.
Figure
1
-
20
: Staging Field highlighted on the Item (NTN) Card
1.7.1 Change Staging Flag on Item
1. Navigate to Items (NTN) list.
2. Select an item.
3. Click on Edit in the ribbon menu.
4. Under the Nav-to-Net tab, check or uncheck the Staging flag.
1.8 Master Items
Master Items is a concept to manage and group items similar to each other, but have unique SKUs (Item No). The presentation on the website is similar to variant.
![]()

Figure
1
-
21
: Master Item flag on an item
1.8.1 Create Master and Child Relationships
To create a master and child relationship, go to the Standard NAV item card , and add the items to a General Production Posting Group and Inventory Posting Group in the Invoicing FastTab (see Figure 1-22 ).
Then select the children items, click Web Child Items in the ribbon menu, and enter in the Item No. of the master item to create the relationship (see Figure 1-23 ). The Master Item card will now reveal the Master Item flag as checked.
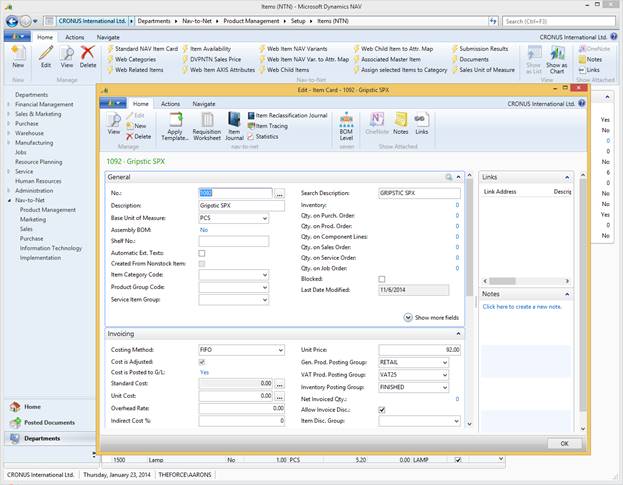
Figure 1 - 22 - Adding items to General Prod. and Inventory Posting Groups.
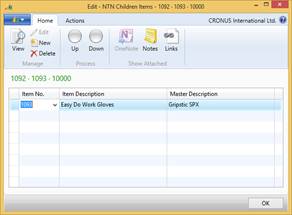
Figure 1 - 23 - Adding children items to a master
1.8.2 Setup of Master Items
- Access the master item table from Nav-to-Net menu option on the Item card.
- Children of the master item(s) should NOT be added to the Item Category. If they are, the Children will appear, both in the Item List and on the Master Item's Product Details Page.
- There is a flag "Master Item" on the Item Card that indicates the item is a master item.
1.8.3 Managing Master Items
To view the items assigned as Children to an item, open the Master Item's Item Card in NAV. Then select: Related Information } Item } Nav-to-Net } Add Child Items to Master Item .
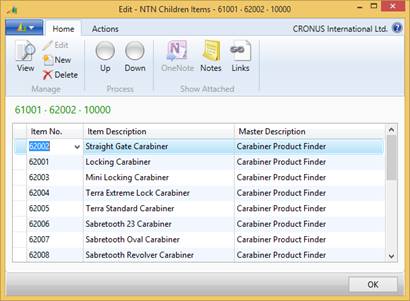
Figure 1 - 24 : Master Item List
- Master items can be used when the "Master item in used" flag in website table is checked and the Master Item template has been configured.
- Note: Children items assigned to the Master item can be added into the shopping cart through product details page. If the children items are not added to a category, you can
still add them into the shopping cart.
- Note: If children items have been added to a category, they can be added into the shopping cart in quick order and shown in search results. In this case, they are treated as individual items, not children items of a master item.
- Children items, which are assigned to the Master Item, will present on the master item detail page.
- Children item can be assigned to multiple Master Items.
- Children items can NOT be a Master Item themselves.
- In order history, if the item is a children item, the link will take user to the master item details page.
- If master item is a qualifier item in coupons, Nav-to-Net checks if any children of master items are in the shopping cart, and will approve the coupon.
- If master item is a promo item in coupons, get percentage off on all children of master item in shopping cart for percentage off coupon.
- Add the children item with lowest price into shopping cart as a free item for buy x get y free coupon.
Figure 1 - 25 : Master Item Product Detail Page
1.8.4 Master Item Pricing and Discounts
Nav-to-Net has replicated NAV 3.60 pricing on the website to maintain ATO (Always Take Orders). The logic from NAV 5.0 and 4.0 is the same as 3.6 pricing and discount .
- When a web user is logged in AND has been assigned a customer No., will see the lower of item unit price, sales price. Then discounts (if any) applied. Please see the MS Dynamics NAV manual on standard NAV pricing for further details about Sales Prices and Sales Line Discounts.
- For web users that have NOT logged in OR have NOT been assigned a customer No., the web user will see the lower of item unit price OR the sales price with type All Customers.
1.9 Item Templates
Templates specify the look and feel for the dynamically created web pages on the website. They are created and modified by a certified Nav-to-Net developer. Templates can specify item product detail pages, pages for categories as well as for the gift registry among other website sections. Templates can be found under Nav-to-Net ► Implementation ► Intial Setup ► Web Templates .
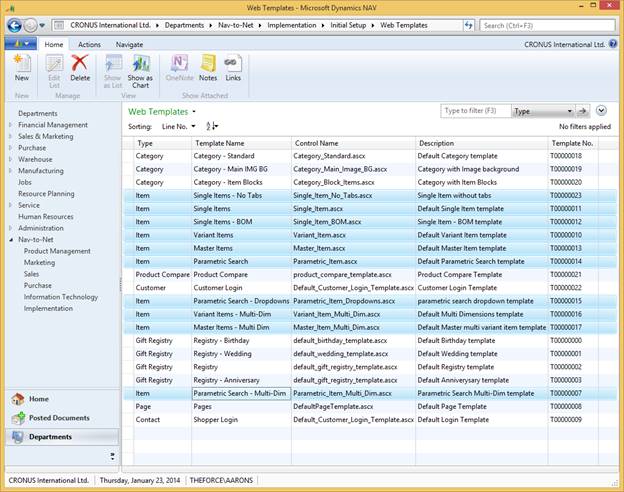
Figure 1 - 26 : Possible Item page templates highlighted on the Web Template setup list
These templates can be chosen for specific items or groups of items in order to display those items, or groups of items differently than the typical item.
1.10 Item Cross References
In instances where Item Cross Reference Type = Customer, the website will interact with those cross reference records in the following way:
Allow customers to enter their cross reference number within Quick Order.
Allow customer to search for their Cross Reference Numbers.
Show Cross Reference numbers (as well as the original item numbers) on the following pages:
1. Search results
2. Category Listing Page
3. Product Details Page for Simple(single) item.
4. Product Details Page for Master item.
5. Parametric Search Results
6. Shopping Cart and Checkout
7. Order Confirmation Page
8. Order Confirmation Email
NOTE: it is assumed that a specific Customer only ever has one cross reference number per item number. If there is more than one cross reference for any given customer, there may be customizations required to address the UI/UX and presentation of more than one cross reference.
NOTE: Non-logged in customers will not see item reference numbers.
2 Websites and Catalogs
Website management allows for multiple websites to be set up and managed within the same Nav-to-Net installation. The usage of multiple websites may have licensing implications. Please contact your authorized Nav-to-Net dealer to discuss further.
A catalog is a collection of categories. For a single website that intends to offer the same products to all users, only one catalog is required.
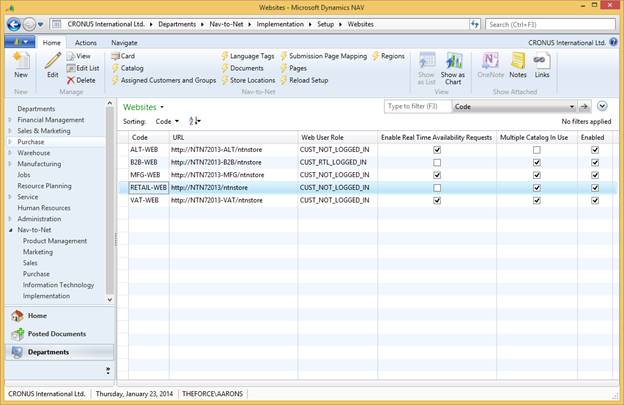
Figure 2 - 1 : Nav-to-Net Website Card
For further information on the setup of above Nav-to-Net feature see Section 30 " Nav-to-Net Setup - Common Attributes "
2.1 DVPNTN Catalogs
Catalogs on a Nav-to-Net website are collections of Categories (which in turn are collections of Items). Real life examples of Catalogs would be "Wholesale" vs. "Retail". Customers are assigned a default Catalog, but provided they have the correct permissions (see Section 7 on Roles and Permissions), they are able to change their Catalog once logged in.

Figure 2 - 2 : NTN Catalog Card
2.1.1 Changing your Catalog on the Website
If the website is set up to support multiple Catalogs, and the shopper has permission to change their Catalog. Figure 2-3 and Error! Reference source not found. show the links to changing the Catalog in standard Nav-to-Net. Once the user selects a different Catalog, the Categories and Items available on the site will change.
![]()
![]()
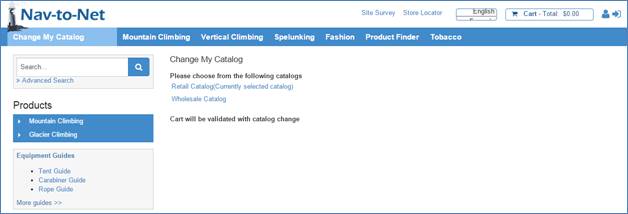
Figure 2 - 3 : Changing Catalogs
2.1.2 Catalogs in a B2C Environment
Typically in a B2C website users are not given a choice to change their catalogs. The default shopper permissions are not usually set up to allow this. It is however, possible to set up multiple Catalogs in a B2C as well as a B2B website. In a B2C environment, should the user decide to change their Catalog prior to logging in, the site will validate all of the Items in their Shopping Cart against their default Catalog during login.
2.1.3 Creating a Catalog in NAV
Creating a Catalog: Typically, a Catalog will be built and assigned to a Website by a certified Nav-to-Net Implementor.
![]()
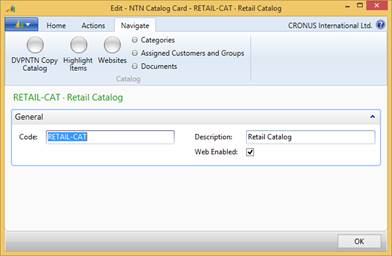
Figure 2 - 4 : More Catalog Information
2.1.4 DVPNTN Copy Catalog
This feature will allow the user to build a complete Catalog based on all of the associated data of another Catalog. This is a good starting point for building a Catalog when an existing Catalog functions well.
The button can be found in NAV on both the Catalog Listing page:
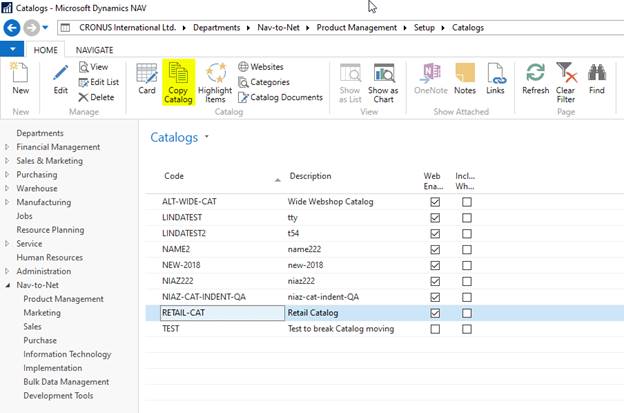
And on the Catalog card:
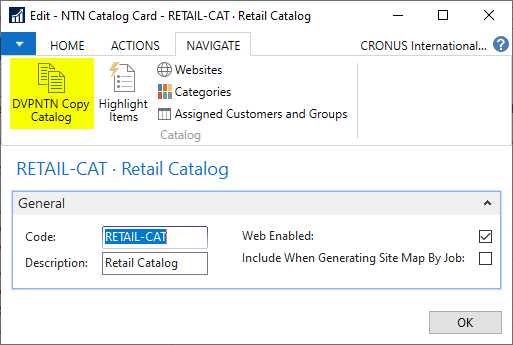
Clicking on either button will open the Copy Categories window as seen below:
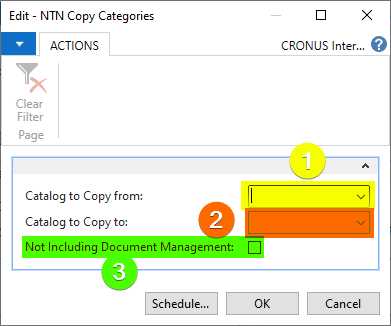
To use this tool, follow the steps below:
1) Select the Copy from Catalog
a. This will be the catalog from which the category structure will be copied
2) Select the Copy to catalog
a. Please note that the Catalog that is being copied to, MUST already exist in the NTN Catalog Table.
3) Decode whether or not to include the Document Management
a. Set this field to TRUE to copy the content refs assigned to the catalog and the corresponding categories from the source catalog to the destination catalog
Once the copy has completed, remember to complete the remainder of the catalog setup (assign to customers, web groups, assign items to the new categories, etc).
2.1.5 Catalog Highlighted Items
Highlighting Items against a Catalog will display those Items prominently on the Home Page of the website. The Items to be highlighted and the order in which they are displayed can be modified from the Web Related Items Form ( Figure 2-5 ).
To highlight items:
- Navigate to Nav-to-Net ► Product Management ► Setup ► Catalogs .
- Select a catalog, and click "Highlight Items" in the ribbon menu (see Figure 2-5: Highlighted Items associated with a Catalog ).

Figure 2 - 5 : Highlighted Items associated with a Catalog
Once an item is added to the list of Web Related Items as Type: Highlight in a Catalog, and Web Enabled they will appear on the Home Page of the website.
Prediction Override: The Prediction Override checkmark will ensure that the Item is displayed as Highlighted regardless of its position in Nav-to-Net's Predictor feature.
Prediction Exclusion: The Prediction Exclusion checkmark will ensure that the Item is not displayed as Highlighted regardless of its position in Nav-to-Net's Predictor feature.
Web Enabled: The record in the Web Related Items needs to be "Web Enabled" in order for the Item to be displayed as a Highlighted Item on the website.
![]()
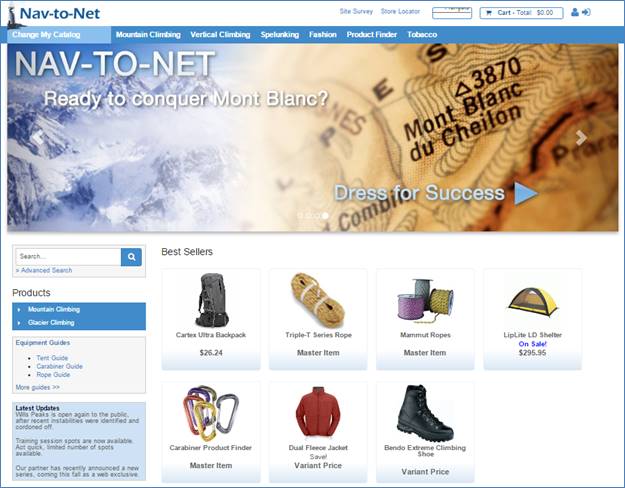
Figure 2 - 6 : Highlighted Items against a Catalog
2.1.6 Catalog Websites
In order for a Catalog to operate correctly on the website that Catalog needs to be associated with the website. If no relationship is defined between a Catalog and a Website that Catalog will not be accessible. Typically this relationship will be defined at the time of Catalog creation by a Nav-to-Net certified developer.
To add a Catalog to a Website:
- Navigate to Nav-to-Net ► Product Management ► Setup ► Catalogs .
- Select a catalog from the list.
- Click on Websites in the ribbon menu (see Figure 2-7: Adding a catalog to a website ).
- Select a Catalog Code from the dropdown menu.
- Click OK to close the form.
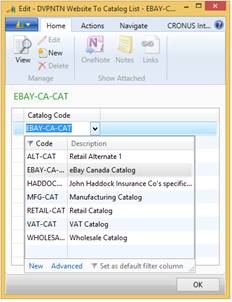
Figure 2 - 7 : Adding a catalog to a website
2.1.7 Catalog Categories
Just as Catalogs need to be associated with Websites, Categories need to be associated with Catalogs. Every Catalog will need a set of Categories to hold the Items for that Catalog. See Section 3 for more information on defining and managing Categories.
To view categories associated with a catalog:
- Navigate to Nav-to-Net ► Product Management ► Setup ► Categories.
- In the Select Catalog filter, click the ellipses to open the Catalogs Card.
- Select a catalog on the Catalogs Card.
- Click OK to close the form.
![]()
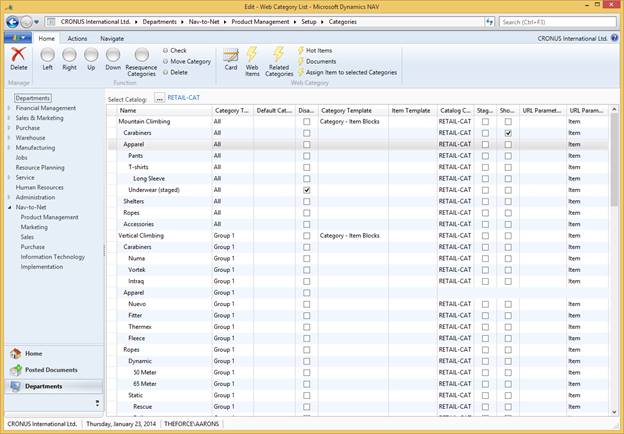
Figure 2 - 8 : Categories associated with the Retail Catalog
2.1.8 Catalog Assigned Customers and Groups
In order for a customer to view a particular catalog, the customer needs to be associated with that catalog. This is typically done for an entire group of customers during the initial setup of the catalog by a Nav-to-Net certified developer.
The relationship between a Customer or Customer Group can be managed from the Customer Card , Web Group Card or the Catalog Card . Below is an example of the Customers and Groups of Customers when viewed from the Catalog List ( Nav-to-Net ► Product Management ► Setup ► Catalogs ).
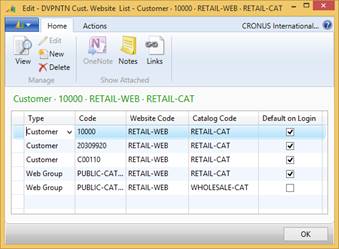
Figure 2 - 9 : Customers and Customer Groups associated with the Retail Catalog
Adding a particular Customer to this list and checking the Default on Login box will ensure that Customer sees this Catalog immediately on logging into the website.
2.1.9 Catalog Documents
Just as Items and Categories make use of Document Managed information, Catalogs do as well. Not as many Content Reference Types are visible for Catalogs on the website as they are for Items and Categories, but there are a few that do appear on the site.
Note: For more information consult the Templates that have been built for your Nav-to-Net solution for what custom Content Reference Types have been built into your Catalog.
2.2 Copying Categories to Catalogs
Once categories have been defined (see section 3.1.2 on page Error! Bookmark not defined. for more information about adding categories); categories can be copied from one catalog to another in order to minimize work.
1. Navigate to Nav-to-Net ► Product Management ► Setup ► Catalogs .
2. Select a catalog.
3. Click Copy Catalog in the ribbon menu.
4. Click the dropdown arrow in the Catalog to Copy from field. Select a catalog and click OK .
5. Click the dropdown arrow in the Catalog to Copy to field. Select a catalog and click OK .
6. Click OK.
Note: To avoid copying the category documents, check the Not Including Document Management box.
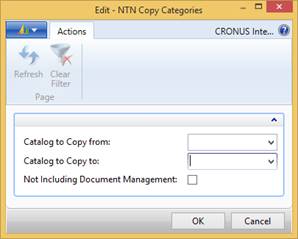
Figure 2 - 10 : Copy Categories
2.3 Web Groups
Web Groups are a method of logically grouping similar customers having similar web experiences (for example: utilizing the same catalogs, categories, items, templates, and related items).
The Web Group field on the customer card defines the Web Group for all of the web users for the chosen customer.
![]()
Figure
2
-
11
: The Web Group Code on the Nav-to-Net Customer Card
2.3.1 Create New Catalog Group
- Navigate to Nav-to-Net } Product Management } Setup } Catalog Groups .
- Click New in the ribbon menu. The DVPNTN Catalog Groups card will now be visible (see Figure 2-12: The Web Group Code on the Nav-to-Net Customer Card ).
- In the first row under Code , type in a unique name for the Catalog Group.
- Fill in any text under Description (optional).
- Click OK to close the form.
![]()
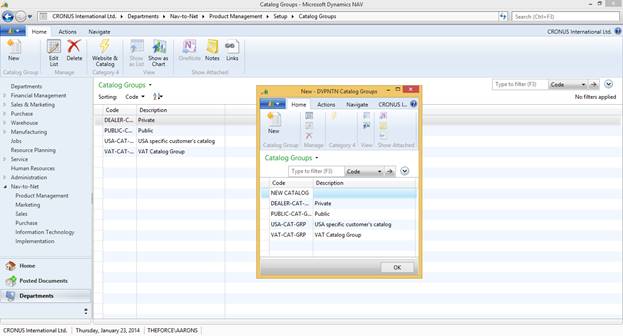
Figure 2 - 12 : The Web Group Code on the Nav-to-Net Customer Card
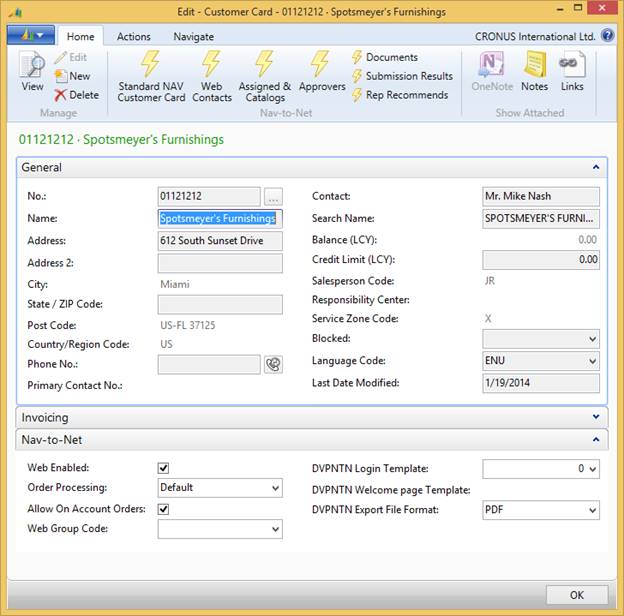
2.3.2 Assign customer to Catalog Group
- Navigate to Nav-to-Net } Sales } Setup } Customers (NTN) .
- Double-click on a customer entry. The Edit Customer card will now be visible.
- Under the Nav-to-Net tab, find the Web Group Code field, and click the dropdown arrow. A list of catalog groups will now be visible.
- Select a Catalog Code/Web Group Code from the list.
- Click OK to close the form.
Figure
2
-
13
: Nav-to-Net Customer Website List
Above is a filtered list of the available website-to-catalog relationships to the chosen customer.
Type: This is the filter by user segmentation. Filter options are by Customer, by Web Group (Catalog Group), or by Company (Salespersons).
Code: The record based upon the Type value from the above. For example: "Customer 10000" or "Web Group PUBLICCUST".
Website Code: Looks up to the available websites.
Catalog Code:
Catalog to be used for the chosen website. This is filtered by the "DVPNTN Website Catalog List". (See

Figure 2-14
)
Default on Login: This determines whether this is the Default Catalog for the Type, Website, Catalog combination.
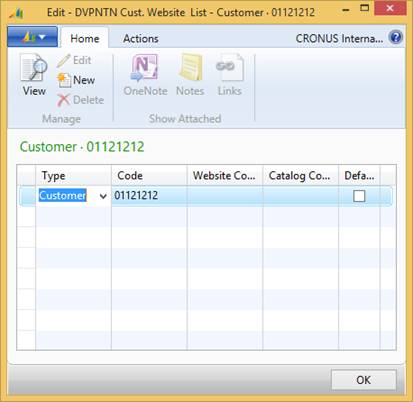
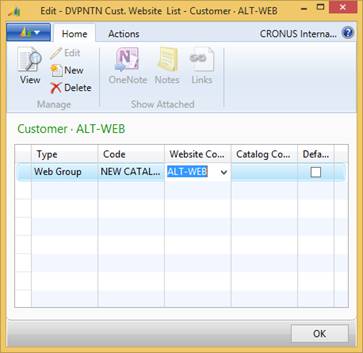
2.3.3 Web Groups by Website
- Navigate to Nav-to-Net } Implementation } Setup } Websites .
- Select a website, and click Assigned Customers and Groups in the ribbon menu.
- Under Type , select Web Group.
- Under Code , select the code for the web group.
- Click OK to close the form.
Figure
2
-
14
: DVPNTN Cust. Website List
3 Categories
A sample category structure is shown in Figure 3-1 .
1. The first-level categories are lined up at the top of the page.
2. Hover over one of the first-level categories to bring up the second-level categories.
3. Hover over one of the second-level categories to bring up the third-level categories.
![]()
![]()
![]()
![]()
![]()
![]()
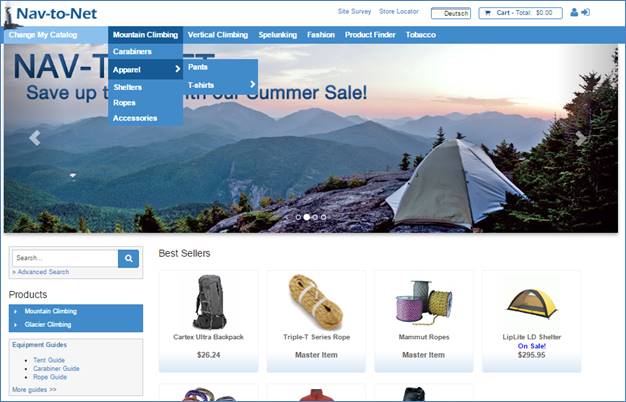
Figure 3 - 1 : Category Listing and Navigation
Categories can be defined and managed through the Web Category Card or the Web Category List in Dynamics NAV. To access the Web Category List, navigate to Nav-to-Net } Product Management } Setup } Categories.
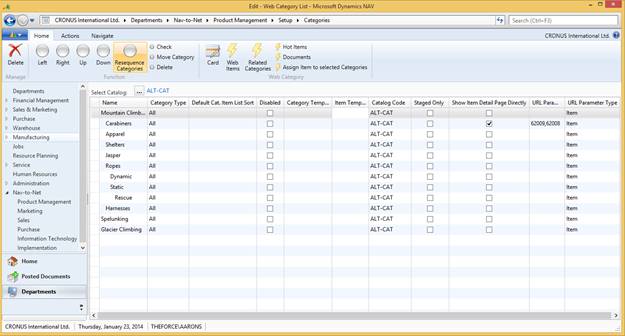
Figure 3 - 2 Web Category List
To access the Web Category Card, navigate to Nav-to-Net } Product Management } Setup } Categories , click on Card in the ribbon bar.
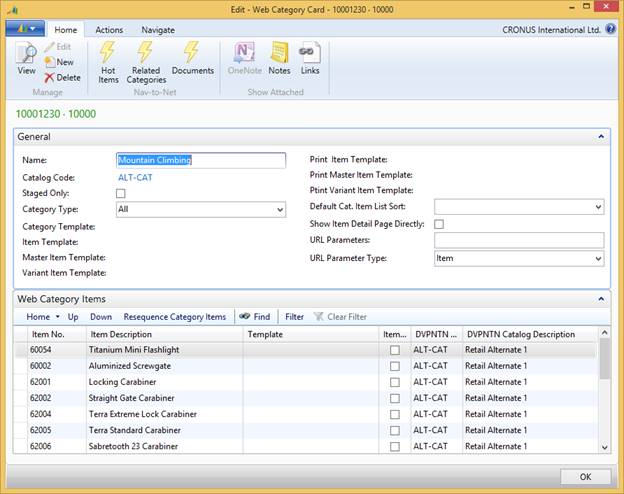
Figure 3 -3 Web Category Card
Most of the fields in the Web Category Card and Web Category List are the same. The Web Category Card would be used in cases where category documents were to be entered. Using the Web Category List allows one to clearly see the mapping of the Category levels.
3.1 Add, Edit and Delete a Categor y
The Web Category Card and Web Category List contain fields and buttons to help with managing the categories and they include:
Name: Specifies a name for the category to be used on the website.
Category Type: The Category Type defines where on the website the Category is to be displayed. Categories are capable of being displayed in the Left Hand Navigation or the Top Navigation areas of the web page.
- Hidden: Hidden categories can contain Items, but the Category itself is not visible on the website. The Items it contains can be added to the cart and purchased.
- Group 1: Typically integrated into the Top Navigation and setup in the Nav-to-Net Website
- Group 2: Typically integrated into the Left-hand Navigation and setup in the Nav-to-Net Website
- Group 3: Available for customized Navigation tools. While not shown on the website, it is typically used for items that are provided as part of promotions/coupons (ex: Buy X Get Y; "Y" is the item that gets into the Group 3)
Default Cat. Item List Sort: The Category can default sort by Name, Price, Popularity or Line Sequence.
Disabled: Specifies if a category should be hidden from the website. When a category is disabled, all its sub-categories are also hidden from the website.
Category Template: Specifies a template to be used for the category when it is displayed on the website. This will typically be managed by a certified Nav-to-Net developer.
Item Template: Specifies a template to be used for the items under the current category when the items are displayed on the website. This will typically be managed by a certified Nav-to-Net developer.
Catalog code: This field establishes which catalog the category belongs to.
Staged Only : This function provides the user with the ability to define a category as staged only, so that its format on the website can be viewed by those with Staging permission (see Section 7 on Managing Roles), but will not be viewable by general users of the site.
Show Item Detail Page Directly:
URL Parameters:
URL Parameter Type:
3.1.1 The Process Pane

Left; Right: The left and right facing arrows decrease and increase the indent levels of a category respectively. Increasing the indent of a category makes it the sub-category of the closest category above it whose indent level is one less than itself. For example, in Figure 3-2 on page 52 , Light Weight, Composite and Breakout, are all sub-categories of Ropes. The maximum number of indent levels is three for Nav-to-Net by default.
Up; Down: The up and down arrows move the category up or down the list.
Resequence Categories: There is a number series operating behind the scenes that determines the ordering of the Categories. It is possible for this number series to become disrupted (through the use of custom reports or dataports, for example). Using the Resequence Categories feature will re-establish the number series and re-order the Categories.
Check: This button performs a check on the category structure. It checks whether any category in the hierarchy is indented incorrectly. It will return a message of valid or invalid.
Move Category: Will be able to move a category (and its associated items) 1) above, 2) below, or 3) be made a child of, or 4) parent of another category.
Delete: Delete the category and its associated items.
3.1.2 Add a Category
1. Open the Web Category List ( Nav-to-Net } Product Management } Setup } Categories) .
2. Click on the lookup button beside Select Catalog.
3. Choose the appropriate catalog code field and click OK.
4. Move off the catalog code field to refresh the list of categories below.
5. Scroll down and position the cursor on the line for the new category or select Insert New from the Edit Menu, or press F3, to insert a line above the current line.
6. Enter a name for the category. The catalog will default to the selected catalog code field.
7. Use the arrow buttons to move the category if desired.
8. Move off the record or close the form to synchronize to the website.
3.1.3 Edit a Category
1. Open the Web Category List ( Nav-to-Net } Product Management } Setup } Categories) .
2. Position the cursor on the line to be modified.
3. Make changes to the fields or rearrange the position of the category using the arrow buttons as desired.
4. Move off the record or close the form to synchronize to the website.
3.1.4 Delete a Category
1. Open the Web Category List ( Nav-to-Net } Product Management } Setup } Categories) .
2. Position the cursor on the line to be deleted.
3. Select Delete from the Edit Menu, or press F4.
4. Click Yes to confirm the Delete or No to cancel the command. Close the Web Category List.
3.2 Associate Items with Categories
There are two methods of associating categories and items, both from the Categories list.
Method #1:
- Navigate to Nav-to-Net } Product Management } Setup } Categories .
- Select a category, and click on Web Items in the ribbon menu.
- The Web Category Items Card will display, as shown in Figure 3-4.
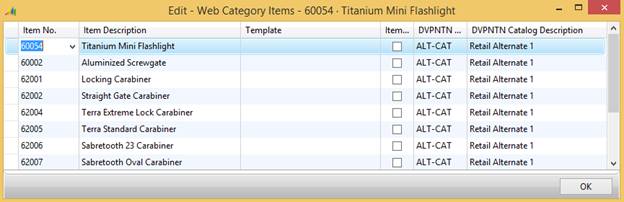
Figure 3 - 3 Web Categor y Items
3.2.1 Access Web Category Items
1. Select a category entry in the Categories List.
2. Click on Web Items in the ribbon menu.
3.2.2 Add a Web Category Item
1. Open the Web Category Items for the item.
2. Click on the field Item No. of an empty line in the form.
3. Click on the dropdown arrow in the field. This will bring up the Item List.
4. Select an item. (Note that the item needs to be Web Enabled - see 1.2.1 Web Enable an Item ).
5. De-select the item for the remainder of the fields to populate.
6. Click OK to close the form.
3.2.3 Delete a Web Category Item
1. Open the Web Category Items for the item.
2. Click on the line of the web item to be deleted.
3. Select Delete from the Edit Menu.
4. Click Yes to confirm the Delete, or No to cancel the command.
5. Click OK to close the form.
Method #2:
An alternative way of associating items with categories is to:
1. Select a Category from the Web Category List. To select multiple categories, hold down the Ctrl Key.
2. Click on Assign Item to selected Categories in the ribbon menu. The Item List will now show.
3. Click on the line of the web item to be added. To select multiple items, hold down the Ctrl Key.
4. Click OK . A confirmation of the action should pop up.
5. Click OK to close the alert.
3.3 Category Templates
Templates are created as predefined layouts for various dynamically created web pages on the website.
These templates can define how Categories pages are displayed as well as Item Pages. Templates are typically created by web professionals.
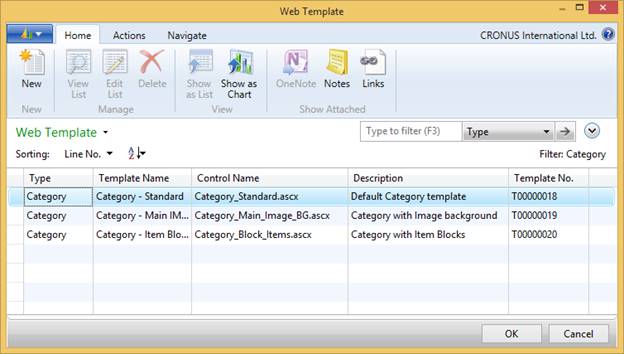
Figure 3 - 4 : Two possible Category page templates highlighted on the Web Template setup list
These templates can be chosen for Categories in order to display those Categories differently than default Categories.
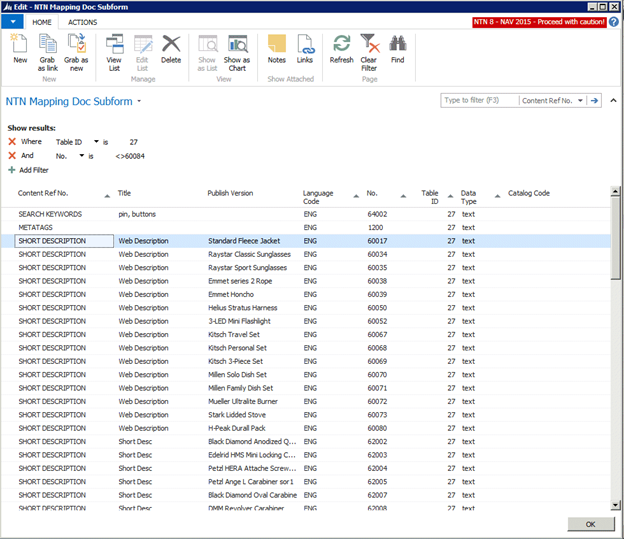
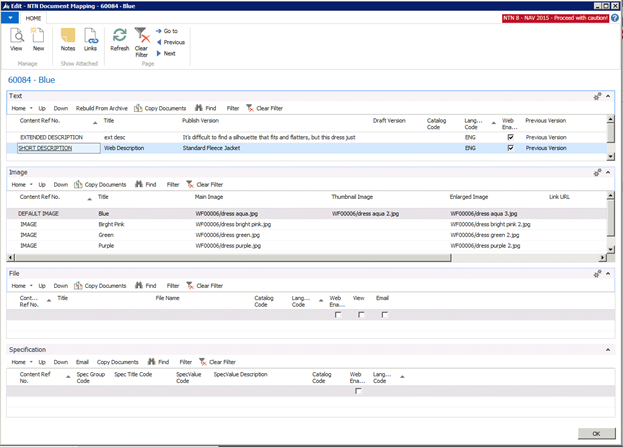
4 Document Manager
The Document Manager provides a way to group documents based on document types. Related information can be put together and transferred across items and categories. It is simple, re-usable and flexible and it has a multilingual capability.
Documents can be added easily to NAV objects (such as item, category or websites) by using the document management tools. Figure 4-1 shows an example of how the documents created in Dynamics NAV are related to the website.
1. Short Description
2. Extended Description
3. Main Product Image
4. Additional Images
To access the Document Manager, navigate to Nav-to-Net } Product Management } Setup } Items (NTN) , select an item and click Documents.
![]()
![]()
![]()
![]()
![]()
![]()
![]()
![]()
![]()
![]()
![]()
![]()
![]()
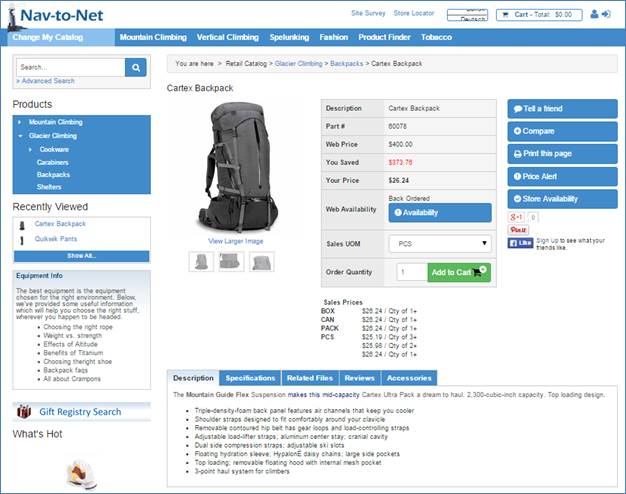
Figure 4 - 1 : Various Types of Document Managed Data on a Product Details Web Page
![]()
![]()
![]()
![]()
![]()
![]()
![]()
![]()
![]()
![]()
Figure 4 - 2 Various Types of Document Managed Data in Dynamics NAV Document Manager
4.1 Introduction to Document Manager
While editing the item description and image (in the next section), if the following error message appears, double-check the installation of the NAV AddIn Helper.
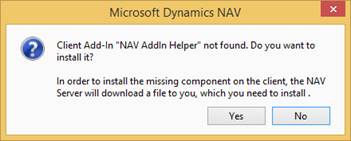
Figure 4 - 3 : NAV AddIn Helper Error Message
Check the location of the file with a certified NTN professional. During the install wizard, the following components should be visible:
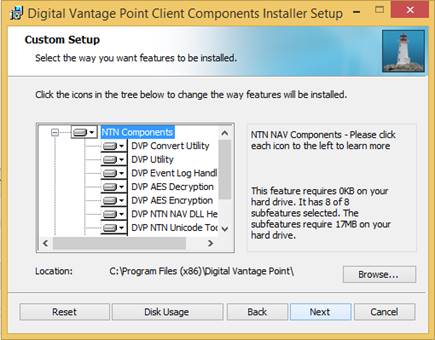
Figure 4 - 4 : Components Installer Setup
If the following error message appears, click Always Allow for the components to load:
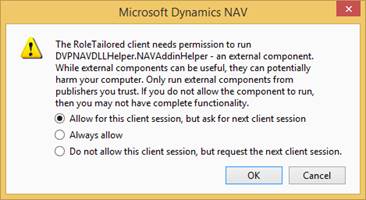
Figure 4 - 5 : Components Installer Setup
These messages may appear for additional functionality of NTN, for e.g. the multi-line text box.
4.2 Add Image to Item
1. Navigate to Nav-to-Net } Product Management } Setup } Items (NTN) , select an item and click Documents . This opens the Document Mapping list of the item.
2. On the Image tab, double-click in the first column (Content Ref No.) of an empty line. A window will appear with two options: 1) Default Image, and 2) Image.
3. Select Image and click OK .
4.
Select the field
Main Image
. A set of ellipses
![]() will appear.
will appear.
5. Click on the ellipses, choose Upload/Replace Image in the options presented (see Figure 4-6 ), and click OK .
6. Choose a compatible image file stored on the computer (see Figure 4-4) and click OK . Compatible image formats are BMP, GIF, JPG and MPG.
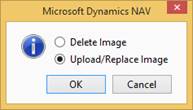
Figure 4 - 6 : Choose Upload / Replace to Add an Image
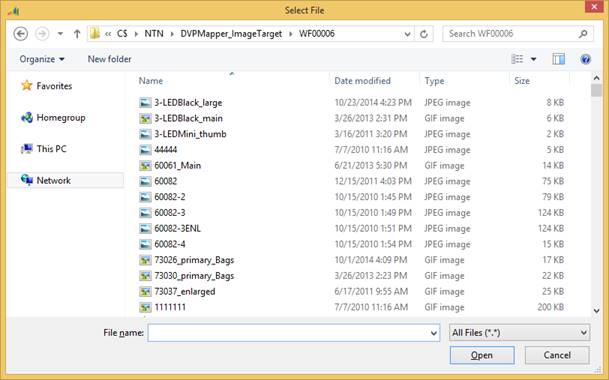
Figure 4 - 7 : Typical image selection
7. Repeat steps 4-6 to upload a Thumbnail Image and an Enlarged Image.
8. For the image to only be available to the specific catalog, enter a Catalog Code by typing it in, or by selecting a code from the dropdown in the Catalog Code column.
9. By default, the Language Code is defined by the Content Reference. You can select a different language code from the language table by clicking on the dropdown arrow .
10. By default, the Web Enabled box is checked. If you uncheck this box, the primary image will be unavailable on the website.
Below is an example of adding a Main image through the Item Card and the relative position of the primary image displayed on the website.
![]()
Figure 4 - 8 : Main Image Location on a Product Details Page
![]()
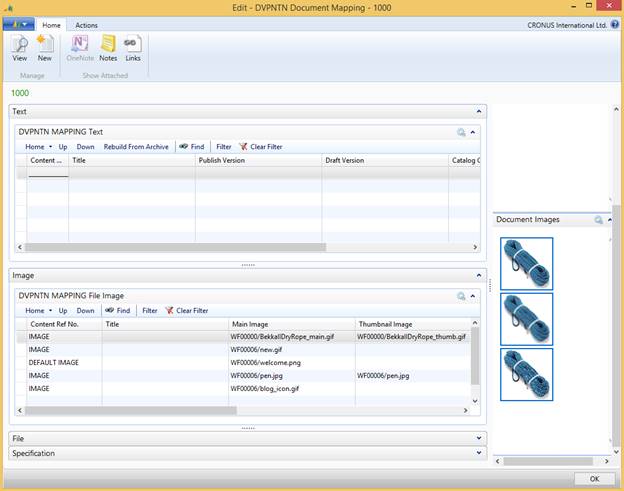
Figure 4 - 9 : Main Image in NTN Document Manager
4.3 Add Additional Images to Item
Additional images can be added to an item by repeating the steps in 4.1 on a new line. Below is an example of an item with multiple images and the relative position of the additional images and thumbnail images displayed on the website.
Note: Clicking on a product image displays an Enlarged Image.
![]()
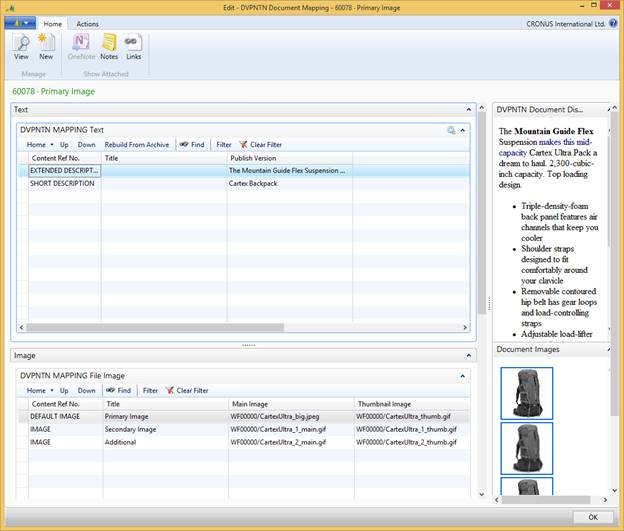
Figure 4 - 10 : An Item with multiple images in the product catalog
![]()
![]()
Figure
4
-
11
: Additional Images and Thumbnail Images pictured above.
4.4 Add a Product Short Description
1. Navigate to Nav-to-Net } Product Management } Setup } Items (NTN) , select an item and click Documents . This opens the Document Mapping list of the item.
2. On the Text tab, double-click in the first column (Content Ref No.) of an empty line. A window will appear with several options (see Figure 4-9).
3. Select SHORT DESCRIPTION and click OK .
4.
Select the column
Publish Version
. A set of ellipses
![]() will appear.
will appear.
5. Click on the ellipses, type some text and click Publish . If you wish your text to be a Draft, click Save as Draft.
6. For the description to only be available to the specific catalog, enter a Catalog Code by typing it in, or selecting a code from the dropdown in the Catalog Code column.
7. Select ENG as the language from the language table by clicking on the dropdown arrow .
8. Check the Web Enabled box by clicking on it. By checking this box, the SHORT DESCRIPTION will be available on the website.
Note: Repeat steps 3-8 to add an EXTENDED DESCRIPTION . If more than one Extended Description Document exists for the selected Language, Nav-to-Net will concatenate the texts together, and present them on the website. The Extended Description uses the Multi-Line Text box (see Figure 4-13: DVP MultiLine TextBox ).
Note: If no Short Description is entered via Nav-to-Net Document Management for the requested Language, then the standard Dynamics NAV Item Description is used in place of the Nav-to-Net Short Description on the website.
Figure 4 - 12 : Content Ref. Options
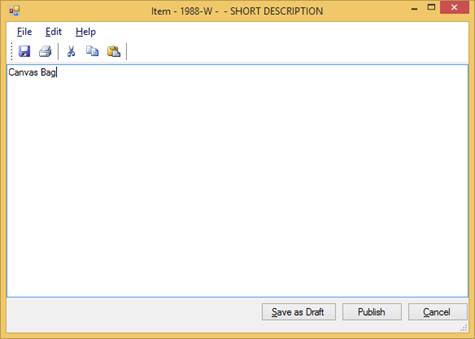
Figure 4 - 13 : DVP MultiLine TextBox
Note: For further information on DVP's Multiline TextBox see the Multiline TextBox Manual
Below is an example of adding a Short Description through the Item Card and the relative position of the Short Description displayed on the website.
4.5 Add Product Specifications to Item
1. Navigate to Nav-to-Net } Product Management } Setup } Items (NTN) , select an item and click Documents . This opens the Document Mapping list of the item.
2. On the Specifications tab, double-click in the first column (Content Ref No.) of an empty line. A window will appear. Select SPECIFICATION and click OK .
3. Under the Spec Group Code field, select a classification (e.g. WATCH , BACKPACK ) from the dropdown menu. This finds attributes (e.g. color, weight, length) to specify for the item based on its classification (e.g. cutlery, eyewear, etc).
4. Under Spec Title Code , e.g. COLOR or WEIGHT .
5. Under SpecValue Code , select the value for COLOR or WEIGHT , e.g. RED or 3.4 OZ .
6. The SpecValue Description field will populate when the SpecValue Code field is filled in.
7. If the Catalog Code is filled in, the specification will be only available to the specific catalog.
8. By default, the Language Code is defined by the Content Reference. You can select a different language code from the language table by clicking on the dropdown arrow.
9. By default, the Web Enabled box is checked. If you uncheck this box, the Specification will be unavailable on the website.
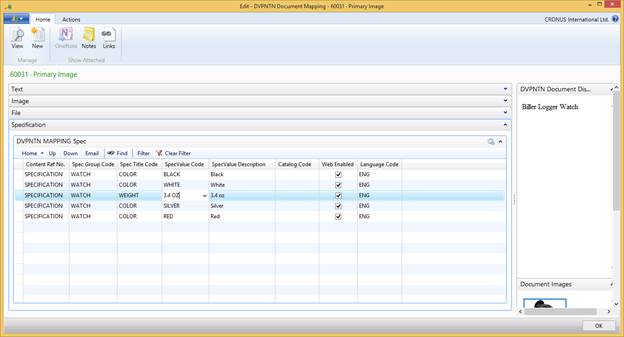
Figure 4 - 14 : Spec Titles
4.5.1 Order of Displaying Specifications on the Website
On the website, Specifications are displayed in alphabetical order based on the text in the Spec Title Code column in Dynamics NAV. In the above example, WEIGHT is entered in between the COLOR choices. But when they are displayed on the website, COLOR will show before WEIGHT.
Below is an example of the relative position of the Specification displayed on the website.
![]()
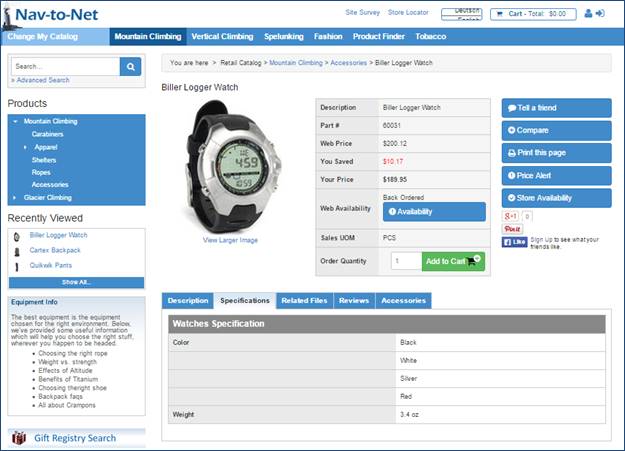
Figure 4 - 15 : Specification as Shown on Product Details Page
4.6 Add Product Reviews to Item
Repeat the steps in section 4.2 on page 61 to add Product Reviews to an Item.
Below is an example of a review on the Nav-to-Net Item Card and the relative position of the Product Review displayed on the website.
![]()
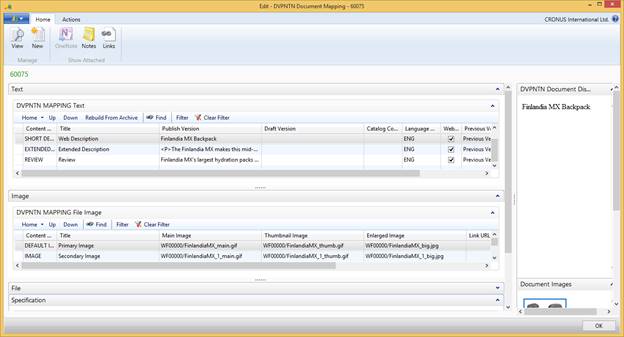
Figure 4 - 16 : Adding a Review for an Item through the Item Card
![]()
![]()
Figure 4 - 17 : Review as Shown on Product Details Page
4.7 Add Product File to Item
1. Navigate to Nav-to-Net } Product Management } Setup } Items (NTN) , select an item and click Documents . This opens the Document Mapping list of the item.
2. On the File tab, double-click in the first column ( Content Ref No. ) of an empty line. A window will appear with Content Ref No. options.
3. Select FILE and click OK .
4. Enter in any text for the Title . This will be the text that shows as a link on the website to download the file (see Figure 4-19 ).
5.
Select the field
File Name
. A set of ellipses
![]() will appear.
will appear.
6. Select the file to upload and click OK .
7. For the File to only be available to the specific catalog, enter a Catalog Code by typing it in, or by selecting a code from the dropdown in the Catalog Code column.
8. By default, the Language Code is defined by the Content Reference. You can select a different language code from the language table by clicking on the dropdown arrow .
9. By default, the Web Enabled box is checked. If you uncheck this box, the file will be unavailable on the website.
Below is an example of adding a Product File through the Item Card and the relative position of the Product File displayed on the website.
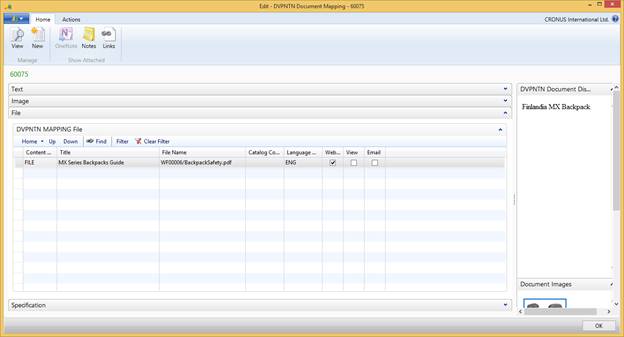
Figure 4 - 18 : A product File for an Item on the Nav-to-Net Item Card
![]()
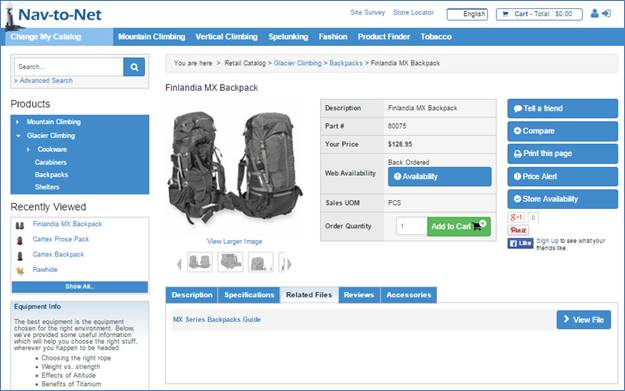
Figure 4 - 19 : Related File shown on Product Details Page
4.8 Copy Document (Grab as New/Link)
Nav user has option to copy one or multiple documents of same data type Text , Image , or File , from one object to another same type object. There will be no change to the source of copy document.
First go to Departments > object (items, Categories, Customer) > select the destination object (item/category/customer) where document needs to be copied to from the list page. Next click Documents under Home Tab and in the documents page expand the document type (Text, Image, or File) that needs copy. Click Copy Documents. NTN Mapping Doc Subform page shows up and is filtered with destination object number and document type.
Grab as New and Grab as Link options are under Home Tab.
4.8.1 Grab as New
If Grab as New is selected, Modified Date and Modified by in the new document are filled in with the current date and user ID who performed the copy function.

4.8.2 Grab as Link
If Grab as Link is selected, Modified Date and Modified by in the new document created against the destination object are populated with the Modified Date and Modified by values in the source document. In addition, the related doc ID is also updated from with the doc ID in the source document.


4.9 Add META Data and Search Engine Optimization Information on Item
It is possible, with Nav-to-Net to add METADATA to images, categories, web pages or any other Document Managed object in NAV.
Metadata in Document Management is information about objects (picture, webpage, category etc.) relevant to search engines and how they sort through websites. Having well thought out and pertinent Metadata on your website will make it easier for users to find your products. This information can include descriptors, similar types of products, categorical information, even common misspellings.
To add Metadata to an item add a new record, go to the list of Document Managed records on that Item. The relevant Content Reference Numbers for SEO are:
- Metatag Descriptions
- Metatag Keywords
- Metatag Page Title
- URL SEO Text - this changes the trailing end of a URL (see page 81 for an example)
Figure 4-23 highlights the Content Reference Numbers that would apply to search engine optimization strategies.
![]()
![]()
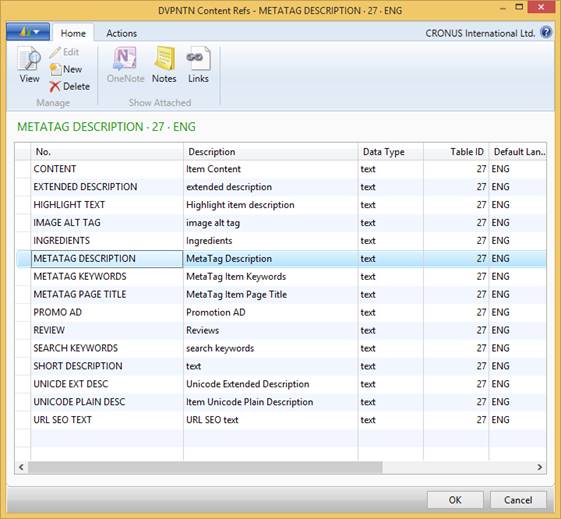
Figure 4 - 23 Adding Metadata
An example of how the METATAG DESCRIPTION and METATAG KEYWORDS would translate into the HTML source:
<meta name="DESCRIPTION" content=" ,Cartextrimline Backpack" />
<meta name="KEYWORDS" content=" ,Cartex, Trimline, Backpack, Pack, Lightweight, dual-density, All Terrain" />
Once added, the search engines will be able to see this information when scanning this page.
4.10 Adding IMAGE ALT TEXT
You may also add IMAGE ALT TEXT to Document Managed objects in NAV. Image Alternative Text can be specified as a replacement for an image whenever that image cannot be displayed. This can occur when the website user:
- uses a screen reader ( e.g. a visually impaired person)
- uses a text-only browser ( e.g. browsing from a mobile phone)
- uses a graphical browser with images turned off
- has not yet downloaded the image
- browses results from a Web search
- fails to download the image because of a network problem
- copies an extract from a Web page into a word processor.
In Document Management, simply add a record with IMAGE ALT TAG as the Content Ref No. on an Item you wish to apply image alternative text. Populate the Display Body with information you want used as the image alternative text.
4.11 Search Engine Optimization and URL Rewriting
As an Internet marketing strategy, Search Engine Optimization (SEO) considers how search engines work and what people search for. Optimizing a website primarily involves editing its content and HTML coding to both increase its relevance to specific keywords and to remove barriers to the indexing activities of search engines. Nav-to-Net is capable of doing this for you through the NAV interface.
One of the primary techniques Search Engine's use to index a website is to analyze its URLs.
http://www.dvp.net/store/productdetails.aspx?id=10000190&itemno=60077
Figure 4 - 24 A Typical Nav-to-Net URL
With Nav-to-Net you are able to dynamically rewrite the URLs of products and items.
To enable this feature open the Website Card of this website:
1. Navigate to Nav-to-Net } Product Management } Setup } Websites , and click Edit on an entry in the Websites List.
2. Scroll to the Advanced FastTab, and double-click the heading to expand the list of settings available in the section.
3. Under Miscellaneous , check the Enable URL Rewriting box.
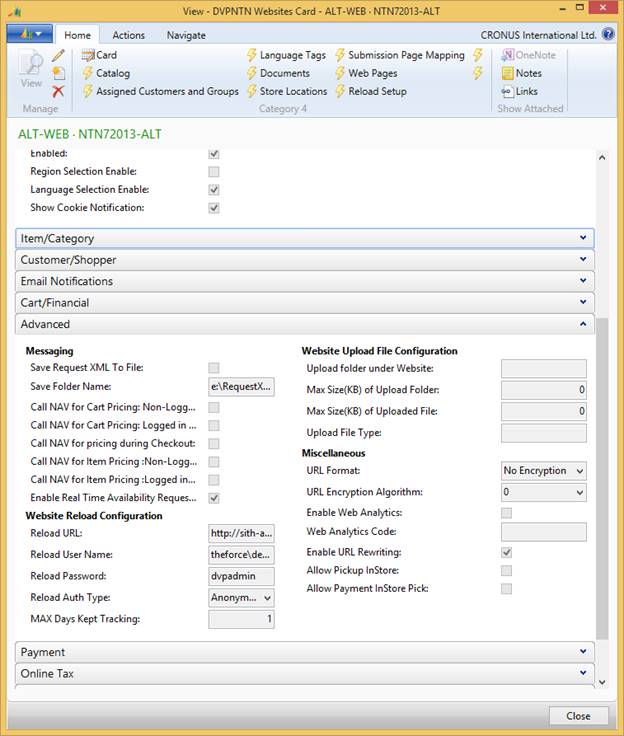
Figure 4 - 25 : Website Card with URL Rewrite Enabled
With URL rewriting enabled, you may now add SEO Text on any Document Managed object with the Document Manager:
![]()
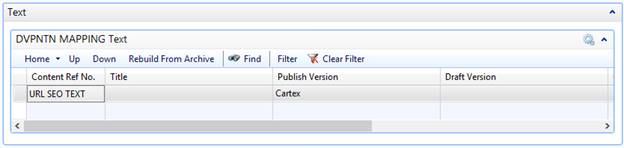
Figure 4 - 26 : Item with SEO Text Added
With the data "Cartex" added as SEO Text on this sample Item, the URL in Figure 17-26 will now read as:
http://www.dvp.net/store/products/10000190/60077/Cartex
Figure 4 - 27 : A SEO Nav-to-Net URL
4.12 Add a Category Primary Image
1. Navigate to Nav-to-Net } Product Management } Setup } Categories , select a category to add a primary image to, then click on Documents in the ribbon menu.
2. Under the Image tab, double-click the first row in Content Ref. No field.
3. In the Content Refs window, select DEFAULT IMAGE , and click OK.
4. Enter text into the Title field, e.g. Primary Image.
5.
In the
Main Image
field, select the ellipses
![]() to open a Select File dialog. Choose a file from the local drive to upload onto the Nav-to-Net server.
to open a Select File dialog. Choose a file from the local drive to upload onto the Nav-to-Net server.
6. Repeat the above step for Thumbnail Image and Enlarged Image .
7. If the Catalog Code is filled in, the image will be only available to the specific catalog.
8.
By default, the Language Code is defined by the Content Reference. You can select a different language code
from the language table by clicking on the ellipses
![]() .
.
9. By default, the Web Enabled box is checked. If you uncheck this box, the Primary Image will be unavailable on the website.
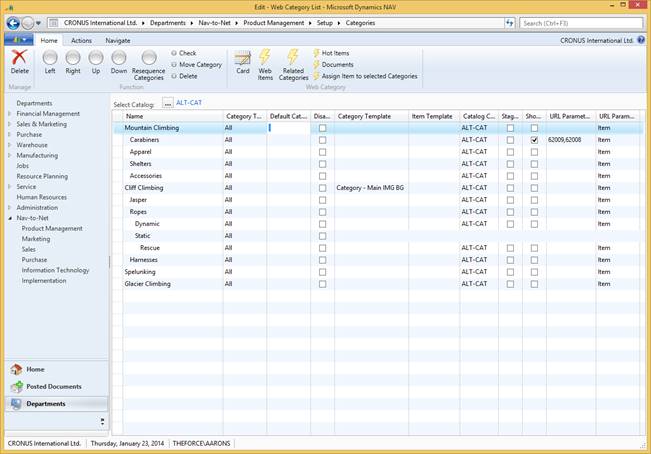
Figure 4 - 28 : Accessing the Documents Card
Figure 4 - 29 : Web Category Card
Below is an example of an Image added to a Category and the relative position of the Category Primary Image displayed on the website.
Figure 4 - 30 : Adding a Primary Image for a Category through the Documents Card
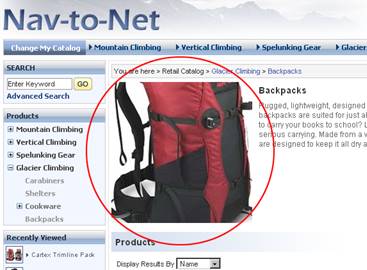
Figure 4 - 31 Primary Image as Shown on Category Page
Also seen on Figure 4-30 is an example of a thumbnail image added for this category.
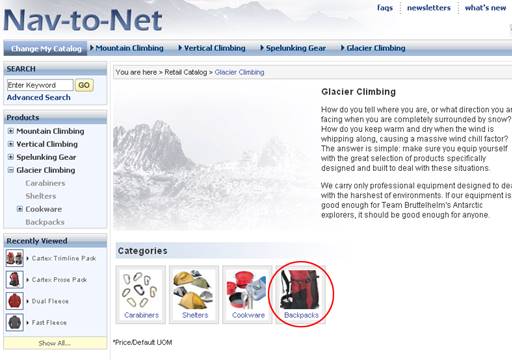
Figure 4 - 32 : Secondary Image as Shown on Category Page
4.13 Adding a Category Extended Description
1. Navigate to Nav-to-Net } Product Management } Setup } Categories , select a category to add the Category Extended Description to, then click on Documents in the ribbon menu.
2. Under the Text FastTab, double-click the first row in Content Ref. No field.
3. In the Content Refs window, select EXTENDED DESCRIPTION , and click OK.
4. Enter text into the Title field, e.g. Extended Description.
5.
In the
Publish Version
field, select the ellipses
![]() to open a MultiLine Text Box dialog. Enter text into the MultiLine Text Box.
to open a MultiLine Text Box dialog. Enter text into the MultiLine Text Box.
6. If the Catalog Code is filled in, the extended description will be only available to the specific catalog.
7.
By default, the Language Code is defined by the Content Reference. You can select a different language code
from the language table by clicking on the
Lookup
button
![]() .
.
8. By default, the Web Enabled box is checked. If you uncheck this box, the Extended Description will be unavailable on the website.
Below is an example of adding an Extended Description through the Web Category Card and the relative position of the extended description displayed on the website.
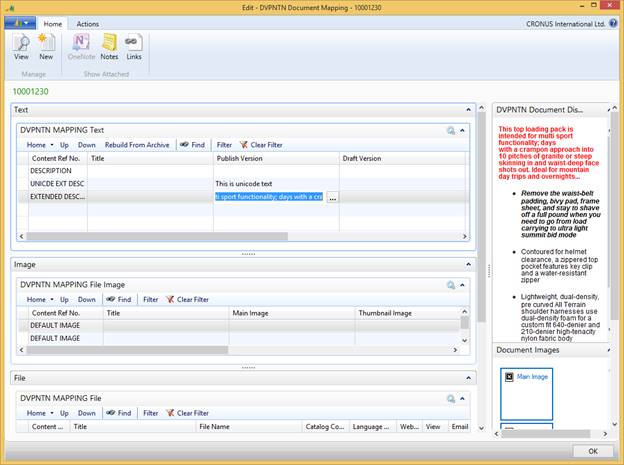
Figure 4 - 33 : Adding an Extended Description for a Category on the Document Mapping Card
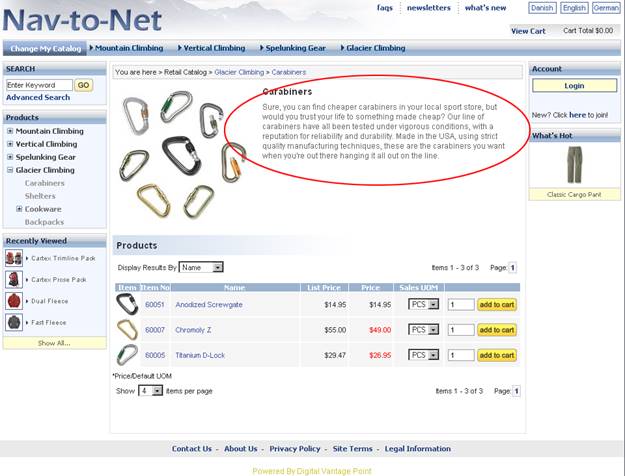 Figure
4
-
34
Extended Description as Shown on Category Page
Figure
4
-
34
Extended Description as Shown on Category Page
4.14 Add a Category Promotion Ad
Categories can be mapped to Promotion Ads. When visiting a category on the website, an ad will display on the left-hand pane.
Below is an example of adding a Promotion Ad through the Web Category Card and the relative position of the Promotion Ad displayed on the website.

Figure 4 - 35 : Adding a Promotion Ad for a Category through the Web Category Card
Figure 4 - 36 : Promotion Ad as Shown on Category Page
4.15 Add a Website Document
Documents can also be attached to Websites. For example, the Cookie Policy content can be attached to a website.
To add
1. Open Web Site Card from Setup -> Websites ->, select the website to which you want to add the Website document, then click on Website Documents.
2. Click on the Text tab.
3.
Click the
Lookup
button
![]() in the
Content Ref. No
field and select a document name such as
About Us
from the
Content Refs List
.
in the
Content Ref. No
field and select a document name such as
About Us
from the
Content Refs List
.
4. Enter text into Title field, e.g. About Us.
5.
Click the
AssistEdit
button
![]() in the
Display Body
Field to open up a
MultiLine Text Box
, enter text into
MultiLine Text Box
.
in the
Display Body
Field to open up a
MultiLine Text Box
, enter text into
MultiLine Text Box
.
6. If the Catalog Code is filled in, the document will be only available to the specific catalog.
7.
By default, the Language Code is defined by the Content Reference. You can select a different language code
from the language table by clicking on the
Lookup
button
![]() .
.
8. By default, the Web Enabled box is checked. If you uncheck this box, the Extended Description will be unavailable on the website.
Below is an example of adding an Extended Description through the Web Category Card and the relative position of the extended description displayed on the website.
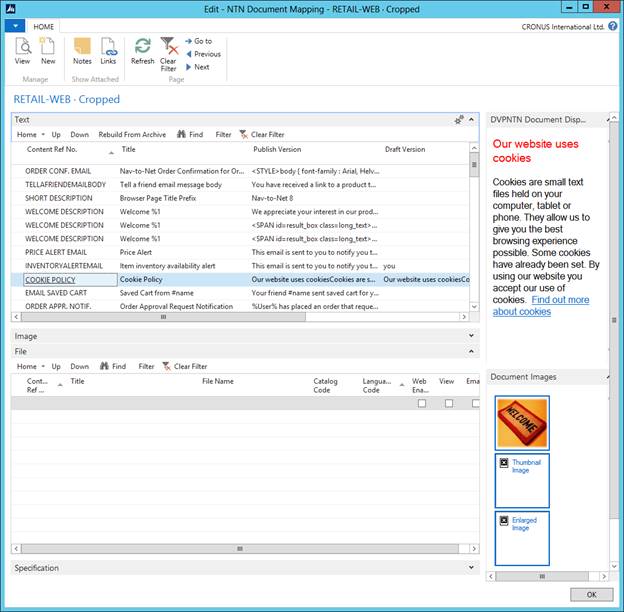
Figure 4 - 37 Adding a Document through the Web Site Card
4.16 Add a Website Logo
Below is an example of adding a Website logo through the Web Site Card and the relative position of the Logo displayed on the website.
![]()
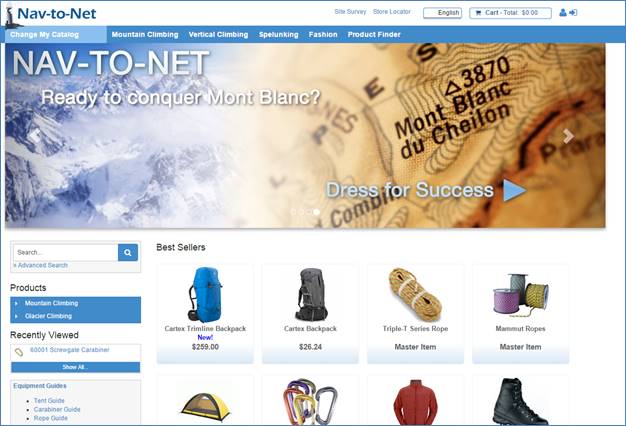
Figure 4 - 41 : Website Logo Show On the Website Card
4.17 Add and Manage Nav-to-Net Pages
Nav-to-Net Pages are an easy way to create static content pages without having to rely on a specific template.
To create a new web page with a URL that is independent from the Nav-to-Net Category structure:
1. Open Pages under Nav-to-Net Setup ( Nav-to-Net } Marketing } Setup } Pages ).
2. Click New in the ribbon menu.
3. Enter text, e.g. "Sample", in the Page Name field.
4. If the PageID field isn't auto populated, select another record or field (besides PageID and Page Name).
5. Click OK to close the form.
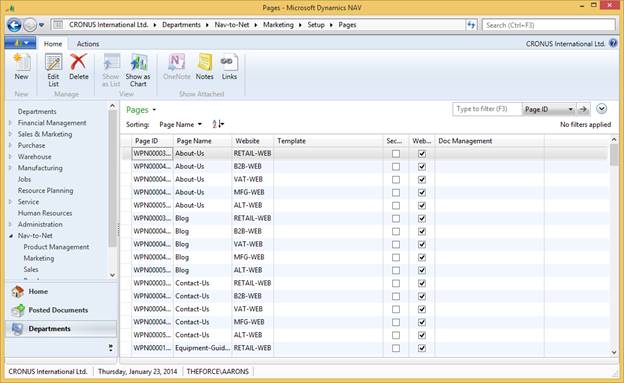
Figure 4 - 42 : Nav-to-Net Pages
The fields that define a Nav-to-Net Page are:
Page ID : Dynamics NAV Code field populated by a number series.
Page Name : The Page Name is required to be populated when creating a new page. Choose a name that adheres to appropriate standards for URLs as the Page Name will define the URL for that new page.
Website : The Nav-to-Net Website this page will belong to.
Template : If a particular custom template is to be used for a page, it can be defined here. By default, no template is necessary.
Security : This Boolean field, when TRUE will require that the website shopper be logged in in order to see the new Nav-to-Net Page. If FALSE, the Nav-to-Net page will be visible to all website users (in a B2C configuration).
Wen Enabled : This Boolean field, when TRUE will allow the page to be available on the website.
Document Management : Used to define the content of the Nav-to-Net Page
The Document Management for Nav-to-Net Pages follows the standard across the rest of the Nav-to-Net Solution. Simply add HTML content to a Content Reference of EXTENDED DESCRIPTION (by default).
The URL of the new Nav-to-Net Page will include the Name of the Page. Typically the URL will include the string " domain /page.aspx?name= Page ", where domain is the formal domain name of the website and Page is the title of the Nav-to-Net Page.
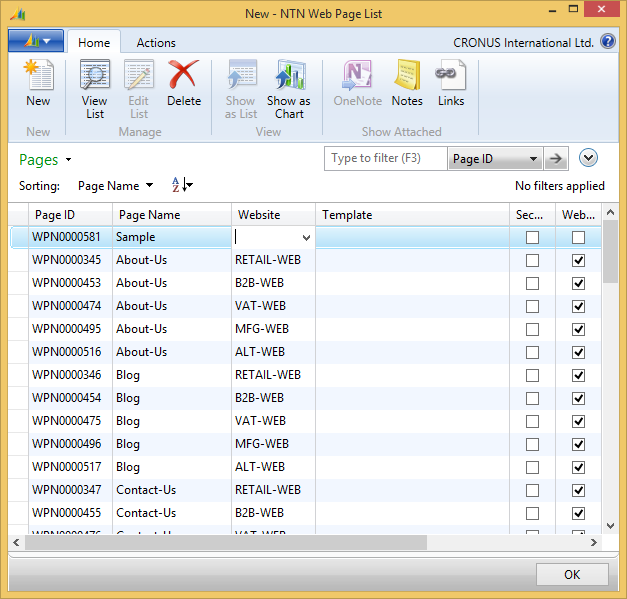
Figure 4 - 43 : A new Nav-to-Net Page Titled "Sample"
Figure 4 - 44 : Nav-to-Net Page with the URL "…/page/About-Us"
5 Static Pages and Web Page Parts
Within\ Nav-to-Net a user is able to create entire Web Pages or portions of a Web Page to be managed as content against the website
5.1 Web Page Parts
Web parts are components that can appear on more than one page of any website. Some examples are coupon promotions, footer, top site links. Website parts are specific to the website and can be accessed from either the website list page OR from the website page.
To access website parts through website list go to Departments/Nav-to-Net/Implementation/Setup/Websites and choose the website. Then click on Parts under the Nav-to-net section above the website list page:
To access website parts from website card page, double click the chosen website OR click Card above the website list page. Then click Part under Nav-to-net section above the website page:
NTN Web Part List shows. In order for a setup web page part to show on website, it should be web enabled. Choose an existing web enabled web page part and click Doc Management against the web page part. For example Footer web page part:
List of the content reference documents for the web part Footer shows up. Extended description content reference document can be setup for a web part in different languages to show different content on website.
Choose the extended description content reference document. Click published version and then click the content button that shows at the right corner of the published version field.
Multi Line text box (MLTB) shows the content setup for the Footer part extended description.
On website footer web part shows the content based on the footer extended description content reference document in Nav-to-Net:
5.2 Out of the Box Web Page Parts
Following is the list of web parts with their respective content reference documents in the website:
Top Site Alert (html) - Website > Parts > Name: "Top-Site-Alert" > Content Ref No.: "EXTENDED DESCRIPTION"
1. Site Logo (image) - Website > Documents > Image > Content Ref No.: "LOGO IMAGE"
2. Site Catalog Categories (data) - Nav-to-Net > Product Management > Categories
a. Top Category Navigation (data) - Website > Card > Item/Category > Top Category Type > Select display group
3. Homepage Hero Image Slider (image, link) - Website > Documents > Image > Content Ref No.: "HOMEPAGE CAROUSEL"
a. NOTE: While there is no limit to the number of hero images, since they are loaded on page load, the more configured, the slower the page will be to initially load, which could affect SEO ratings.
4. Site Welcome (text) - Website > Language Tags > Label Code: "_SITENAMEWELCOME"
5. Site Introduction (html) - Website > Parts > Name: "Homepage" > Content Ref No.: "EXTENDED DESCRIPTION"
6. Promotion Homepage Top (html) - Website > Parts > Name: "Promo-Homepage-1", "Promo-Homepage-2", "Promo-Homepage-3", "Promo-Homepage-4" > Content Ref No.: "EXTENDED DESCRIPTION"
7. Featured Catalog Items (text/data)
a. Featured Items Title (text) - Website > Language Tags > Label Code: "_FEATUREDITEMSLABEL"
b. Featured Items (data) - Nav-to-Net > Product Management > Catalogs > Highlight Items > Type: "Highlight"
8. Recently Viewed Section (text) - Website > Language Tags > Label Code: "_ RECENTLYVIEWEDLABEL "
9. Promotion Homepage Bottom (html) - Website > Parts > Name: "Promo-Homepage-Full" > Content Ref No.: "EXTENDED DESCRIPTION"
10. Footer (html) - Website > Parts > Name: "footer" > Content Ref No.: "EXTENDED DESCRIPTION"
11. Copyright Message (text) - Website > Language Tags > Content Ref No.: "_COPYRIGHTFOOTER"
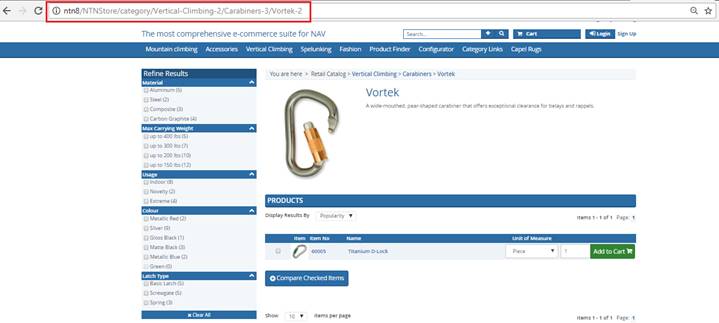
6 Website Friendly URLs (slugs)
Slugs or a Website Friendly URL is a web address that is easy to read and includes words that describe the content of the webpage and can be identified for each Item, Category and Page. The latest version of Slugs allow the full path to be displayed as a Friendly URL.
Ex: if an item is in a Category20 which is a sub-category of Category1 , it would show as http://company.com/category20/category1/item
NTN8: http://ntn8/NTNStore/category/Vertical-Climbing-2/Carabiners-3/Vortek-2
Here, the item Vortek-2 belongs to the Carabiners-3 subcategory of the Vertical-Climbing-2 category.
6.1 Setup URL Rewrite Rules (Slugs)
The initial setup of the URL Rewrite Rules is happening in the NTN URL Rewrite Card.
Note: improper NTN URL Rewrite Rule setup can result in your website failure. Please contact your NTN Partner or NTN Client Support team for the initial installation.
In the NTN URL Rewrite card, rules can be set against Item, Page, Category or Other.
After rules are set, they need to be generated in order to be transferred to the IIS.
To generate rules, click "GenerateURLRewriteRule " on the ribbon menu:

NTN URL Rewrite Card
'Generating rule' action creates a document that is transferred to the IIS and dictates how URL rewriting is executed:
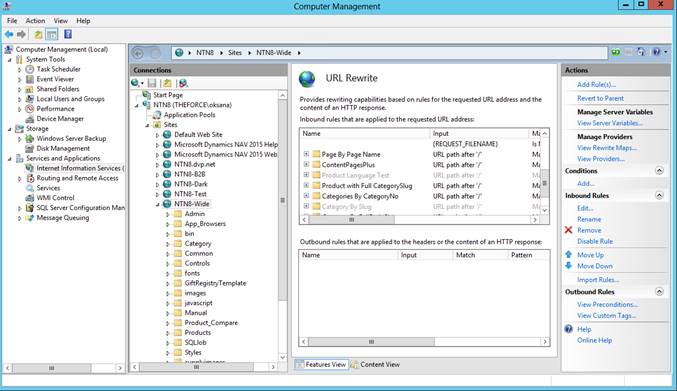
IIS URL Rewrite
After rules have been generated in the NTN URL Rewrite Card , a Website Card needs to be set up to use URL Rewriting. Make sure that 'Enable URL Rewriting' flag is set:
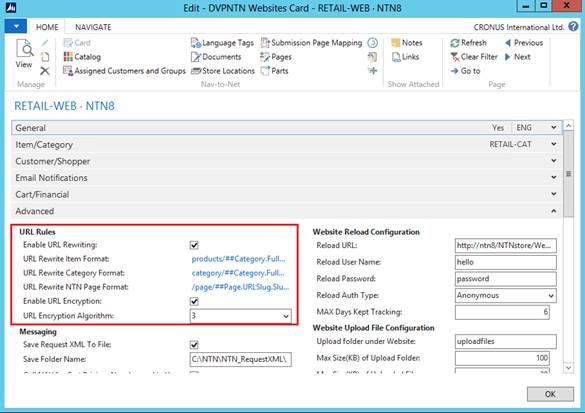
URL Rewrite activation
6.2 How to add Slugs:
After URL Rewriting Rules have been generated and the URL Rewriting functionality is enabled on the Website Card, end users can start utilizing Slugs functionality by creating URL Slugs against Items, Categories or Pages.
Nav-to-Net > Product Management > Setup > URL Slugs (Figure 1-1)
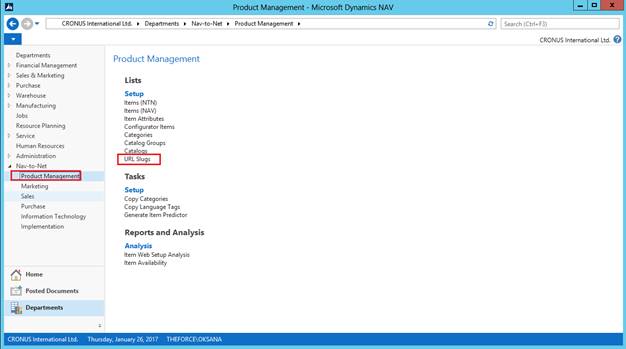
Accessing the Nav-to-Net URL Slug
The Slug page can be opened up from Item, Category or Page, pre-filtered for that record:
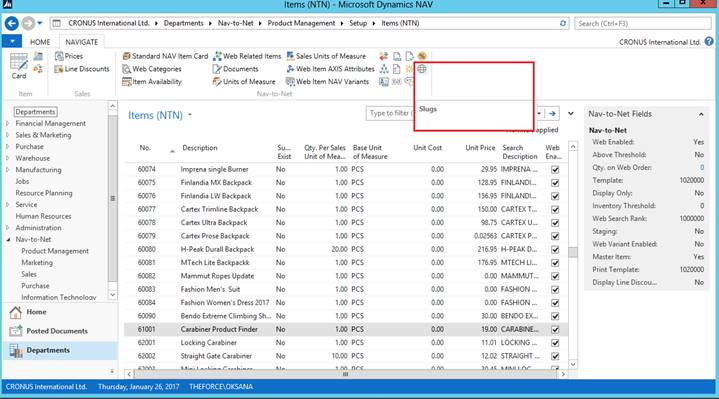
Accessing URL Slug from the NTN Item Card
A New URL Slug can be added against an Item, Category or Page
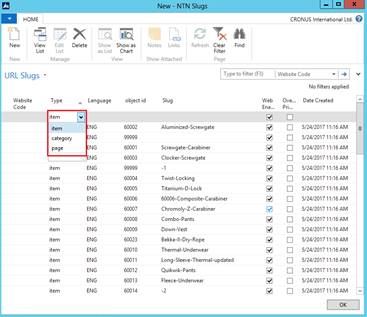
Adding a New URL Slug
The URL for items and categories have the URL Slug for all categories in the path. The highest level category is the left-most portion, and the lowest level is the right-most.
http://ntn8/NTNStore/category/Vertical-Climbing-2/Carabiners-3/Vortek-2
To add a new URL Slug , select desired values in the below setup window.
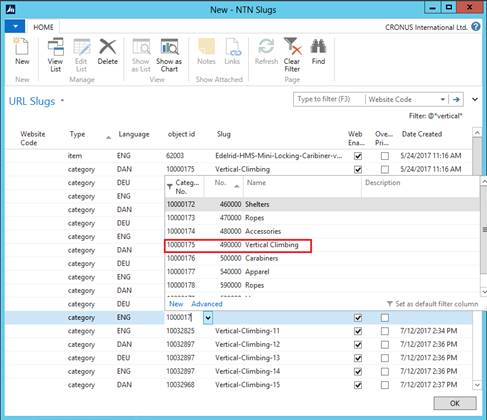
If a Slug already exists in the table, the Slug will be updated that it is appended with a number. The numbers start at -1, then -2, then -3, etc until a unique slug is found.
If multiple slugs exist against one Object, the most recent Slug will be automatically used. If a user wants to display one of the earliest slugs, the checkmark should be placed to " Override Primary Slug " (Figure 2-5).
A maximum of one record can be marked " Override Primary ". If the user checks Override Primary , the system automatically unchecks Override Primary on all other records for the same Object.
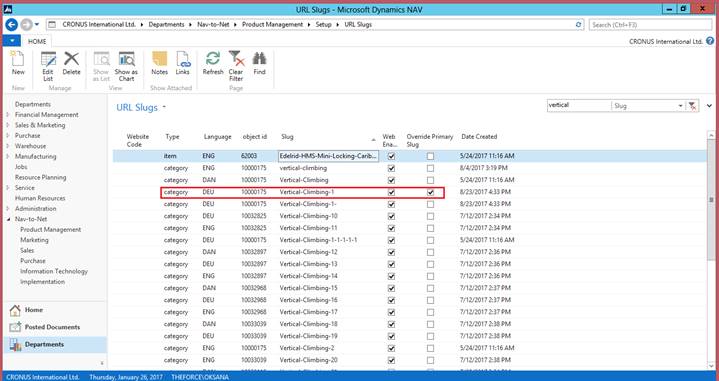
Override Primary Slug
FYI: A slug is created when:
- The report is run
- Category on INSERT
- Category on MODIFY where xRec."Description" <> Rec."Description"
- NTN Mapping, on INSERT for a "SHORT DESCRIPTION" record for that category's ID
- NTN Mapping, on MODIFY, for a "SHORT DESCRIPTION" records, where the Actual Body has changed, for that category's ID
You can make a "better, more permanent" slug by just entering one in the Slug table (or Category Card -> Slugs page), and checkmarking "Override Primary Slug". Then that slug will * ALWAYS * be the one used, instead of the "most recent" one.
7 Units of Measure
A new field has been added to the Nav-to-Net Website Card . This field, called Sales Unit of Measure , dictates whether or not Item Units of Measure are displayed on the website. By default, the units of measure displayed on the website are Sales Units of Measure (see highlighted area below).
![]()
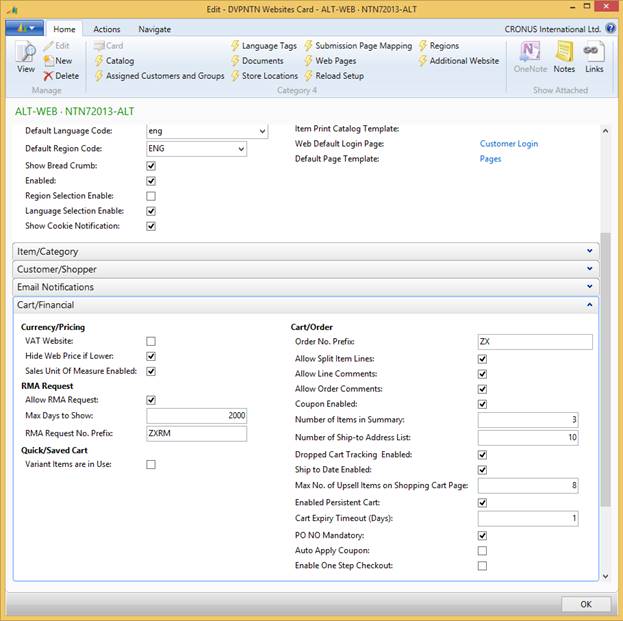
Figure 5 - 1 : Sales Unit of Measure on the Nav-to-Net Website Card
To change the Sales Unit of Measure (see Figure 5-2):
1. Navigate to the item in NTN, and check its Item Card (by double-clicking on it).
2. Scroll to the Invoicing tab.
3. Open the Invoicing tab (by double-clicking on it).
4. In the bottom right-hand corner, click on the Sales Unit of Measure's field value (in this case - pieces, or PCS).
5. Here, its value can be changed if applicable (to a Box for example).
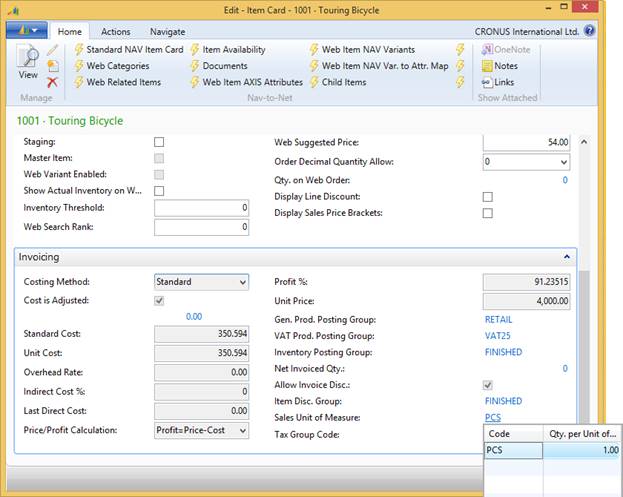
Figure 5 - 2 : Nav-to-Net Item Card - Sales Unit of Measure
A Web User is able to change the units of measure when ordering the Item through the website.
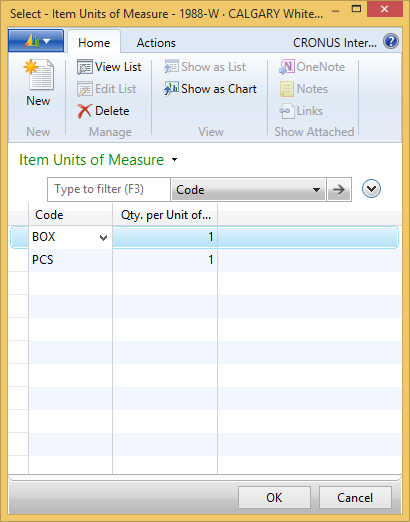
Figure 5 - 3 : Nav-to-Net Item Card - Units of Measure
7.1 Search Result s
If Sales Unit of Measure is checked on Nav-to-Net Website Card , items default unit of measure show up on search result page and gives web user ability to add the item choosing a different unit of measure.

Figure 5 - 4 : Search Result - Unit of Measure
7.2 Category Product listing page
If Sales Unit of Measure is checked on the Nav-to-Net Website Card , an item's default unit of measure will show up on a category listing page. The web user is able to choose another Unit of Measure, if available, for an item. If this Item is then added to the shopping cart, it will be added with the newly selected Unit of Measure.
![]()
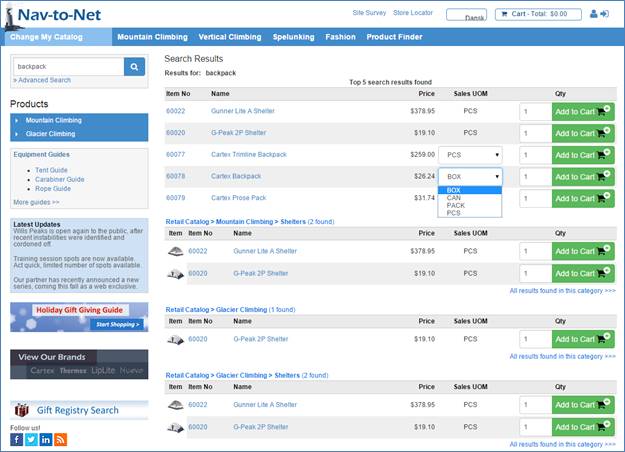
Figure 5 - 5 : Category Product Listing Page - Unit of Measure
7.3 Item Details Page
If Sales Unit of Measure is checked on the Nav-to-Net Website Card , an item's default unit of measure will show up on the Item Details web page. The web user is able to choose another Unit of Measure, if available, for this item. If this Item is then added to the shopping cart, it will be added with the newly selected Unit of Measure.
![]()

Figure 5 - 6 : Product Details Page - Unit of Measure
7.4 Shopping Cart
If Sales Unit of Measure is checked on the Nav-to-Net website card , a web user is able to change unit of measure for an Item in the shopping cart before check out.
![]()
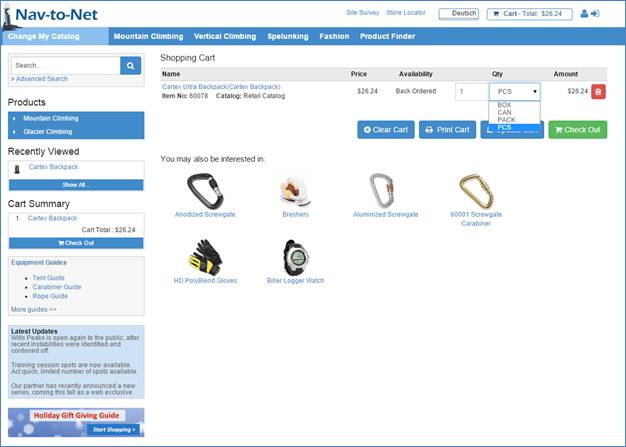
Figure 5 - 7 : Shopping Cart - Unit of Measure
7.5 Item added from Order History
When item is added to shopping cart from order history or a saved cart the existing unit of measure is added to cart with that item.
![]()
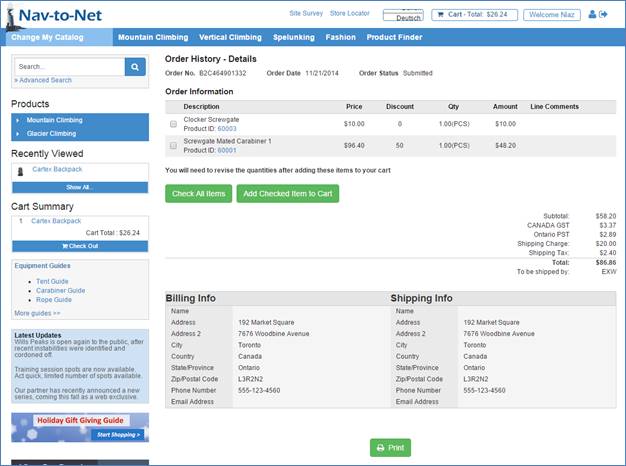
Figure 5 - 8 : Order History - Unit of Measure
7.6 Item added from a Saved Cart
The process is the same as when item is added from Order History page. When item is added from a saved cart the existing unit of measure on the saved cart will be added to cart.
![]()
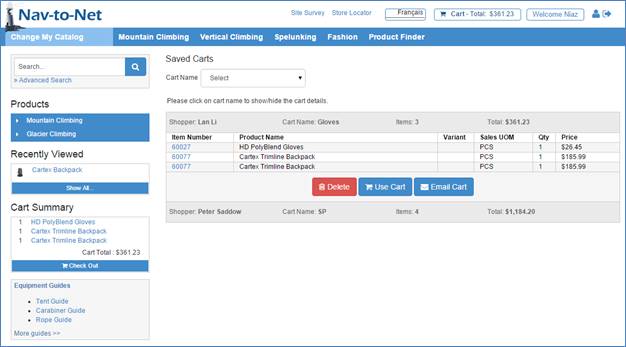
Figure 5 - 9 : Saved Cart - Unit of Measure
7.7 My Favorite List
If Sales Unit of Measure is checked on the Nav-to-Net website card , web user is able to change items unit of measure on wish list.
![]()
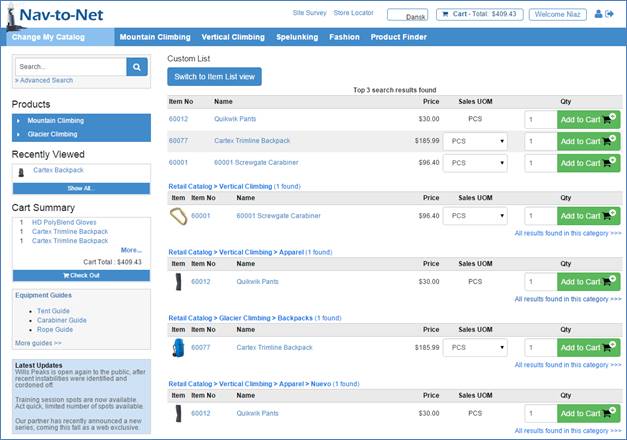
Figure 5 - 10 : Favorite List - Unit of Measure
8 Users
The users accessing Nav-to-Net are divided into two groups:
- Customers
- Salespersons
Web Customer Contacts (Customer related) or Sales Agents / Salespersons (Company related).
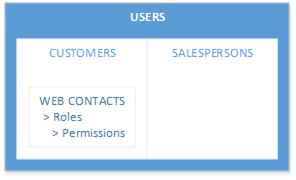
A customer has a group of web contacts associated with it that can log in to the website and place orders, but only for the Dynamics NAV Customer to whom they belong.
Salespersons have login credentials associated with them as well, to place orders on behalf of their customers.
The main difference between the two groups of users is the access (i.e. roles and permissions) they have to different areas of Nav-to-Net.
A few examples of roles are:
- Sales Manager
- Customer Accounts Payable
- Vendors
Roles will be explored in detail in the next section. Each role may have a group of permissions attached to them. For example:
- Able to submit an item review
- See Order History
- Bypass payment
- View item availability by store
Different roles can always be created based on existing standard NTN permissions.
In general, Customer Contacts are allowed to manage information and place orders only for the Dynamics NAV
Customer to whom they belong. Sales agents have access to multiple Customers that have been assigned to
them. They can manage information, place orders, and view reports for these customers. They can also manage
individual Customer Contacts belonging to these Customers.
8.1 Manage Customer s
Navigate to Nav-to-Net } Sales } Setup } Customers (NTN) to access the Customer Card . Customers are managed through this Customer Card (see Figure 6-1 ).
![]()
![]()
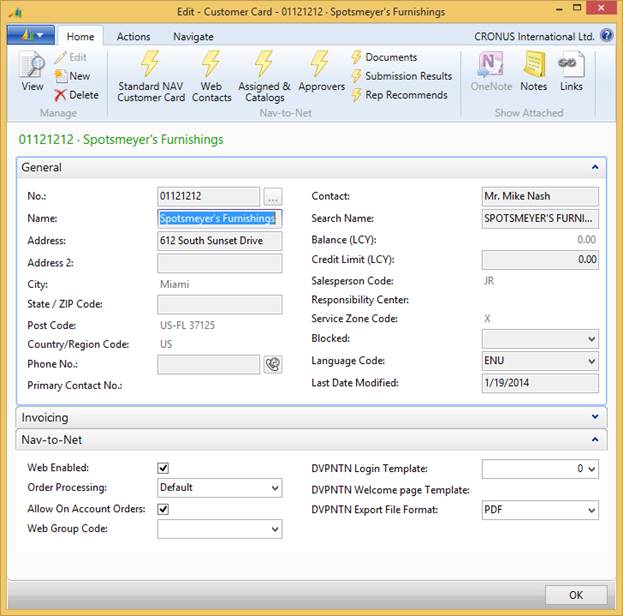
Figure 6 - 1 Customer Card
8.1.1 Customer Card Overview
The General tab of a Web Customer is shown in Figure 6-1 . The details in the Name and Address information are used in Nav-to-Net as the billing address on the website when orders are placed for this customer. If the Sales Agent functionality of Nav-to-Net is utilized, the salesperson on the customer card can place orders on behalf of his customers. For details on how to populate data on the tabs in the customer card other than Nav-to-Net, please refer to your Dynamics NAV manual.
8.1.2 Nav-to-Net Tab
The Nav-to-Net tab is found in the Customer Card . There are seven properties that can be modified on this tab (see Figure 6-1 ).
Web Enabled: Indicates whether the customer is allowed to order online through the Nav-to-Net website. Check this box if the customer will be making web orders.
Order Processing: Indicates whether orders for this customer should be held in the holding table even if order processing is on.
Allow on Account Orders: This setting allows the customer to checkout without using a credit card .
DVP Nav-to-Net Catalog Group (Web Group Code): If the customer should see a specific catalog after logging into the website, select the catalog here. If blank, the customer will see the default catalog.
DVPNTN Login Template:
DVPNTN Welcome page Template:
DVPNTN Export File Format:
8.1.3 Web Enable or Disable a Customer
1. Open the Nav-to-Net Customer Card and navigate to the Customer to be modified.
2. Go to the Nav-to-Net tab. Toggle the Web Enabled checkbox to either web enable or disable the customer.
3. Move off the record or close the form for the customer information to synchronize to the website.
Note: Disabling a customer card will disable all web contacts in the Nav-to-Net contacts table, and therefore all of the customer's contacts will not be able to login.
8.2 Manage Web Customer Contact s
In order for web enabled customers to place orders online through Nav-to-Net, web customer contacts must be created for the customers to log into the website. This is done using the Web Contacts in the ribbon menu as highlighted in Figure 6-2 . This brings up the NTN Web Cust. Contact List in Figure 6-3 . Double-click one of the web customers, or click New/Edit/View in the ribbon menu to bring up the Web Customer Contact Card in Figure 6-4 .
Note: Customers that are using Dynamics NAV's Relationship Management and the standard Dynamics NAV Contacts would not use the Web Customer Contact Card to manage their contacts, but would use Dynamics NAV's Contact Card.
![]()
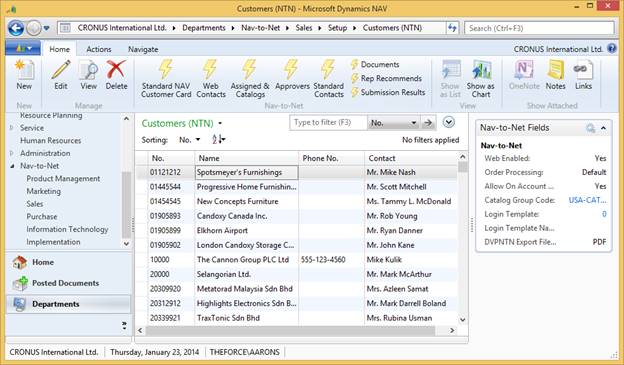
Figure 6 - 2 Accessing the Web Customer Contact Card
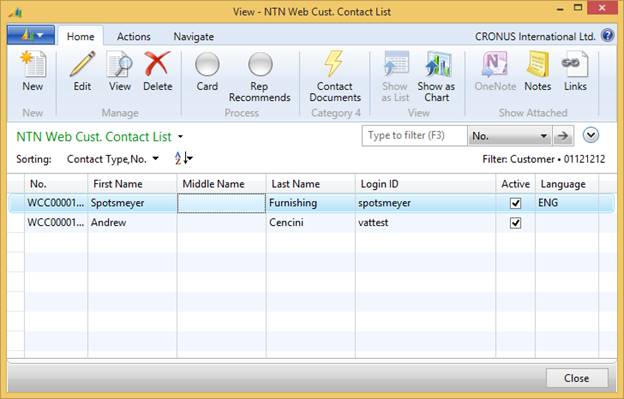
Figure 6 - 3 Web Contacts aka NTN Web Cust. Contact List
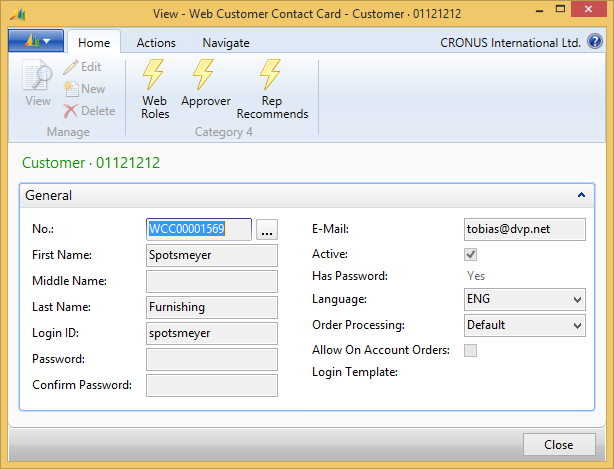
Figure 6 - 4 Web Customer Contact Card
To view a list of Web Customer Contacts associated with a particular customer, click the list button or press F5
No.: Like the customer card, the customer contact number is the unique identifier of the contact within Dynamics NAV. It is controlled through a standard Dynamics NAV Number Series as assigned in Nav-to-Net Setup.
First/Middle/Last Name: Specifies the first, middle and last names of the contact.
Login ID: Specifies a unique login ID for the contact. This is the login ID the contact will use to log into the Nav-to-Net website.
Password: Specifies a password to log into the Nav-to-Net website.
Confirm Password: Since the passwords are encrypted, Nav-to-Net requires that the password be entered twice.
E-Mail: Specifies an email address for the contact. This is the address to which the order confirmation is sent.
Active: Indicates whether the contact is active on Nav-to-Net. Check this box if the contact is allowed to login to the Nav-to-Net website.
Has Password : Since the passwords are encrypted, this field indicates if a password has been set or not.
Language: The language preference of the customer.
Order Processing: Indicates whether orders for this customer should be held in the holding table even if order processing is on.
Allow on Account Orders: This setting allows the customer to checkout without using a credit card .
Login Template:
8.2.1 View the Web Customer Contact Card
1. In the Customers (NTN) list page, click on Web Contacts in the ribbon menu.
2. Double-click an entry, or select New/Edit/View in the ribbon menu to view the Web Customer Contact Card .
8.2.2 Add a Web Customer Contact
1. In the Customers (NTN) list page, click on Web Contacts in the ribbon menu.
2. Select New in the ribbon menu to open the Web Customer Contact Card .
3. Enter the information for the new customer contact.
4. Move off the record or close the form for the contact information to synchronize to the website.
8.2.3 Edit a Web Customer Contact
1. In the Customers (NTN) list page, click on Web Contacts in the ribbon menu.
2. Select an entry and click Edit in the ribbon menu to open the Web Customer Contact Card .
3. Enter the updated information for the customer contact.
4. Move off the record or close the form for the changes to synchronize to the website.
8.2.4 Delete a Web Customer Contact
1. In the Customers (NTN) list page, click on Web Contacts in the ribbon menu.
2. Select an entry and click Delete in the ribbon menu.
Note: it is recommended that a web customer contact be disabled, rather than deleted.
8.2.5 Ship-to Addresses
![]()
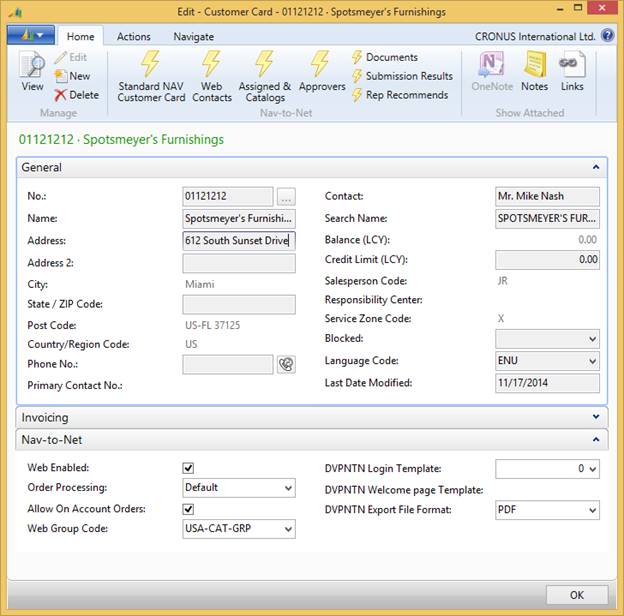
Figure 6 - 5 Customer's Ship-to Address information
There is no additional web information on the ship-to address card in Dynamics NAV. The only modification made is to assign a number series in the Nav-to-Net Setup so that the ship-to addresses created on the website have a unique identifier. In Dynamics NAV, the ship-to addresses are associated with a customer, so the combination of the customer and ship-to code is unique. However, prior to a customer being created, the website cannot make this identification. Therefore, Nav-to-Net uses a number series. Ship-to addresses initially created in Dynamics NAV keep the standard Dynamics NAV functionality.
8.3 Add, Edit and Delete a Sales person
Another group of users that have access to Nav-to-Net are sales agents. They are company related and can manage multiple customers and place orders for them. Sales agents are managed through Salespersons Contacts under Nav-to-Net } Sales } Setup } Salespersons Contacts .
Double-click on a contact to view their details in the Web Company Contact Card , or select the contact, and click Edit in the ribbon menu to edit their details.
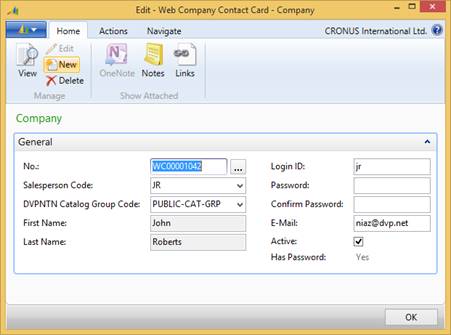
Figure 6 - 6 Main Menu, Nav-to-Net, Web Company Contacts
No.: Like the customer card, the web company contact number is the unique identifier of the contact within Dynamics NAV. It is controlled through a standard Dynamics NAV Number Series as assigned in Nav-to-Net Setup.
Salesperson Code: Specifies the code for the salesperson associated with the Web Company Contacts. The lookup is to Dynamics NAV's Salesperson Code.
DVPNTN Catalog Group: This is the Catalog group sales person is assigned to and can view on website.
(First Name/Last Name): Displays the name for the salesperson specified by the Salesperson Code.
Login ID: Specifies a unique login ID for the contact. This is the login ID the contact will use to log into the Nav-to-Net website.
Password: Specifies a password to log into the Nav-to-Net website.
Confirm Password: Since the passwords are encrypted, Nav-to-Net requires that the password be entered twice.
Email Address: Specifies an email address for the contact. This is the address to which the order confirmation is sent.
Active: Indicates whether the contact is active on Nav-to-Net. Check this box if the contact is allowed to be logged into the Nav-to-Net website.
Has Password: Since the password is encrypted, the box is checked when a password is present.
8.3.1 Add a Salesperson
1. Navigate to Nav-to-Net ► Sales ► Setup ► Salesperson ► Contacts .
2. Click the New button from the ribbon menu.
3. Enter the information for the new salesperson.
4. Click OK to close the form and synchronize to the website.
8.3.2 Edit a Salesperson
1. Navigate to Nav-to-Net ► Sales ► Setup ► Salesperson ► Contacts .
2. Double-click the salesperson entry, or select the salesperson and click Edit from the ribbon menu.
3. Make changes to the fields as desired.
4. Click OK to close the form and synchronize to the website.
8.3.3 Delete a Salesperson
1. Navigate to Nav-to-Net ► Sales ► Setup ► Salesperson ► Contacts .
2. Select a salesperson entry.
3. Click the Delete button from the ribbon menu.
4. Click Yes in the confirmation window.
5. Click OK to close the form and synchronize to the website.
8.4 Setup of Sales Team s
An individual salesperson can be added to the territory of another salesperson. There are no limits to the number of salespeople or territories that can be given to a salesperson.
1. Navigate to Nav-to-Net ► Sales ► Setup ► Salesperson Contacts .
2. Select desired Salesperson from the Sales Person Contact List.
3. Click on Sales Team in the ribbon menu.
4. Add the desired salespersons to the list. Note: Only salespersons that have been created as web company contacts already will be visible on this list.
a. The Salespersons that you are adding to the Sales Team card are the salespersons that can be managed by the salesperson that was selected in #2 above.
b. Hint: Adding themselves to the team allows the salesperson to query on themselves when navigating the website. See "Using Sales Teams" section below.
c. NOTE: it is ONLY the salesperson defined in #2 above that has additional access to their team member's customers, reports, etc. Each team member would need to need to have their own team setup if the desire is to have every team member manage every team member's customers, reports, etc.
5. Close OK to close the form and synchronize changes to the website.
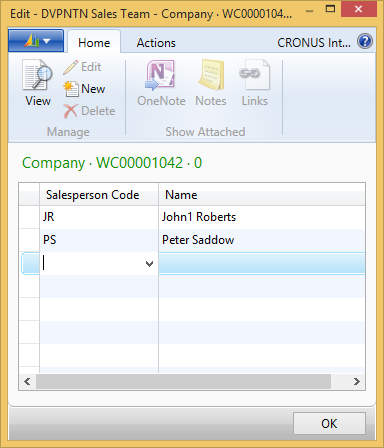
Figure 6 - 7 : Nav-to-Net Territory Reps
8.5 Using Sales Teams
On the website, when the Salesperson has the "Manage Agents" permission, a new menu option will appear on the account drop-down called "Manage Agents". Selecting the "Manage Agents" menu drop-down option takes the web user to the Manage Agent List.

From here, the web user can select an agent, and edit the salesperson account information as per below.

Additionally the Salesperson, when running web reports, filtering by the Salesperson code.
When the salesperson selects a customer, they see all the customers for all the members within their team.
8.6 Countries and States/Provinces setup
On the website, Countries and States are used in many places, such as the checkout process, customer information, and managing addresses. Countries and States are managed in Dynamics NAV.
For further information on the setup of Countries, please see Section 25.3 " Setting up and Enabling Countries ".
8.7 Managing Head Office Locations
The Head Office managing Multiple NAV Customer feature is for when a NAV customer wants to manage multiple locations (customers) from a single customer record on the web. There is a "parent / child" relationship between multiple customer records. There is a field on the customer record that defines the relationship between the "Parent" (Head Office) customer and the Satellite location "Child". This new field will be a lookup into the Customer Table. The field name is "head office" (Boolean flag) and "Head Office Cust No" (the one the shopper is against).

For example, below shows that Customer G123 has three satellite locations.

The Parent Customer may setup and maintain shoppers and roles for the Child Customer online.
The Child Customer may login and perform all of the functions that the typical Nav-to-Net customer can (dependent on permissions). Likewise, the Parent Customer may login and perform all of the functions that the typical Nav-to-Net customer can (dependent on permissions).
Per standard Nav-to-Net, the customer info page displays the logged in customer information. For Parent Customers, a new feature is presented on a new page, (loginas.aspx), called "Select Customer". There is an option dropdown list that displays the active (web enabled) child accounts, plus the parent account. The option dropdown list is sorted alphanumerically by Customer Number, except the parent customer account will be the first record. The list contains the child "Customer No." and "Customer.Name".
When a child customer is selected, the Parent Customer is fully acting as that child. The information is overridden in the session in everything except the permissions related to the original shopper (similar to salespersons). Add session variable that signifies that this session is a parent of a child.
From checking order history, to placing orders, specific pricing, etc. The ONE exception will be that the "Select Customer" feature will still be available for the user logged in, such that the user of the parent customer can change to a different child customer, or back to the parent customer.
At the top of the customer info page, in large red font, a message is displayed to communicate to the user that they are editing another customer record.
![]()
The permissions of the web contact of the parent customer will be used for the experience when acting as the child. (Permission: "Act as child").
Orders will be assigned to the Child Customer.
The order submitted to NAV will signify who made the order, and that it was the Parent Company that placed the order. A new Boolean field within "NTN Web Order Detail" Table: "Parent Customer Order" to signify that the order was placed by the Parent Customer; not the Child Customer.
NOTE: Children customers have NO visibility to other children customers.
NOTE: Wish list is personal (logged in shopper), and not of chosen customer (same behavior as salesperson). Parent cannot add item to child customer wishlist; child wishlist does not show.
9 Roles
9.1 Create Roles & Permissions
In order to create a Web user, the contact must be created in Dynamics NAV. The Nav-to-Net website can then be accessed using the Login ID and Password specified for that new user.
In Nav-to-Net , users are granted different levels of authorization to perform various functions according to the roles they are assigned. Roles can grant, or prevent access to different areas of the website and can grant or prevent some functions of the website.
A user's role is selected upon creation of his or her web contact and is simply a grouping of permissions. Roles can be customized to match the business functions being performed by a particular user, or a group of users.
Note: If no role is assigned when the contact is created, that contact will receive the Default Not Login User Role . This role is given basic features and is defined in the "Default Not Login User Role" field of the Dynamics NAV Website Setup Card .
The set of permissions defined in a role gives the user access to a particular area of the website or the ability to perform a specific function. These permissions are predetermined in Nav-to-Net and will be assigned to each user as part of that user's role. If needed, new permissions can be added to a role through the DVPNTN Web Permission table. However, because web page code needs to be modified in order to create a new permission, this will be done by certified Nav-to-Net professionals.
Web Roles are found under Nav-to-Net } Implementation } Security } Security Web Roles.
Web Permissions are found under Nav-to-Net } Implementation } Security } Security Web Permissions.
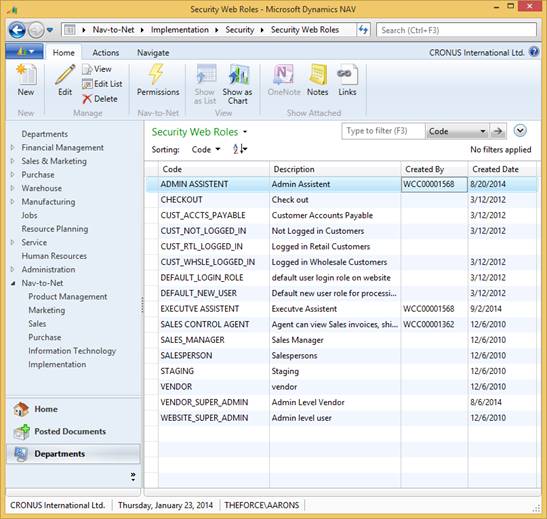
Figure 7 - 1 : Nav-to-Net Web Role Table
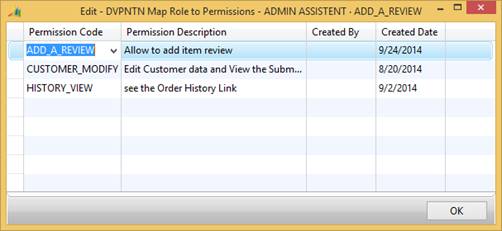
Figure 7 - 2 : Nav-to-Net Role to Permission Mapping Table
If the role is created in Dynamics NAV, Created By field on a particular role is blank. If the role is created on the website, the Created By field is given the Dynamics NAV Contact ID .
9.2 Manage Roles from within Dynamics NAV
9.2.1 Assign Roles to a Web Contact
1. Go to Salespersons Contacts by navigating to Nav-to-Net } Sales } Setup } Salesperson Contacts .
2. Select a contact and click on Web Roles in the ribbon menu (Figure 7-1).
3. Click on the dropdown arrow in the Role Code field.
4. Select a role from the DVPNTN Web Roles list or add a new role to this list and select it, then click on the OK button.
![]()
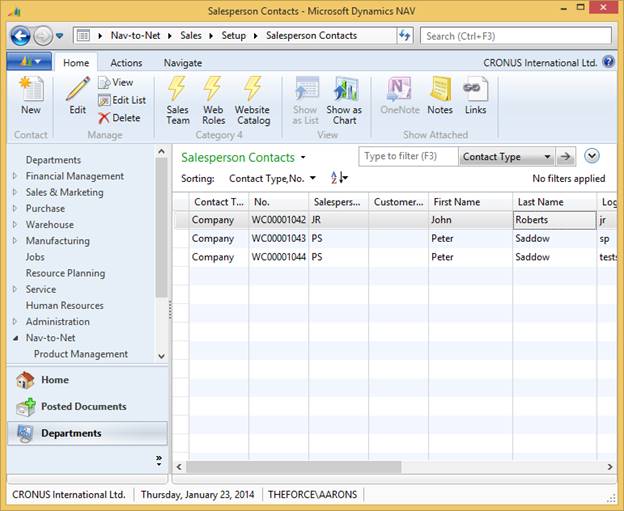
Figure 7 - 3 : Accessing the Web Roles of a Particular Web Customer Contact
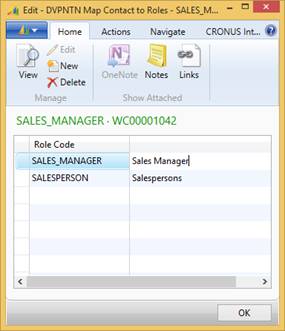
Figure 7 - 4 : Web Role List
In the example in Figure 7-5 below, the contact has been given the role of "Staging" and "Not Logged in Customers".
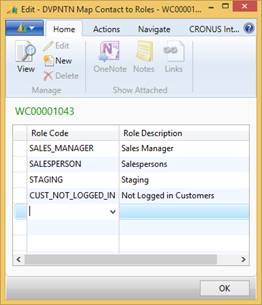
Figure 7 - 5 : Map Contact to Roles
9.2.2 Add Permissions to Roles from within Navision
To add permissions to a particular role, follow the steps below:
1. In the DVPNTN Map Contact to Roles list, select the role that permissions are to be added to.
2. Click on Web Role -> Permissions .
3. Click on the Lookup button in the Permission Code field and select a permission from the Nav-to-Net Web Permissions list or add a new permission and select it, then click on the OK button.
![]()
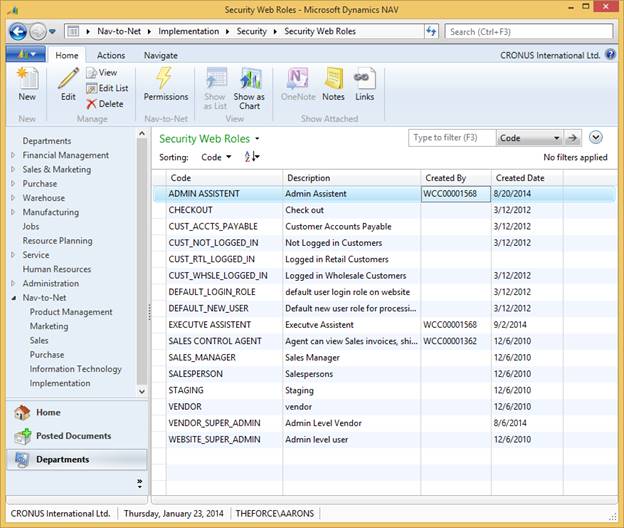
Figure 7 - 6 : Accessing the Permissions of a Particular Web Role
Figure 7 - 7 : Assigning Permissions to a Role
9.3 Manage Roles from the Website
The permission named MANAGE_ROLE_VIEW is standard to Nav-to-Net. If a web contact is assigned this permission, it enables the contact to perform the following tasks using the list of permissions the company of the contact is assigned to.
Figure 7 - 8 : Website Manage Role Permission in the List of Permissions
Web roles can be managed on Manage Role web page under My Account if the contact is assigned MANAGE_ROLE_VIEW permission.
The following task can be performed in the Manage Role area of the website:
- Create new web roles
- Edit existing web roles created by logged in contact
- Delete existing web roles created by logged in contact
- View existing web roles not created by logged in contact
- View existing Navision Roles
9.3.1 Access the management of Roles on the website
1. Log in with a web contact that is assigned MANAGE_ROLE_VIEW permission.
2. Click on Admin Tools (see Figure 7-9 ).
3. On the page that loads, click on Manage Role under the Website Management section.
![]()
![]()
![]()
![]()
Figure 7 - 9 : Manage Roles Link under "My Account"
Figure 7 - 10 : List of Company Roles within Website Role Management
Permissions that are displayed on the Manage Role web page of the website have the "Manage from Web" field is checked in the Nav-to-Net Web Permissions table.
![]()
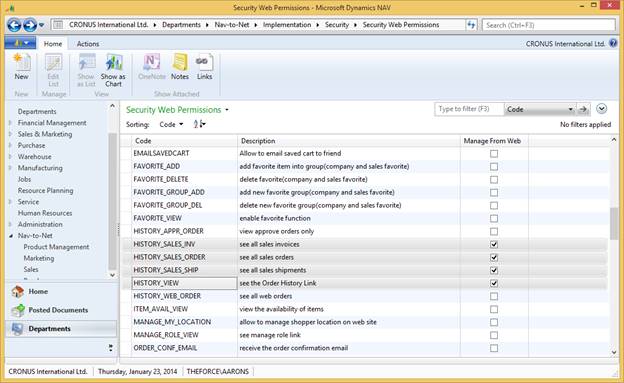
Figure 7 - 11 : Permissions that are Manageable from the website are set in NAV
9.3.2 Add a new Web Role
To add a new web role from within the Manage Role web page:
1. Follow the steps in section 7.3.1 .
2. On the Manage Role page, click on the Add New Role button .
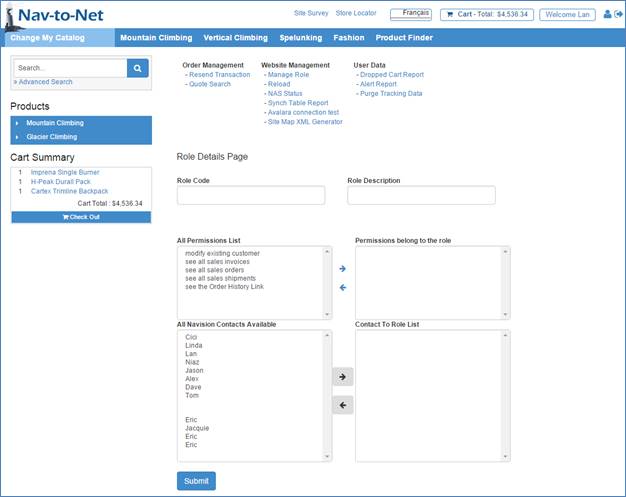
Figure 7 - 12 : Role Details Page
4. Enter a Role Code for the new Web Role .
5. Enter a Role Description for the new Web Role .
6. (Optional) Select one or a set of permissions from the list of the permissions available in the All Permissions List .
a. Add these permissions the list of Permissions Belonging to this Role using the arrow buttons ">>" and "<<" .
7. (Optional) Choose one or more contacts this Web Role will be assigned to from the All Navision Contacts Belonging to this Role .
a. Add these Contacts to the list of Contact To Role List using the arrow buttons ">>" and "<<" .
Note: Choosing permissions and contacts for the newly created role is optional. A web role can be created with no permissions or contacts assigned to it. If a Web Role is created with no permissions associated with it and assigned to Contacts, the contacts will not be able to log into the site.
8. Click on "Submit"
9. The confirmation message is received that "Role is submitted to Navision successfully".
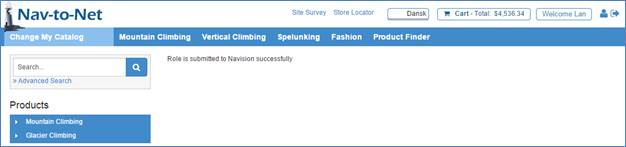
Figure 7 - 13 : Confirmation Page - Create a Web Role
9.3.3 Edit an Existing Web Role
If a web contact is assigned the "MANAGE_ROLE_VIEW" permission, that user is able to edit existing web roles they created.
Note: This user is only able to view Navision Roles and Web Roles created by other web contacts. The user will be able to click on " Edit " from the List of Company Roles ( Figure 7-10 ), but the succeeding page will only display the Web Role information, preventing the user from making any changes. There will be no " Submit " button available. This is explained further in section 7.3.5 on page 131 .
To edit a Web Role previously created by the currently logged in Web Contact:
1. Click on Manage Role under My Account .
2. From the List of Company Roles web page ( Figure 7-10 ), click on Edit against a web role created by this web contact.
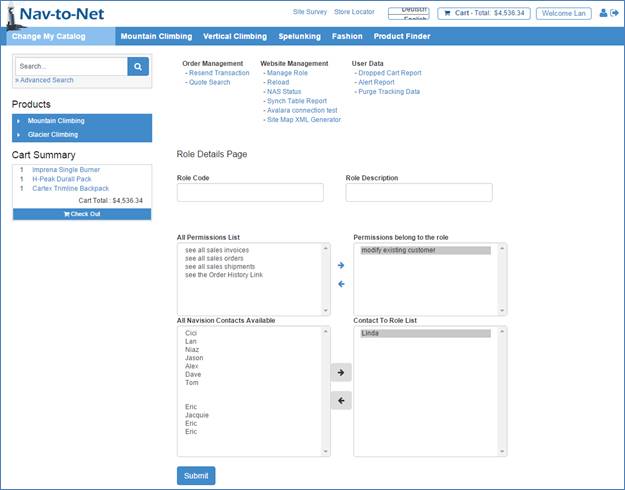
Figure 7 - 14 : Role Details Page - editing a Role
Note the Role Code and Role Descriptions are grayed out and not editable after web role creation.
1. Add to the list of Permissions belong to the role using the arrow buttons ">>" and "<<"
2. Add to the list of Contact To Role List using the arrow buttons ">>" and "<<"
3. Click Submit
4. The confirmation message is received that "Role is submitted to Navision successfully".
9.3.4 Delete Web Roles
If web contact is assigned MANAGE_ROLE_VIEW" web role they are able to Delete Web Roles they previously created.
If a Web Role had been created by a user there will be a Delete button next to that role.
To delete a web role from the list of company roles:
1. Follow the steps in section 7.3.1 on page 124 to access the List of Company Roles
2. On List of Company Roles, click the Delete button next to the role that was previously created.
3. The confirmation message is received that "Role is deleted successfully" .
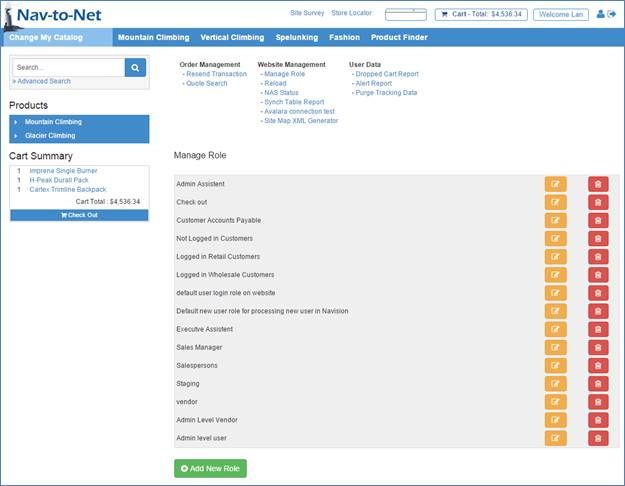
Figure 7 - 15 : A Web Role that is Capable of Being Deleted
Note: The Delete button shows up next to a Web Roles created by the currently logged in web contact. The rest of the web roles, which do not have Delete buttons, are either created by another web contact or are standard Navision Roles .
9.3.5 View Web Roles created by other web contacts
If there are web roles created by other users of the website (section 7.3.2 ), the currently logged in web contact can only view them when clicking on the Edit button against that web role.
![]()
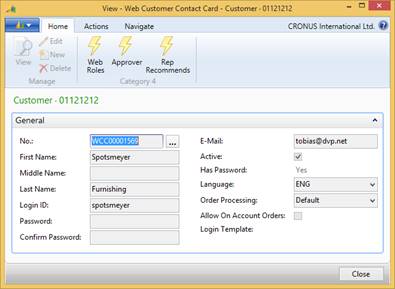
Figure 7 - 16 : Sample Nav-to-Net Web Contact
![]()

Figure 7 - 17 : Nav-to-Net Web Role table - A Role created by the second (not Logged in) Contact
![]()
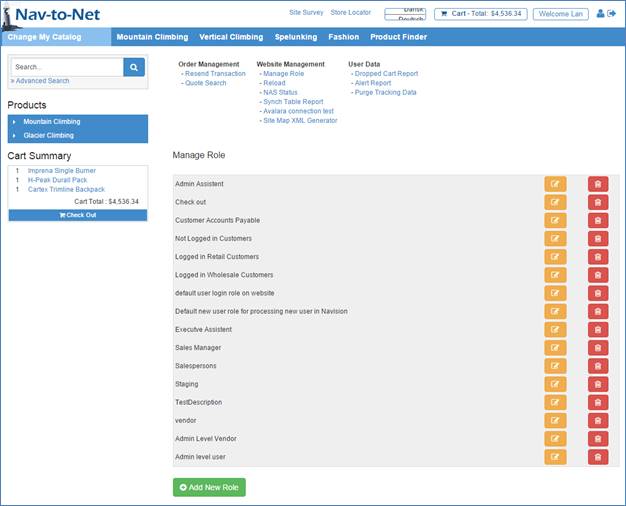
Figure
7
-
18
: View the website of the same information on the website
Notice this user is unable to delete the Web Role lan0924
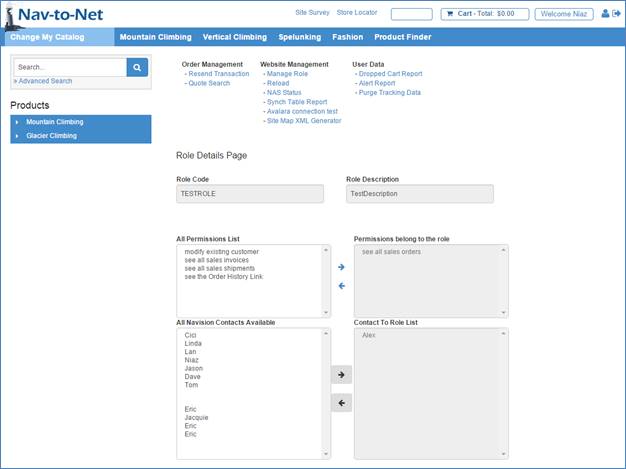
Figure
7
-
19
: The same Web Role as seen in
Figure 7-14
now being viewed by a different user
Notice the typically editable fields are grayed out and there is no "Submit" button.
9.3.6 View Roles that have been created in Navision
All existing Navision Roles show up among List of Company Roles on Manage Role area for the contact with Manage Role permission. Just like Web Roles created by other users, these Roles are not editable from the website.
Figure 7 - 20 : Standard Nav-to-Net Web Roles
Figure 7 - 21 : Web Roles created in Navision cannot be edited or deleted on the website
Note: Just like Web Roles created by other users Navision Roles can only be viewed by web contacts on the website, there is no "Submit" button to Edit and save changes on Role details page.
9.4 Manage Roles on the Website via the Customer Info web page
An alternative to managing roles via the "Manage Roles" link under "My Account" described in section 7.3 , users with the proper permissions are able to manage the roles of users directly from their Company Contacts.
This section describes this method of management.
If a logged in web contact is assigned the following permissions:
- MANAGE_ROLE_VIEW
- CUSTOMER_VIEW
- CONTACT_MODIFY
This web contact is then able to perform the following tasks from the Contact Info.web page:
- Create new web roles for other company contacts
- Edit existing web roles for other company contact
- View existing web roles , created by other users, for other company contacts
- View Navision Roles assigned to other company contacts
9.4.1 Create new Web Roles against a specific Contact
A web contact is able to Create a new web role for the company's other web contacts directly from the Company Contact List. The permissions that are applicable to this new Web Role are checked in the DVPNTN Web Permissions table, just as in section 7.3.2 on page 126 .
To create a new web role on specific Web Contact:
1. Log in to the website with a web contact that is assigned the permissions described in the beginning of section 7.4 .
2. Click on Customer Info under My Account
3. Click the Edit button next to the web Contact that you want to create the new Web Role for
4. The Contact Info. web page will then load
![]()
Figure 7 - 22 : Customer Info web page
Figure 7 - 23 : Contact Info web page
5. Click "add new role"
Figure 7 - 24 : Creating a new Web Role - The Manage Role web page
6. Enter a Role Code for the new web role
7. Enter a Role Description for the new Web Role
8. Choose one or a set of permissions from the list of the permissions available in the All Permissions List . (this is optional)
9. Add these permissions the list of Permissions Belonging to this Role using the arrow buttons ">>" and "<<" (this is optional)
Note: The permissions that show up on Role Details web page are permissions that have the "Manage from Web" field is checked on the Nav-to-Net Web Permissions table. (See Figure 7-11 on page 126 )
10. Click on "Submit"
11. The confirmation message is received that "Role is submitted to Navision successfully" .
9.4.2 Editing Web Roles via the Contact Info web page
The same restrictions for editing the Web Roles of contacts described in section 7.3.3 on page 128 hold true when editing Web Roles via the Company Contact List. Only Web Roles created by the logged in web contact can be edited on Contact Info. page. Navision Roles & Web R oles created by other contacts can only be viewed (using Edit Button).
To edit previously created web roles, via the Contact Info. web page:
1. Log in to the website with a web contact that is assigned the permissions described in the beginning of section 7.4 .
2. Click on Customer Info. under My Account
3. Click the Edit button next to the web Contact to be modified
4.
The
Contact Info.
web
page will load displaying the Web Roles associated with the selected contact.
Note: Navision Roles and Web Roles created by other users will display, but clicking the Edit button next to
these Roles will only display the Role's details.
Figure 7 - 25 : Contact Info web page displaying the Roles that are available for Editing
5. Click on Edit against the web role that is to be modified.
6. The Web Role details page loads.
Figure 7 - 26 : Editable Role Details Web Page
Note: The Role Code and Role Description are grayed out and cannot be edited because the user is modifying an existing Role.
7. Edit the Permissions belong to the role using the " >> " and " << " buttons as in previous sections.
8. Click Submit
9. Confirmation web page loads: " Role is submitted to Navision successfully"
9.4.3 View Web Role created by other web contacts
Existing web roles which are not created by the logged in web contact cannot be edited on Contact Info. page, they can only be viewed.
Viewing the details of Roles created by other users follows the same procedure as editing them.
Figure 7 - 27 : Viewing a Web Roles Details, Notice there is no "Submit" Button
9.4.4 View Navision Roles
Navision roles can generally never be edited on website. However they can be viewed on the web site by users with the correct permissions. In section 7.3.6 on page 133 it was described how to view these roles via the "Manage Roles" feature on the website. They can also be view via the Contact Info web page.
Follow the procedure described in section 7.4.2 . Note that the properties of the Role will be "grayed out" and there will be no "Submit" button.
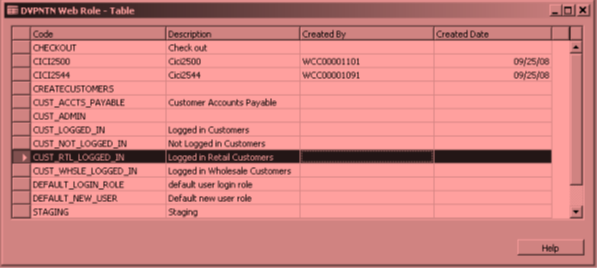
Figure 7 - 28 : A Typical Navision Role
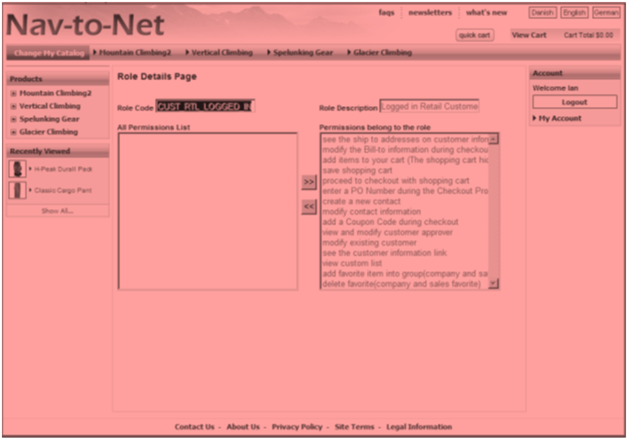
Figure 7 - 29 : A typical Navision Role as seen on the website
10 Credit Card Types
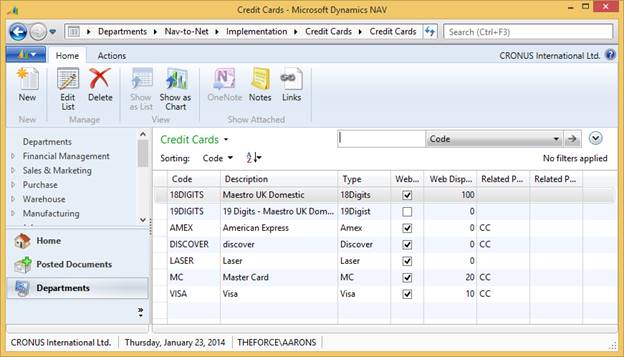
Figure 8 - 1 : Credit Card Types
Nav-to-Net comes pre-configured to handle four different types of credit cards: American Express, Discover, Master Card and Visa. There are basic validation rules associated with each type of card such as the number of digits, starting digit, etc.
11 Shipping Charges
Nav-to-Net allows for management of shipment methods exposed to the website shopper in checkout. This includes the ability to segment by order total, ship-to address, and weight and present the shipment price accordingly.
Figure 9 - 1 : Web Shipment Method Page in NAV
Nav-to-Net Web Shipment Methods are a means to:
a) Create a shipment price to be charged to the customer on the website and
b) Associate a NAV Shipment Method.
The options that a website user will have on the website for Shipment Options are determined by:
-
Total Product Weight in the Cart
And
- Ship-to Address
Or
-
Total Product Value in the Cart
And
- Ship-to Address
This will determine what Web Shipment Method Options to present to the website shopper as well as the Shipment Price charged to the website shopper.
Figure 9 - 2 : Web Shipment Methods visible on Step 2 of the Checkout
The setup values for Web Shipment Methods are:
- Code: Standard NAV Code value for the Web Shipment Method.
- Website Code: Lookup reference to the Nav-to-Net Website List. If this field is populated, that Web Shipment Method will only be applicable to the website defined.
- Description: Text field describing the Web Shipment Method. This text will be visible on the website as the content of the drop down box seen in Figure 9-2 .
- Country Code: This field is required. Lookup to the Standard NAV Country/Region Table. Used to filter available Web Shipment Records, based on the Ship-to Address set in checkout.
- Province/State: Lookup to the Nav-to-Net NAV Province Table. Used to filter available Web Shipment Records, based on the Ship-to Address set in checkout.
- Charge Type: Option Field used to determine what criteria to use when filtering available Web Shipment Methods.
o
By Price:
This will allow the Website to define the available Web Shipment Method filtering by the total Price Value of
the Cart. This will also set the Shipment Price to use the "Price" field. If defined, the available Web
Shipment Method will also be filtered by Website, Country and Province/State.
o
By Weight:
This will allow the Website to define the available Web Shipment Method filtering by the total Weight Value of
the Cart. This will also set the Shipment Price to use the "Price Per Unit Weight" field. The weight of the
Cart and the "Price Per Unit Weight" will be determined by the Item."Gross Weight" of Standard NAV. If
defined, the available Web Shipment Method will also be filtered by Website, Country and Province/State.
o
Highest:
The available Web Shipment Method will be filtered by Website, Country and Province/State, provided these
fields are defined. This calculation method will then compare the "By Price" method and the "By Weight" method
Shipment Prices and determine which will have the highest Shipment Price. This will define the Shipment Price
for that Web Shipment Method.
e.g.: Charge 20.00 when the weight of the cart is below 50. Above a weight of 50, charge 0.50 per unit of
weight in the cart. (Note the units of weight and currency in this example are determined by the NAV
implementation).
o
Lowest:
The available Web Shipment Method will be filtered by Website, Country and Province/State, provided these
fields are defined. This calculation method will then compare the "By Price" method and the "By Weight" method
Shipment Prices and determine which will have the lowest Shipment Price. This will define the Shipment Price
for that Web Shipment Method.
e.g.: Charge 20.00 when the weight of the cart is above 50. For a Cart weight of 0 to 40, charge 0.50 per unit
of weight in the cart. (Note the units of weight and currency in this example are determined by the NAV
implementation).
- Lower Price Range: Decimal field used to filter the available Web Shipment Methods when Charge Type is set to "By Price", using the total cart value for comparison.
- Upper Price Range: Decimal field used to filter the available Web Shipment Methods when Charge Type is set to "By Price", using the total cart value for comparison.
- Price: Decimal value of the price to be charged to the customer when calculating By Price. This value is set in the LCY of the NAV Company. Standard exchange rates apply should a different currency be used on the website.
- Lower Weight Range: Decimal field used to filter the available Web Shipment Methods when Charge Type is set to "By Weight", using the total cart weight for comparison.
- Upper Weight Range: Decimal field used to filter the available Web Shipment Methods when Charge Type is set to "By Weight", using the total cart weight for comparison.
- Price per Unit of Weight: Decimal value of the price to be charged to the customer when calculating By Weight. This value is set in the LCY of the NAV Company. Standard exchange rates apply should a different currency be used on the website. This value is multiplied by the total weight of the cart.
- G/L Account: Look up to the Standard NAV chart of accounts. This G/L Account will be defined on the Order Line of Type G/L during the make order process for the shipment price line. This will identify what account to drive the funds charged for shipments.
- Tax Prod. Posting Group: If the price charged for shipping is to be taxable, this lookup to the Standard NAV Tax Prod. Posting Group Table will define the tax setup for that line.
- Tax Group Code: If the price charged for shipping is to be taxable, this lookup to the Standard NAV Tax Group Table will define the tax setup for that line.
- Priority: The order in which the shipment methods are to be displayed on Step Two of the checkout when more than one is valid for that Shopping Cart / Ship-to Address.
- Shipment Method Code: The Standard NAV Shipment Method code that will be applied to the Sales Order Header via the Make Order Process.
- Web Enable: Defines if the Web Shipment Method Record should be available on the website.
12 Tax
12.1 Calculating Tax
12.1.1 Sales Tax
In Dynamics NAV, customers and their ship-to addresses are assigned a Tax Area Code . The Tax Area Code is a group of Tax Jurisdictions . An item is assigned a Tax Group Code . Tax details (e.g. tax rates) are defined for the combinations of Jurisdictions and Group Codes. Where tax is payable for both the customer and the item, Dynamics NAV calculates the applicable tax. If a ship-to address is selected, the tax area code and resulting tax liability will be applied based on the ship-to address, not the customer address.
For further information on the setup of above Nav-to-Net feature see the Dynamics NAV Help Files
12.1.2 VAT
To apply VAT, a customer is assigned a Tax Business Posting Group . It does not apply to ship-to addresses. An item is assigned a Tax Product Posting Group . There are no jurisdiction codes with VAT, so the Tax details (e.g. tax rates) are defined for the combination of the Tax Business Posting Group and Tax Product Posting Group.
For Dynamics NAV customers, the website follows the same rules as Dynamics NAV, in that it will use the existing Tax Area Code or Tax Business Posting Group for its calculation. The population of the Tax Exemption Number or VAT Registration Number has no effect. (In the unlikely event that a customer has both fields filled in and active, the VAT calculation will prevail.) For Reverse Charges , the Reverse Charge indicator in the Tax Posting Setup results in no tax being calculated on a sale. There is no distinction between corporate and individual customers. The system looks solely to the Tax Business Posting Group assigned to the customer.
For further information on the setup of above Nav-to-Net feature see the Dynamics NAV Help Files
Figure 10 - 1 : VAT Enabled Website
For new customers, a Tax Area Code or Tax Business Posting Group is unknown. Therefore, the website uses the DVPNTN Web Tax Details table to find the appropriate Tax Area Code or Tax Business Posting Group, based on the shipping address of the web order. If no match is found, the message "Taxes will be calculated later" will be shown.
13 Coupons
Nav-to-Net allows for coupons to be set up in Dynamics NAV and offered on the website.
13.1 Coupon Types
There are four types of coupons:
- Percentage off - provides a credit on the order for a percentage off the order sub-total.
- Dollar Amount off - provides a credit against the order for a specific amount.
- Buy X get Y Free - provides a credit against the order for item Y if item X is purchased.
- Free Shipping - provides a credit against the order for the amount of the shipping charge.
13.2 Coupon Setup
13.2.1 Coupon Settings
General Tab
Coupon Code: The code that will be entered on the website during checkout. This is also the primary key of the Coupon Table in NAV.
Coupon Title: The display title of the coupon that will be displayed on the website when the coupon is properly validated.
Apply-to Type: The type of group this coupon will be effective for. The options are "Customer", "Customer Group" or "All Customer". If "Customer" is chosen, a single customer can be specified that will be able to use the Coupon. If "Customer Group" is chosen a group of customers will be able to use the Coupon. This will be specified by a Customer Posting Group. If "All Customer" is chosen all web enabled Customers will be able to use the Coupon on the website.
No.: The Customer No. or the Customer Posting Group is specified in this field, depending on which Type is chosen in "Apply-to Type".
Coupon Terms Description: The description of the Terms of the Coupon to be displayed on the website.
Coupon Type: The Type of Coupon is specified here. "Percentage Off", "Dollar Amount Off", "Free Shipping", or "Buy x get y Free" are the possible Coupon Types. The details of each Coupon, depending on its Type, is specified in the appropriate, subsequent tabs.
Start Date: The date at which the Coupon will become effective.
End Date: The date at which the Coupon will no longer be effective.
Start Time: The time at which the Coupon will become effective.
End Time: The time at which the Coupon will no longer be effective.
Minimum Order Value: If specified, the cart amount required before the Coupon can be used (optional).
GL Account: The GL Account the discounts are applied to.
Tax Prod Posting Group: The Tax Product Posting Group to be used when calculating taxes on the discounted amount.
Reusable: Whether or not the Coupon can be used more than once.
Enabled: Enabled needs to be set to true in order for the Coupon to be used on the website.
Qualifier Item Type: The group of Items the Coupon is effective with. If "Item" is chosen, a single Item may be specified that the Coupon can be used with. If "Category" is chosen an Item Category Code can be specified allowing a group of Items that the Coupon can be used with. If "Product Group" is chosen a Product Group Code can be specified allowing a group of Items that the Coupon can be used with.
Qualifier Item No.: The Item, Category or Product Group the Coupon is effective with.
Qualifier Item Name: Auto-populated Item Name, Category Name or Product Group Name.
Qualifier Item Quantity: The quantity of Item that needs to be in the cart before the Coupon is effect.
Few Web Shipment Code: The Web Shipment Code that will be used when a "Free Shipping" Coupon Type is used.
NOTE: in Business Central there is no concept of Product Groups. Rather, it uses Item Categories. (Item."Item Category Code"). Nav-to-Net, for coupons, has been changed to look at the Item Category Code instead of the Product Groups, only for Business Central.
13.2.2 General setup for all coupon types
1. Navigate to Nav-to-Net } Sales } Setup } Coupons , and click New in the ribbon menu.
2. Fill in Coupon Code, Coupon Title, and Coupon Terms Description.
3. Customer No. is optional. If it is filled in, the coupon will be valid only for the specified customer. If it is not filled in, it will be valid for any customer.
4. Select a Coupon Type.
5. Start Date, End Date, Start Time and End Time are optional. If they are filled in, the coupon will only be valid for the specified date and time.
6. Minimum Order Value defaults to 1.00. It can be changed to any positive number. The coupon will be valid if the order amount is greater or equal to the Minimum Order Value.
7. The GL Account can be set differently for different coupons. It is optional. If it is not filled in, the Default GL Account from Nav-to-Net Setup will be used.
8. If Reusable is checked, the coupon can be used more than once. Otherwise it can only be used once.
9. Enable must be checked in order for a coupon to be used on website.
10. Auto-Apply. Enabling this feature for a specific coupon will force this coupon to be checked (during checkout) against each new order (moving forward) to see if it could apply to the order in question. Multiple coupons can be checked to see if they can be "auto applied". If there is more than one valid coupon, then the list of valid coupons is presented to the web customer. The web customer then can select one of the coupons to apply to their order.
NOTE: This feature will work only if the Auto-apply flag is ALSO set on the NAV Website card.
 Figure
11
-
1
: DVPNTN Coupon Card - General Tab
Figure
11
-
1
: DVPNTN Coupon Card - General Tab
13.2.3 Specific Setup for Percentage Off
1. In the General tab, select Percentage Off from the Coupon Type field.
2. Click on the Percentage off tab.
3. Fill in the percentage to be deducted in the Percentage off field.
4. Shipping Charge Before Discount . If checked, the shipping charge will be calculated on the order total prior to the discount being applied.
5. Qualifier Item No is optional for Percentage off coupon. If it is filled in, when the coupon is used, the user will be required to buy the Qualifier item.
6. Qualifier Item Name will be filled in automatically if Qualifier item No is filled in.
7. Qualifier Item Qty. is optional. If it is filled in, when the coupon is used, it will require the user to buy the Qualifier item in a quantity greater than or equal to the Qualifier Item Qty.
8. Promo. Item No is optional for Percentage off coupon. If it is filled in, only the Promo. Item will get the percentage off. Otherwise all the items in the shopping cart will get the percentage off.
9. Promo. Item Name will be filled automatically if Promo Item No is filled in.
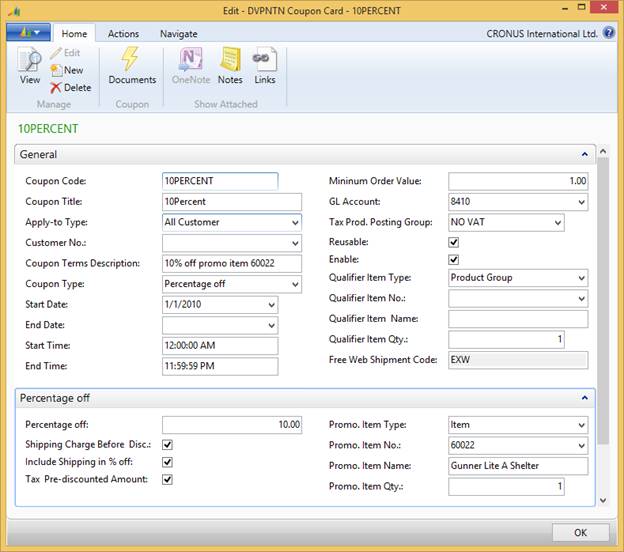 Figure
11
-
2
: DVPNTN Coupon Card - Percentage Off Tab
Figure
11
-
2
: DVPNTN Coupon Card - Percentage Off Tab
13.2.4 Specific setup for Dollar Amount off
1. In the General tab, select Dollar Amount off from the Coupon Type field.
2. Click on the Dollar Amount off tab.
3. Dollar Amount off is required. It specifies the actual dollar amount of discount that user gets when using the coupon.
4. Shipping Charge Before Discount is optional . If checked, the shipping charge will be calculated on the order total prior to the discount being applied.
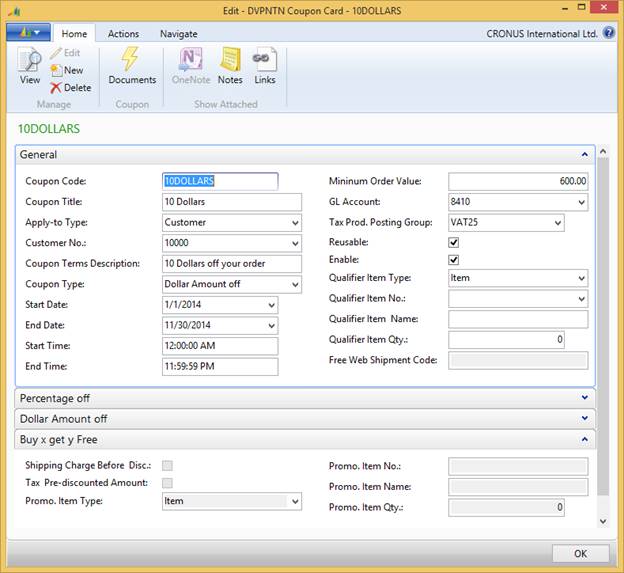 Figure
11
-
3
: DVPNTN Coupon Card - Dollar Amount Off Tab
Figure
11
-
3
: DVPNTN Coupon Card - Dollar Amount Off Tab
13.2.5 Specific setup for Buy x get y Free
1. In the General tab, select Buy x get y Free from the Coupon Type field.
2. Click on the Buy x get y Free tab.
3. Fill in the Qualifier Item No. This is the item that must be purchased in order to receive the promotional item.
4. Qualifier Item Name will be filled in automatically if Qualifier item No. is filled in.
5. Fill in the Qualifier Item Qty . When the coupon is used, the user must buy the Qualifier item in a quantity greater than or equal to the Qualifier Item Qty.
6. Fill in the Promo. Item No . This specifies which the free item is.
7. Promo. Item Name will be filled automatically if Promo Item No is filled in.
8. Shipping Charge Before Discount . If checked, the shipping charge will be calculated on the order total prior to the discount being applied.
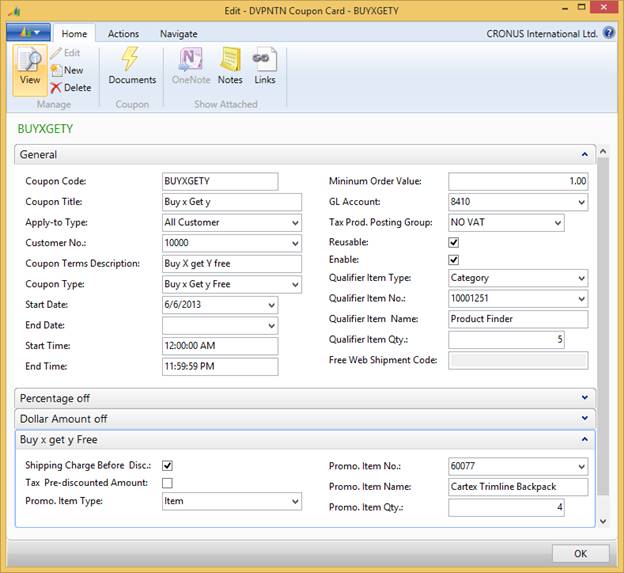
11 - 4 : DVPNTN Coupon Card - Buy x get y free Tab
13.2.6 Specific setup for Free Shipping
1. Under the General tab, select Free Shipping in the dropbox options for Coupon Type.
2. Select a Free Web Shipment Code for the free shipping coupon to apply to (e.g. FEDEXPRESS)
3. NOTE: Typically, our customers create a different Web Shipment Method that is called "FREE Shipping" BUT do not web enable it, then assign this Web Shipment Method code to the Free shipping coupon. The act of not web enabling it means it will not show up during the times that the Free shipping Coupon is NOT in use, but can be used when the FreeShip coupon is used.
13.3 Using Coupons on the Website
If a coupon is enabled for the website and user is assigned COUPON permission, user is able to view Coupon code entry box and enter the coupon code in Checkout Step 1 . If the coupon requirements are not met, an appropriate error messages will be given. In order to continue shopping, the user can either modify the shopping cart to satisfy the coupon requirements or remove the coupon from the shopping cart. Examples of coupon requirements are that the coupon has not expired, that product X was purchased in order to get Y free or that the minimum amount was ordered.
14 Searching (for Items )
Creating a web order starts with finding the item to purchase. Items can be found by browsing through the product categories, or by using the search functions. Nav-to-Net has two search functions: Basic Search and Advanced Search .
14.1 Basic Search
The Basic Search allows a user to search for the item number, item name and short description. There are three types of searches: All Keywords, Any Keyword, and Exact Phrase .
All Keywords : The system will search for any item that contains all entered words in the item number or item name. For example, if a user enters " Fast Fleece" into the keyword field, it will return all the items that contain both "Fast" and "Fleece" in the item number or item name or item short description.
Any Keyword : The system will search for any item that contains any of the entered words in the item number or item name. For example, if a user enters " Fast Fleece" into the keyword field, it will return all the items that contain "Fast" or "Fleece" in the item number or item name or item short description.
Exact Phrase : The system will search for any item that contains only the exact phrase entered in the item number or item name. For example, if a user enters " Fast Fleece" into the keyword field, it will return all the items that contain "Fast Fleece" in the item number or item name or item short description. If an item name or short description contains the phrase "Fleece Fast", it will not be in the search result.
Once the search criteria have been entered, click the Go button to perform the search.
14.2 Advanced Search
If a user has been assigned the " search the catalog " permission, the Advanced Search link in the line above the Top-Level Categories will be visible. By clicking on the link, the user will be taken to the Advanced Search page.
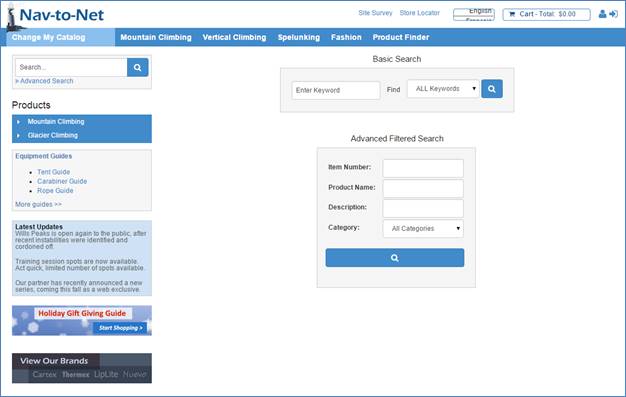
Figure
12
-
1
Advanced Search
Through the Advanced Search, a user can search by Item Number , Product Name , Description , or Category . As well, two or more filters can be combined. For example, a user could search by Item Number and Product Name together. Once the search criteria have been entered, click the Go button to perform the search.
14.3 Search Results
After a user clicks the Go button, the search results are displayed as follows:
- The keyword entered is displayed.
- The top 4 items found by the search engine are displayed.
- The matching items in each category are displayed. (The number of matching items that are displayed is configurable in the website card.) By clicking on the category or "All results found in this category", all matching items in this category will be displayed.
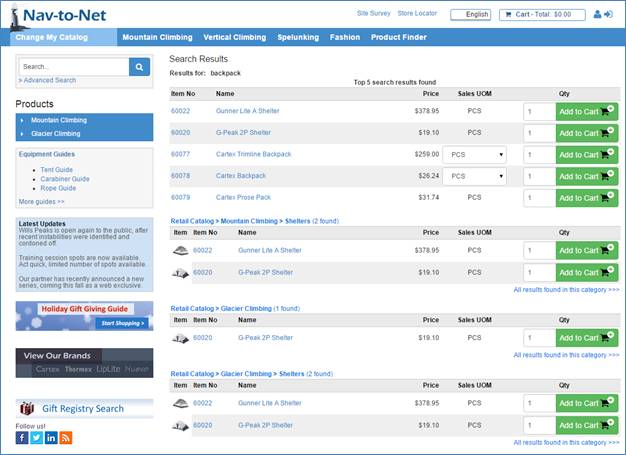
Figure
12
-
2
Search Results
14.4 Parametric Search
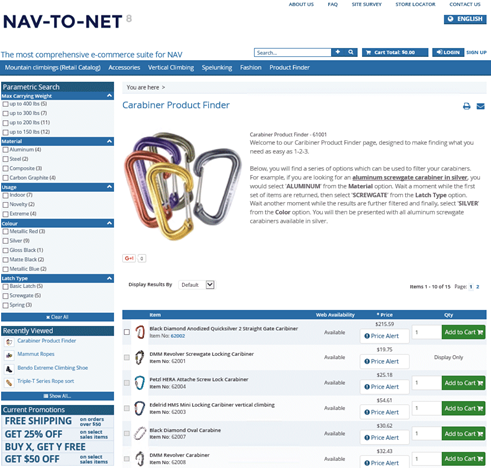
Parametric Search is based on a Master Item and its assigned Child Items. Defined Parameters for the Master Item (Web Item AXIS Parameters) and their possible values (AXIS Attributes + their Values) need to be assigned to the Child Items. The search process filters all Child Items based on the selected parameters.
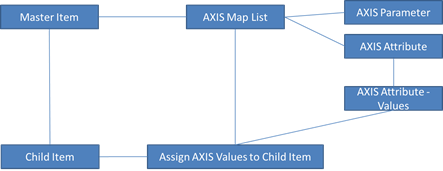
To create a category/page that uses the parametric search you need to go through the following steps:
1. Since the parametric search is based on Master-Items and their related Child-Items, a Web Enabled Item is needed with its Template set to Parametric Search Template . To do this, open the NAV Client access the Nav-to-Net Item Card to create a new Item.
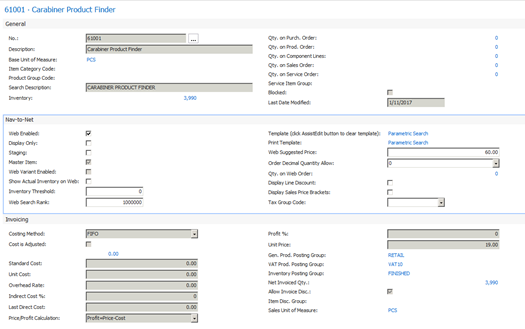
2. Add the Item to an existing Category or create a new Category which will be used as the parametric search page. Access the Category List under CRONUS International Ltd./Departments/Nav-to-Net/Product Management/Setup/Categories. Add a new entry and assign the newly created Item to this Category. If you select Redirect to First item, URL Parameter Type and also enter a URL Parameter (an Item No. in this case), the Category will display this Item in the result set. URL Parameter Type can also be Attribute(s). If more than 1 attributes, "," can be used to separate the attribute codes.
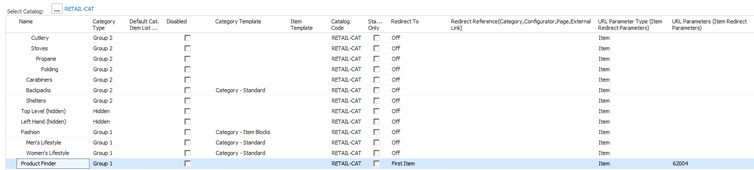
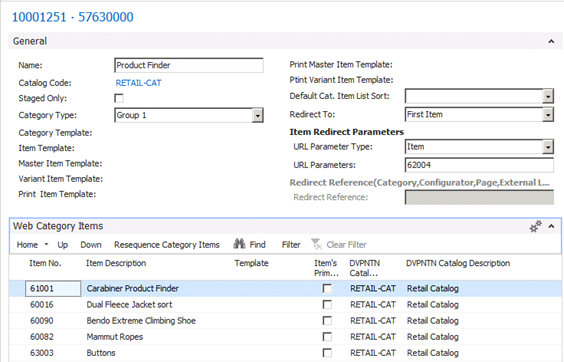
3. After creating the Category and assigning the new Item to this Category you should be able to see the new Category in the navigation pane on the website - the result should be a blank website or the result displays the Item you passed through via URL Parameter . In order to see the Parametric Search block you have to define parameters that you would like to use in the new search engine. These parameters need to be set up in relation to the Master-Item. Therefore open Web Item AXIS Attributes under HOME Tab in the NTN Item card ribbon.
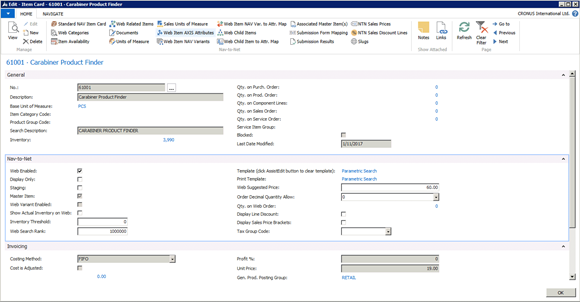
Each of the desired parameters has to be set up with an AXIS Code and an AXIS Value . The AXIS-Code needs to begin with " PARAMETRICSRCH" , as it can be seen on the screenshots below.
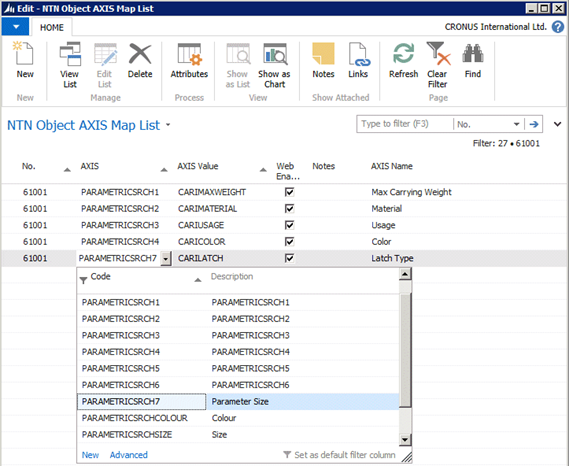
4. After you have selected or created the AXIS-Code , you need to select or create an AXIS-Value and its possible attributes. The AXIS-Value and its attributes are displayed as one category in the search engine.
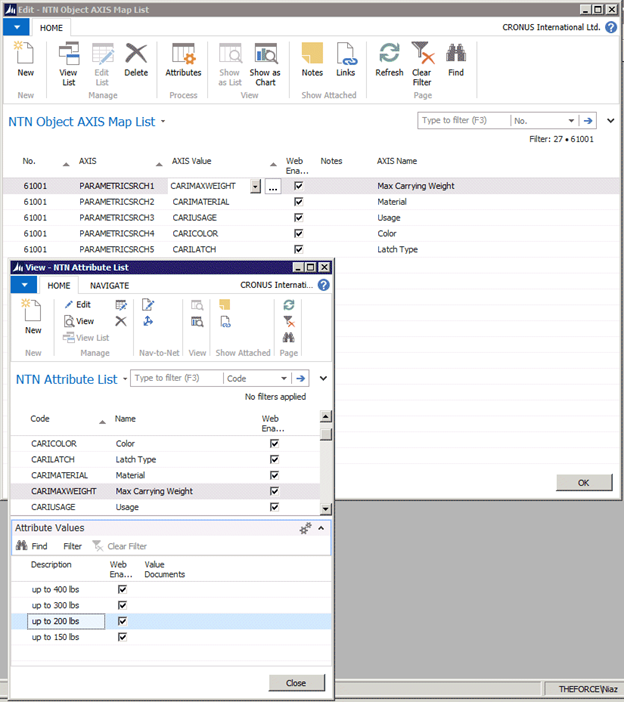
5. After setting up all desired AXIS-Codes , AXIS-Values + its attributes, they need to be assigned to actual child Items. Therefore assign a ( Child)-Item to the newly created Master-Item . Select Web Child Items under HOME Tab in the NTN Item card ribbon.

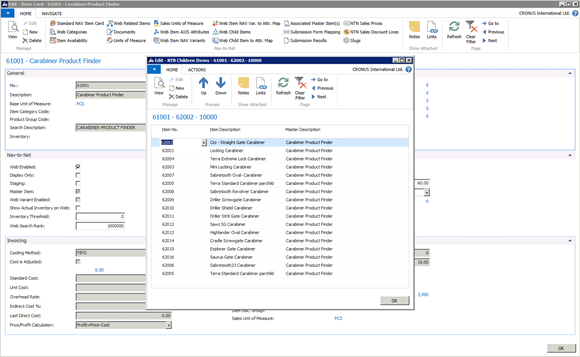
6. To be able to search for those Child-Items later, they have to be described with the parameters you created earlier. Select Web child Item to Att. Map under HOME Tab in the NTN Item card ribbon. In the upper window select the Item you want to describe and use the lower window to describe it with parameters by selecting possible attributes.
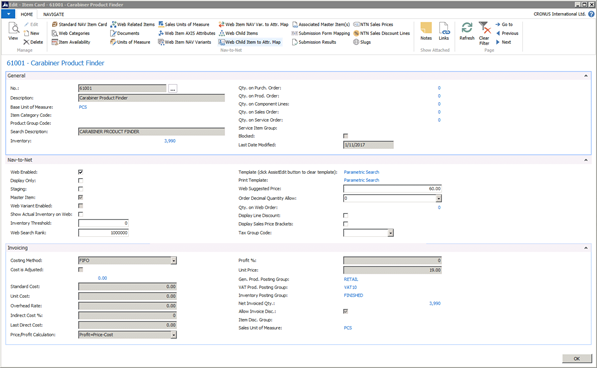
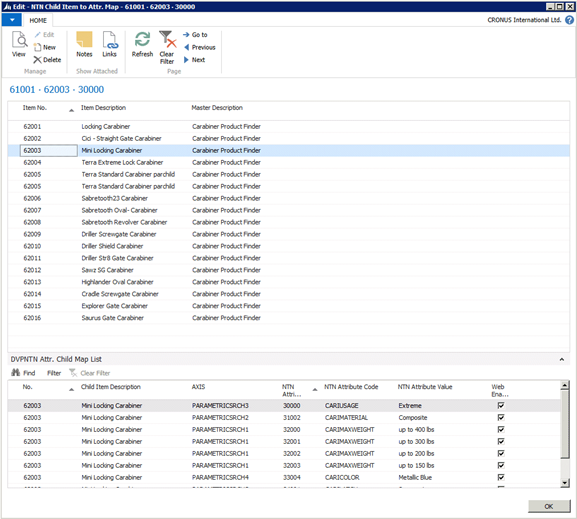
7. After you added all desired (Child)-Items to the Master-Item and every (Child)-Item has been described through parameters, you should now access the Parametric Search Engine online and perform some tests.

15 Placing Orders on the Website
Web Enabled Customers can create orders online through the Nav-to-Net website. Before they can submit an order, they must have contacts associated with them. Contacts, as discussed in the previous section, can be related to a customer or a company.
On a B2C site, customers who do not have accounts in Dynamics NAV will have their customer card and web customer contact cards created when their first order is processed in Dynamics NAV.
15.1 Salesperson Acting as Customer
For a salesperson to place an order on behalf of a customer:
1. Log in with sales person credentials
2. Click the Select Customer button in the left hand navigation (See Figure 3 ).
3. Choose a customer from the list by clicking the Select button next to the customer name, or search for customer by their name or number (See Figure 4 ). The sales agent is now acting on behalf of the customer (See Figure 5 ).
![]()
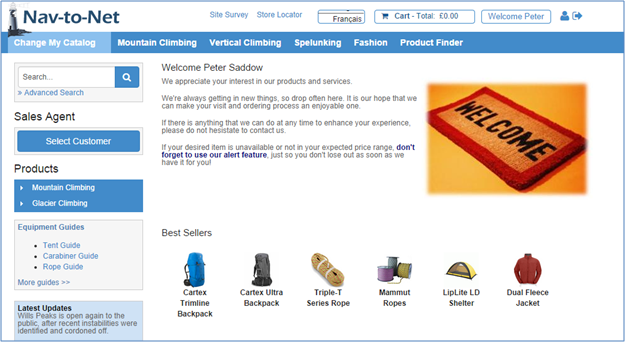
Figure 3 - A salesperson can act on behalf of a customer via the Select Customer button
![]()
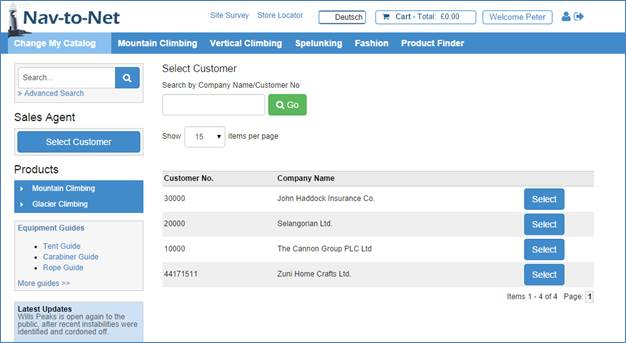
Figure 4 - A salesperson can act on behalf of a customer via the Select button on this page.
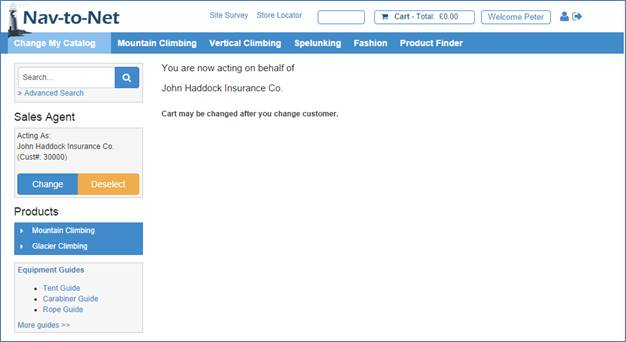
Figure 5 - Salesperson confirmed to be acting on behalf of a customer.
15.2 Adding Items to the Shopping Cart
Once an item has been selected, continue to create the web order by adding the item to the shopping cart with one of the following steps.
1. Enter an Order Quantity on the Product Details (shown below) or on the Product Listing page or on the Search result page, or on the recently viewed page. For logged in user, you can also add items to the shopping cart through My Favorite List .
2. Click the Add to Cart button next to the order quantity textbox to put the item into the shopping cart.
15.2.1 Quick Order
1. Click on the Quick Order link
2. Enter Item numbers and the quantities
3. Click Add to Cart button
![]()
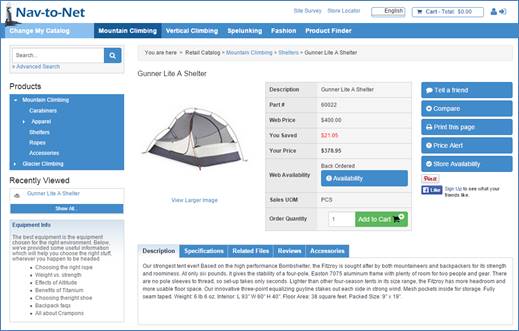
Figure
14
-
1
Nav-to-Net, Add To Cart
To review and make changes to the content of the shopping cart, click the View Cart button on the top right hand corner of the page.
![]()
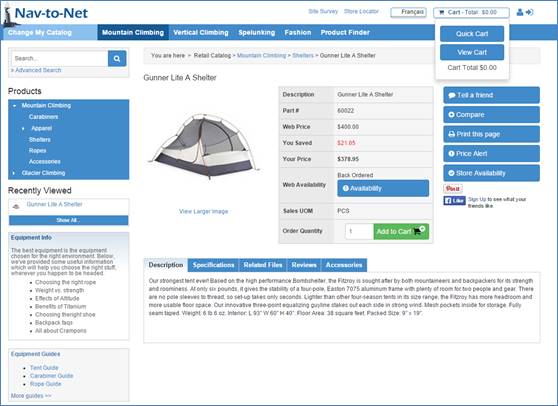
Figure 14 - 2 Nav-to-Net Shopping Cart
![]()
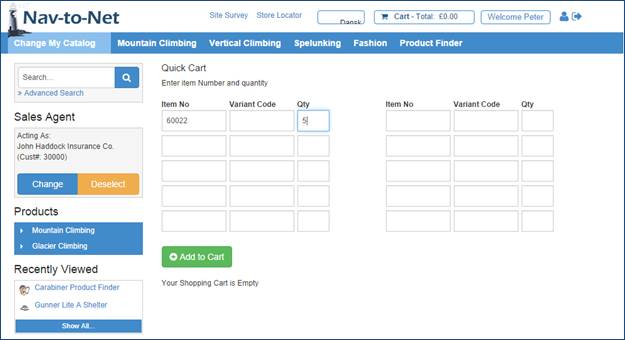
Figure 8 - Quick Cart
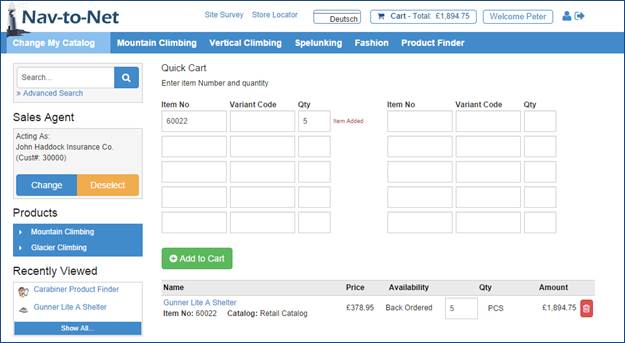
Figure 9 - Quick Cart Item Added
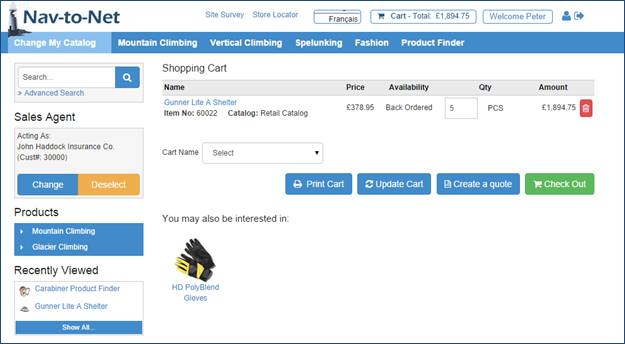
Figure 10 - View Cart
To modify the order quantity of an item, change the number and click Update Cart . The new quantity and amount will be displayed shortly afterwards. To remove an item from the Shopping Cart, click the Trashcan / Remove This Item button at the end of the line or change the quantity to 0 and click on Update Cart .
Click the Checkout button to check out all items in the Shopping Cart.
15.3 Checkout
The Nav-to-Net website allows anonymous shoppers to browse and add items to the Shopping Cart. However, users are required to log in before they can proceed through checkout. New customers must create an account on the website prior to checking out the items in the Shopping Cart.
An existing customer can request a new password by filling in his username and email address. The system will perform a validation on the information and a new password will be sent to the email address in question.
Note: The page shown below will not be displayed if the shopper has logged in prior to checking out.
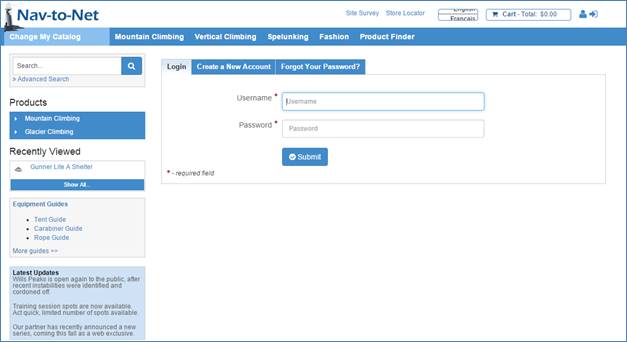
Figure 14 - 3 Request for Login (for anonymous shoppers)
15.3.1 1-Step vs. 4-Step Checkout
The 1-step and 4-step checkout follows the following behavior for input of the promotional code, billing and shipping information. The 4-step checkout consists of the following pages:
1. Billing and shipping information
2. Shipping and Billing method
3. Order Preview
4. Order Confirmation
The 1-step consolidates pages #1, #2 and #3 above.
15.3.2 1-Step Checkout setup
In order to setup 1-step checkout, go to Departments > Nav-to-Net > Implementation> Setup> Website> Open website card> Cart/Financial Tab> Under Cart/Order> Enable One Step Checkout field
Check the Enable One Step Checkout field, then reload website values by Admin on website OR reload from Navision and retry checkout and it is 1-Step Checkout now.
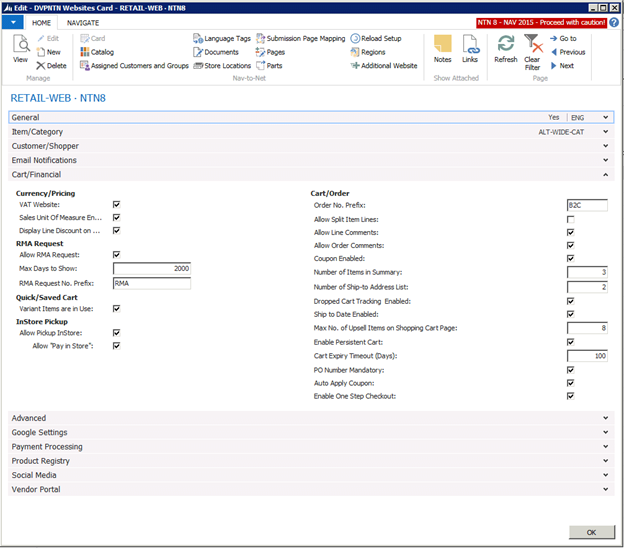
15.3.3 Enter Billing and Shipping Information
Once a user has logged in successfully, he will be asked to enter the addresses for the order.
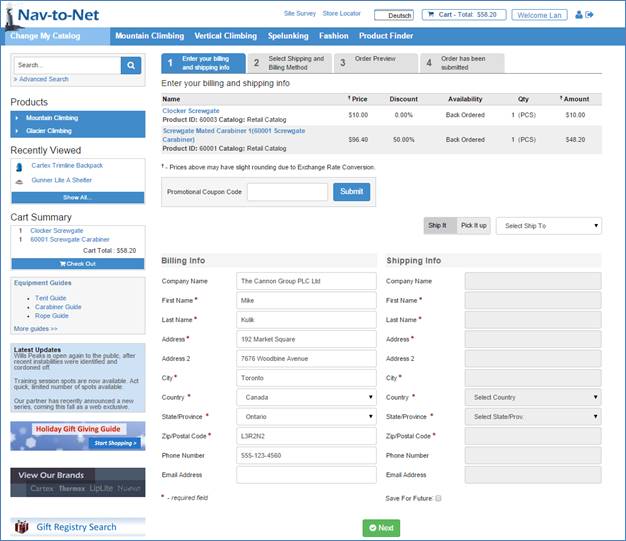
Figure
14
-
4
Nav-to-Net,
Enter Billing and Shipping Info
A Promotional Coupon Code (see Section 11 for Managing Coupons) can be entered on this page.
Billing Info:
1. For a new customer, both the billing and shipping information must be entered.
2. For an existing customer, the billing information comes from the customer card. If a user has " modify the Bill-to information during checkout" permission, the billing information is editable.
Shipping Info:
Three options are available for entering shipping information.
1. Use New Address : If a user has "create a new ship-to in checkout process" permission, he/she will see "Use New Address" option from the Shipping Info dropdown. When a shipping address is entered, the user can check the Save For Future checkbox at the bottom of the form to save the shipping address for future orders if the user has " Shows "Save For Future" box during check out to save new Ship-to " permission. This address will ultimately synchronize to Dynamics NAV's ship-to address table.
2. Use Billing Address : To have the shipping address automatically filled in with the bill-to address, select this option.
3.
Existing Ship-to address
: Previously saved shipping addresses are pre-loaded in the dropdown; user can select any existing ship-to
address from the list.
If the Customer has several Ship-to Addresses, They will have the option to search for a specific Ship-to
Address.
-
Searching for a Ship-to Address
After choosing this option the user will be able to search for an existing Ship-to Address by Address, City,
Zip / Postal Code, or State
Click Continue to Next Step to proceed. If any of the required fields are missing, Nav-to-Net will return users to this screen until the information entered is complete.
15.3.4 Select Shipping and Billing Method
Once address information is obtained, the user defines the shipping and billing method.
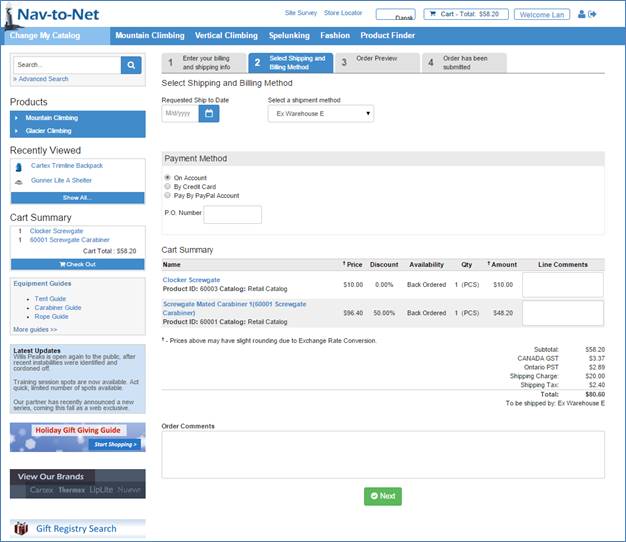
Figure
14
-
5
Nav-to-Net, Payment Method Selection
Shipping Methods: The available shipment methods are listed on the drop down. Upon selection, the page will refresh as the shipping charge is based on the shipment method chosen.
Payment Methods: If a user has " allow paying by payment terms (on account) " permission, the user will see On Account option in the checkout process and can select On Account as a payment method.
Credit Card Information: If a user has " enter a credit card as payment during checkout " permission, the user will be able to enter credit card information. The user must complete all 5 fields of information. The available cards on the Credit Card Type are based on the credit card setup in Dynamics NAV.
PO Number: A PO Number is optional.
Line Comments and Order Comments: These fields are visible if checked in the Website Setup in Dynamics NAV.
15.3.5 Preview Order Details
The preview page gives the user the option to review the order before submitting it.
Figure
14
-
6
Nav-to-Net,
Preview Order Details
15.3.6 Order Confirmation
Once all submissions required for the order process are completed, the user will receive a confirmation message.
Figure 14 - 7 Nav-to-Net Order Confirmation
16 Managing Orders in Dynamics NAV
After an order has been submitted on the Nav-to-Net website, it will be stored in the Web Holding Table before being processed. Errors in an order can be fixed in the Web Holding Table before it is turned into a Dynamics NAV order. To access the Web Holding Table, go to Departments } Nav-to-Net } Sales } Processing } Web Holding.
16.1 Web Holding Table
Double-clicking on an Order Record in the Web Holding List will open the Web Holding Table . There are nine tabs on this form, and a sub-form showing details of the ordered items in the lower half.
Figure 15 - 1 Web Holding Table, General Tab
16.1.1 Web Holding Payment Tab
If the order was placed On Account, the Payment Tab displays the PO Number and the On Account field checked.
If the user paid by Credit Card, the Payment tab looks like this:
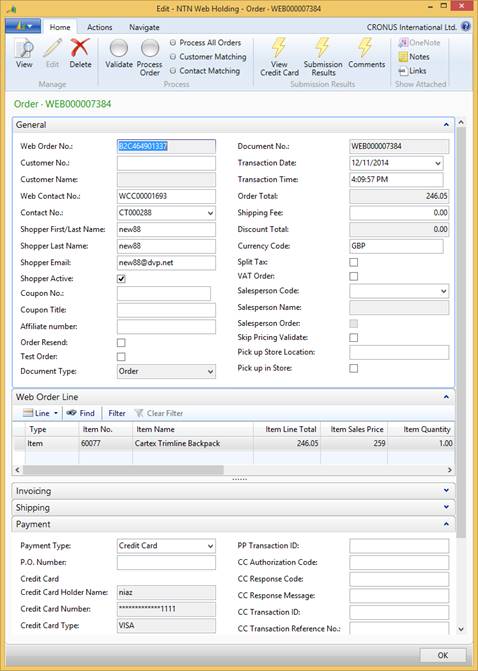
Figure 15 - 2 Web Holding, Payment Tab
The credit card number is encrypted. If the Dynamics NAV user needs to edit the credit card number, they must have permission to edit the credit card form and the decryption license on their local computer. To edit a credit card, click on the View Credit Card button in the ribbon menu.
16.1.2 Web Holding Table's Errors Tab
Errors in an order will appear under the Errors tab of the Web Holding Form. If an error is found in the order, the Error No. and the Error Code will be displayed on this tab. All errors must be corrected before an order can be processed in Dynamics NAV. Click the Validate button to check for errors in the order.
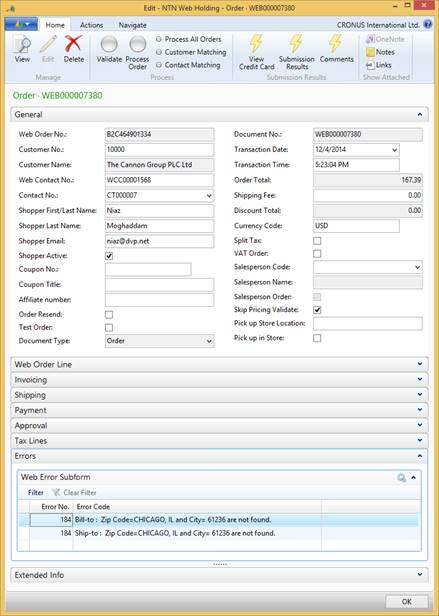
Figure 15 - 3 Web Holding Table, Errors Tab
16.2 Customer Matching
Web Customer Matching is only required for orders submitted by new users created on the Nav-to-Net website. Because these users are created on the website, there is no Dynamics NAV Customer No. associated with them. This prevents Dynamics NAV from processing the order they have submitted. To resolve this problem, Nav-to-Net provides a function to match existing customers to an order or create a new customer for the order when no matching customer is found. A Contact No. will also be assigned to the newly created web user.
To access the Web Customer Matching from the Web Holding Table, click on the Customer Matching button in the ribbon menu.
A customer match is carried out based on the customer match criteria specified in the Web Customer Match Criteria .
16.2.1 To View the Web Customer Match Criteria
1. Select an Order in the Web Holding list by clicking on it.
2. On the ribbon menu, click on Customer Matching to view the order's associated Customer Matching criteria.
16.2.2 To Set up the Web Customer Match Criteria
1. Navigate to Departments } Nav-to-Net } Implementation } Setup } Customer Match Criteria .
2. Click in the Field No. of an empty line and click the dropdown arrow.
3. Select a field to use for matching a customer (e.g. by Phone Number or Postal Code) and click OK. The field Name will be auto-populated.
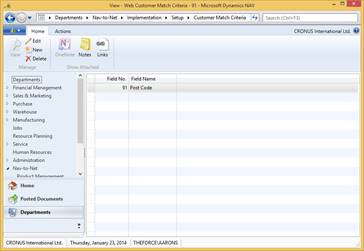
Figure 15 - 4 Web Customer Match Criteria
Once the Web Customer Match Criteria have been setup, customers can be matched using the Customer Matching form.
16.2.3 To Match a Customer on a Web Order
1. Navigate to Departments } Nav-to-Net } Sales } Processing } Web Holding .
2. Click on the order that requires a customer matching. The order should have a blank Bill-to Customer No.
3. Select from the list of customers from the lower form to apply the customer number to the order. Click on the menu button Function and select Apply Customer Number.
4. To process the order in Dynamics NAV, click on the menu button Function and select Process Order. The user type of the new shopper is Regular.

Figure 15 - 5 Customer Matching
16.2.4 To Create a new Customer on no match
1. Open the Customer Matching form.
2. Click on an order that requires a customer matching. The order should have a blank Bill-to Customer No.
3. Click on the menu button Function and select Process Order. A new Customer will be created in Dynamics NAV for the new user and the Customer No. will be applied to the order automatically. The new shopper will be promoted to an Administrator.
16.3 Processing Web Orders
Under the functions button, select Process Order to process the current order only into the sales order tables for Dynamics NAV. Select Process All Orders to process all orders into the sales order tables for Dynamics NAV. A message will be returned after the order(s) is successfully created.
Figure 15 - 6 Order Processing Complete Message
The record is deleted from the web holding table when the sales order is created. The web order number becomes the sales order number in the sales order.

Figure 15 - 7 Dynamics NAV Sales Order
16.4 Nav-to-Net Sales Order
Navigate to Nav-to-Net } Sales } Processing } Sales Orders .
Figure 14-8 Nav-to-Net Sales Order
16.4.1 Nav-to-Net Fields General Tab
Open a Sales Order in
Departments
}
Nav-to-Net
}
Sales
}
Processing
}
Sales Order
by double-clicking on the order. Click on Web Order Detail in the ribbon menu of the Sales Order card.
Clicking the "Nav-to-Net Fields" button on the NAV Sales Order will display the DVPNTN Web Order Details
Page.
Figure 14-8 Sales Order Nav-to-Net fields, General and Payment Tabs
16.4.2
Edit Nav-to-Net Credit Card fields on sales order
In order to edit Credit Cards fields on Sales Order Nav-to-Net fields, click on
Function-> Edit Credit Card.
Figure 14-8 Sales Order Nav-to-Net fields Edit Credit Card Function
Credit Card information can be edited here.
Figure 14-9 Edit Credit Card Info on Sales Order
Note: If the NAV Client sites an error, it is likely the credit card decryption tool was not installed on the specific computer. Please see your NAV administrator.
17 Order History
Orders can be viewed on the website through the Order History link. The first page displayed is the Order Summary page.
![]()
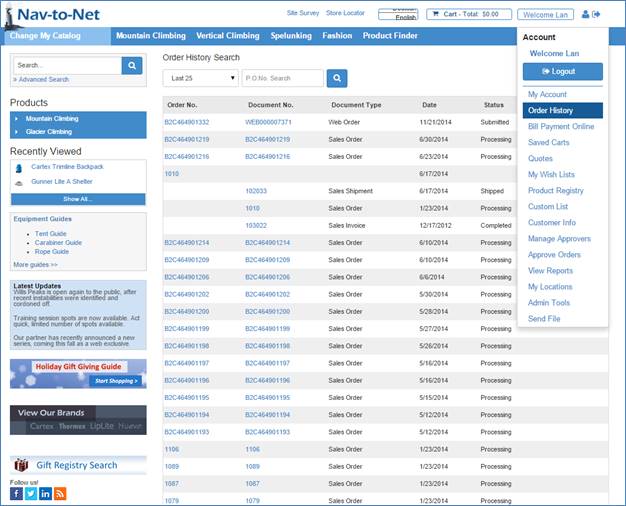
Figure 16 - 1 Order History Summary
There are eight possible statuses:
Submitted: The order has been submitted from the website, but has not yet been processed in Dynamics NAV as a Sales Order. The order details are maintained in the holding tables.
Pending Approval: The order has been submitted from the website, but has not yet been processed in Dynamics NAV as a sales order because manual approval is required. The order details are maintained in the holding tables. (Please refer to Chapter 14.3 for Approver details).
Approved: The order has been submitted from the website, but has not yet been processed in Dynamics NAV as a sales order. Manual Approval has been granted.
Denied: The order has been submitted from the website, but has not been processed in Dynamics NAV as a sales order. Manual Approval has been denied.
Denied and Resubmitted: If an order has been denied manual approval, it can be resubmitted for an approval from the website.
Processing : The order has been processed from the holding tables to the Dynamics NAV sales order tables. The status of the order remains as "processing" for as long as the order remains in the Dynamics NAV sales order tables.
Completed: The order is complete when it has been fully shipped and invoiced and the sales order is no longer in the Dynamics NAV sales order tables.
Cancelled: The order status is displayed as cancelled when the order is deleted from either the holding tables or the Dynamics NAV sales order tables.
For all orders (except cancelled), clicking on the order will bring up the number of Dynamics NAV documents associated with the order.
Clicking on the individual document will open the Order Details page for that Order (see Figure 16-2 ).
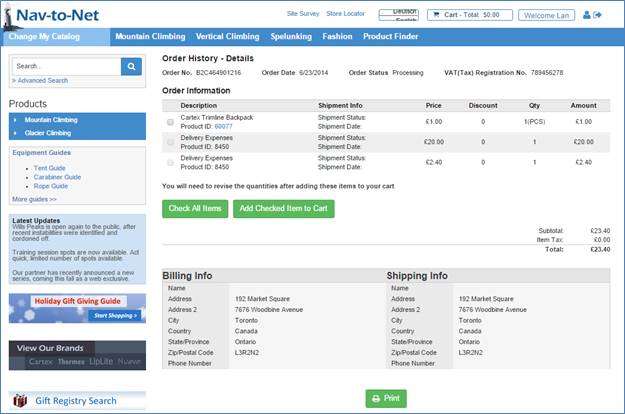
Figure 16 - 2 Order History Details
There are several Types of Documents that are available in the Order History Listing Page. Each document refers to records held in different tables in NAV. Web Order documents in the Order History display Orders that are still in the Web Holding Tables in NAV. Sales Order documents show information on Orders that are held as Sales Orders (in standard Nav-to-Net these will only be Sales records of Type Order as opposed to Quotes, Invoices, Credit Memos or Return Orders).Sales Invoice documents will show records in the Sales Invoices Tables in and NAV and the Sales Shipment documents will show records in the Sales Shipment Tables in NAV.
Each of these documents will display slightly different information about the order to the user of the website. The Order History Details Page for each of these document types will show fields and information specific to that type of document.
Because these documents can potentially include information recently populated in NAV (new Sales Orders, tracking information, etc.) all of the pages displayed here contain information pulled in real-time from NAV.
17.1 Web Order Document
The Web Order Details page will display the lines and header of Orders that have yet to be processed to the Sales Order Tables from the Web Holding Tables (see Section 15 on Managing Orders in Dynamics NAV ).
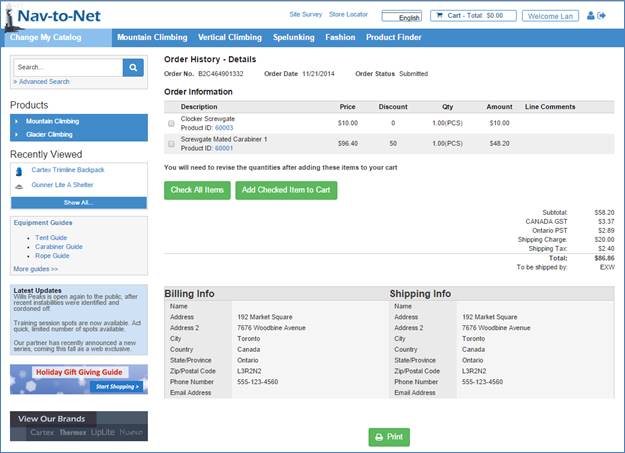
16
-
3
: Web Order Details Page
17.2 Sales Order Document
The Sales Order Document Details Page will display Sales Order records (of Type Sales only) to the website user. These records will include both Orders that were originally created on the website as well as Orders created in NAV from the RTC or Classic Clients, provided the website user has the correct permissions.
The Sales Order and the Web Order Details Pages show the same types of information because the data stored in NAV is nearly identical.
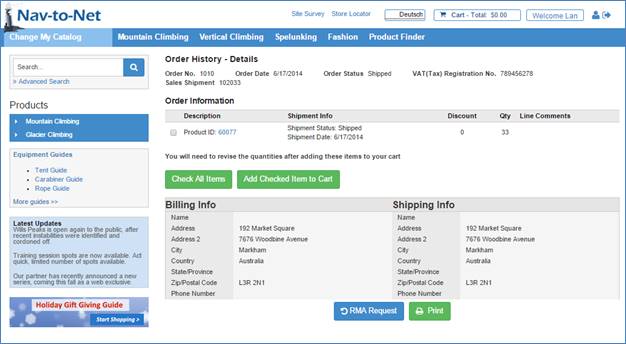
16 - 4 : Sales Order Document Details Page
17.3 Sales Invoice Document
Sales Invoice documents display records that have been posted in NAV from the Sales Order Tables to the Sales Invoice Tables. Because a Sales Order may be partially invoiced, it is possible to see several invoices for every order.

16 - 5 : Sales Invoice Document Details Page
17.4 Sales Shipment Document
The Sales Shipment Document Details Page will show records that have been created during the pick, pack and ship process in NAV. All of the information displayed here originates in the Posted Shipment Tables in NAV. Similar to invoices, several sales shipments can originate from a single Sales Order.
This document is also where a website user can request an RMA (Return Merchandise Authorization).
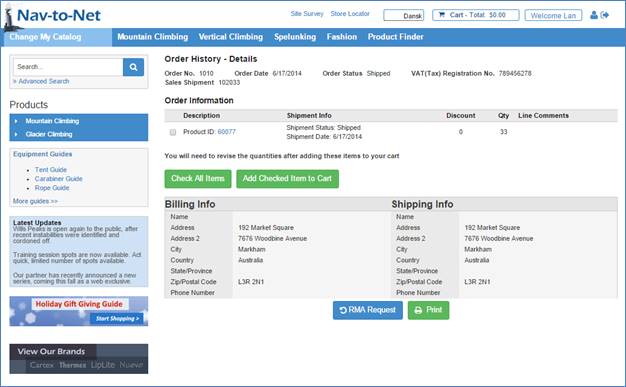
16 - 6 : Sales Shipment Document Details Page
17.5 Adding Items to the Cart from the Order History Details Page
Items are able to be added directly to the Cart from the Order History Details Page for the Web Order, Sales Order and Sales Invoice Documents. Simply click on the checkmark to the right of the Item or Items that are to be added to the Cart. Click the "add items to the cart" button and they will be added. The "check all items" button will set the checkmark to True for all of the Items on the current Order, allowing you to add them all to the cart with only two clicks.
Note: The Item in displayed in the Order History Details page must be currently web enabled in order for the user to be able to add it to the Cart.
17.6 Requesting an RMA
From the Sales Shipment Document Details Page the user is able to click on the "RMA Request" Button. This button will open the page displayed here:
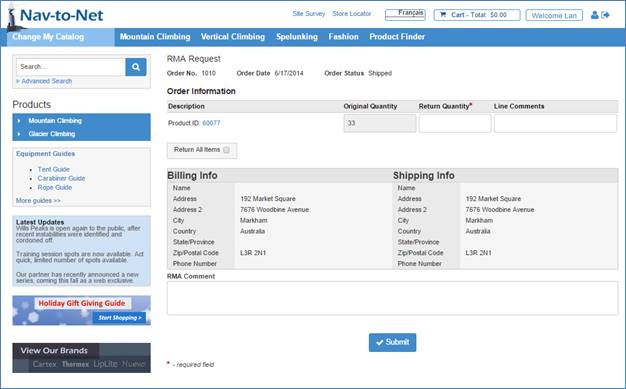
16 - 7 : RMA Request Page
Once a user fills out the request for an RMA on the website the RMA will be sent to NAV. In NAV the RMA Requests can be seen in the Web RMA Request List ( Nav-to-Net } Nav-to-Net } Sales } Processing } Web RMA Holding ).
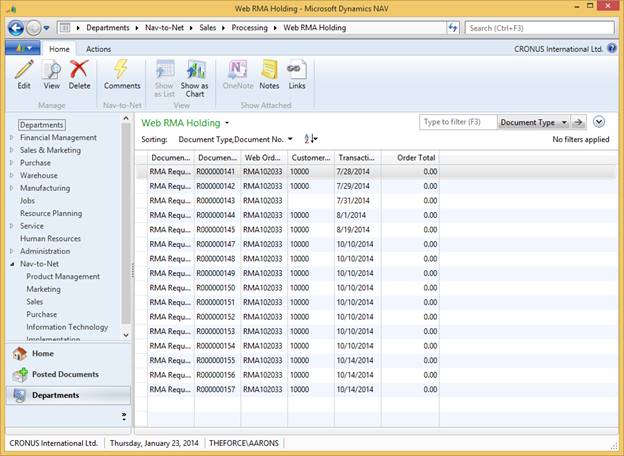
16 - 8 : RMA Request List in NAV
The details of that RMA Request can be viewed by double clicking or opening the Web RMA Request Card. From here the RMA may be "processed" to the Sales Order Tables as a record of Type "Return Order".
Please note: Only the "Make Order" process is provided with sample code for the demonstration of moving web data into the NAV business process. The "Make RMA," "Make Bill Payment," "Make Form Submission Results," "Gift Registry," etc. are all typically the responsibility of the NAV partner to integrate into the NAV business process.
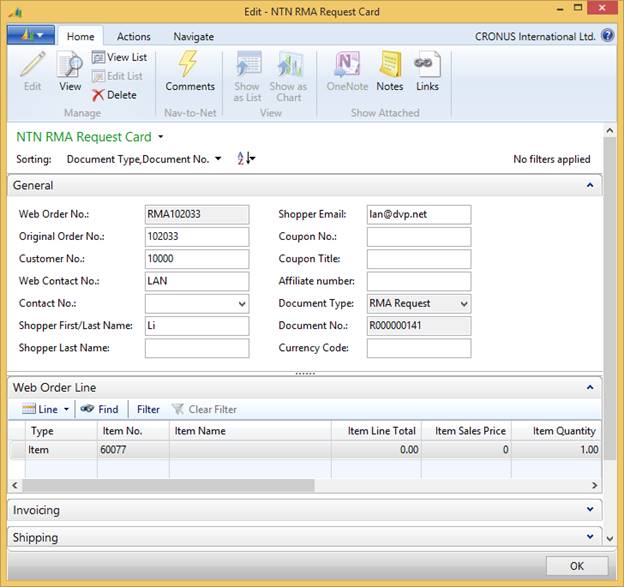
16 - 9 : RMA Request Header in NAV
18 Wishlists
18.1 Personal Wish List
When a customer logs in to the site, they can create a personal wish list. These lists, as well as any items in these lists are only visible to the person that has logged in.
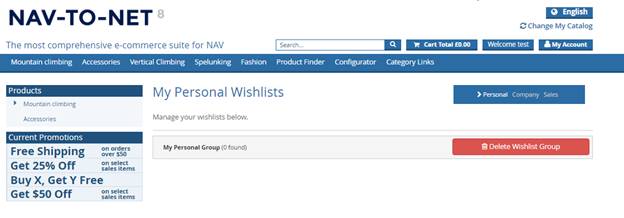
For example, if John Smith (contact 0001 under customer number C0001) creates a personal wish list and adds some items to it, Jane Doe (contact 0003 under the same customer) will not be able to see this list. The same would be true for Jane's personal wish lists.
As these wish lists are personal to the individual that created them, a salesperson, Betty, who is assigned to the same customer would not be able to see the lists.
18.2 Company Wish List
Company wish lists can only be managed by contacts that have the right permissions assigned to them in NAV. These wish lists are visible to all contacts in the same customer as long as they have the permission to do so.
The permissions are:
- FAVORITE_ADD
- FAVORITE_DEL
- FAVORITE_GROUP_ADD
- FAVORITE_GROUP_DEL
Using the same example above, if John creates a company wish list, Jane will be able to see (and modify) the wish list. Salesperson Betty can see his wish list after she's selected the customer, but she will only be able to see the list and the items within. She won't be able to modify them in any way.
18.3 Salesperson Wish List
Last but not least is the salesperson wish list. Only a salesperson can create a salesperson wish list for a customer and they can only create it for a customer they are assigned to. Once a salesperson creates a salesperson wish list for a customer, every contact that has the permission to view salesperson wishlists will be able to see them. Any salesperson wish list Betty creates can only be seen by contacts of that customer, as well as the salesperson once the salesperson has selected the customer. Should the salesperson select another customer, the list will no longer be visible to them.
If Betty creates a salesperson wish list, John and Jane will be able to see the list, and even be able to add the items to their cart directly, but they won't be able to modify the list or its contents in any way as only Betty can. If Betty selects another customer (C0002), she won't be able to see the list she created for C0001. If she creates a salesperson wish list for C0002, John and Jane, who are under customer C0001, will not be able to see that list.
If Betty selects C0001 again, she will be able to see the first list she created but she will no longer be able to see the list she created for C0002 until she selects that customer again.
19 Reports
Nav-to-Net is pre-configured with six commonly used sales reports. The available reports are:
- Accounts Receivable
- Sales Order Status
- Top Customers
- Total Commissions
- Total Commissions by Customer
- Total Sales by Customer
19.1 Viewing and Printing Reports on the Nav-to-Net Website
Reports are available for both Customer Contacts and Salespersons. Salespersons have access to all of the reports available on Nav-to-Net, while the Customer Contacts can only view the Accounts Payable (Accounts Receivable for Salesperson) and the Sales Order Status reports.
To access the reports, click on More Options, View Reports . Select the desired report from the list.
![]()
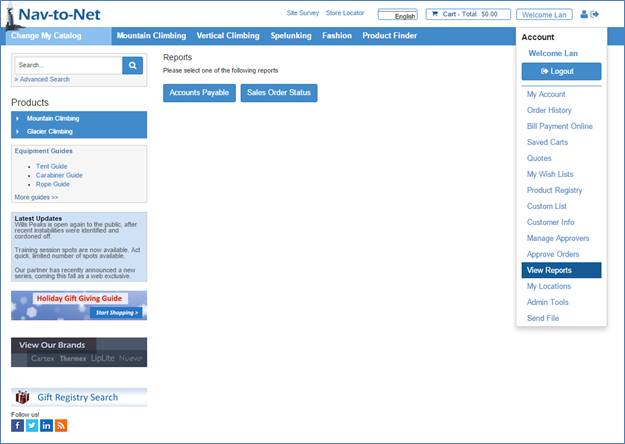 Figure
17
-
1
Nav-to-Net Reports Index
Figure
17
-
1
Nav-to-Net Reports Index
19.1.1 To View a Report
1. Login.
2. Click on the link My Accounts -> View Reports .
3. Click on the desired report.
4. Depending on the report selected, specify the required parameters for the report to be generated (for example, Customer Name, Date Range).
Different reports are available depending upon the permission granted. See the following table for the list of applicable permissions.
|
Function |
Permission Required |
|
View Accounts Receivable Report link and run report |
view and execute the Accounts Receivable (Payable for Customers) Report |
|
View the Sales Order Status Report link and run report |
view and execute the Sales Order Status Report |
|
View the Top Customer Report link and run report |
view and execute the Top Customer Report |
|
View the Total Commissions Report link and run report |
view and execute the Total Commissions Report |
|
View the Total Commissions by Customer Report and run report |
view and execute the Total Commissions by Customer Report |
|
View the Total Sales by Customer Report and run report |
view and execute the Total Sales by Customer Report |
Figure 17 - 2 Salesperson Reports - Table of Permissions
19.1.2 To Print a Report
1. Open the report to be printed.
2. Click on the Printer Friendly Version button. A printer friendly version of the report will be opened in a new window. The report is now ready to be printed using the Print function of the browser.
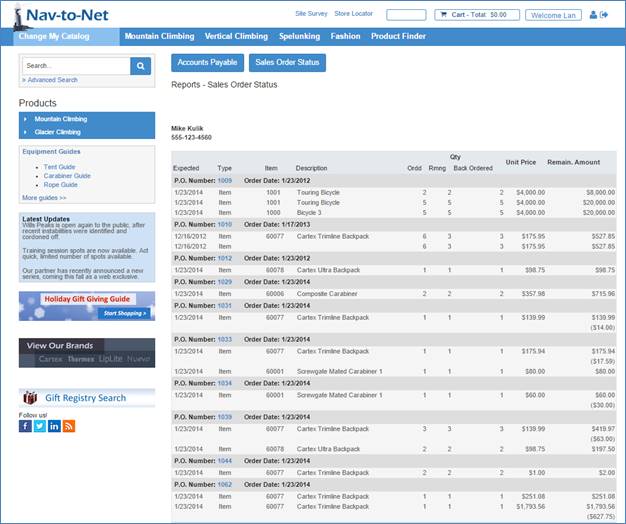
Figure 17 - 3 Nav-to-Net Sample Report
20 Form Submission Generator
Nav-to-Net has the ability to build and customize web forms from within Dynamics NAV. The Nav-to-Net Form
Submission Generator is used to construct and manage these forms. In some cases the location for the web form
will need to be added to a web page or template by development before the template can be constructed and
managed.
Note: To create a new web page that supports a Nav-to-Net Submission Form or modify the location (see
Submission Mapping below) of a form on an existing page, contact DVP or a Nav-to-Net certified integration
partner.
![]()
Figure 18 - 1 : Nav-to-Net Web Form
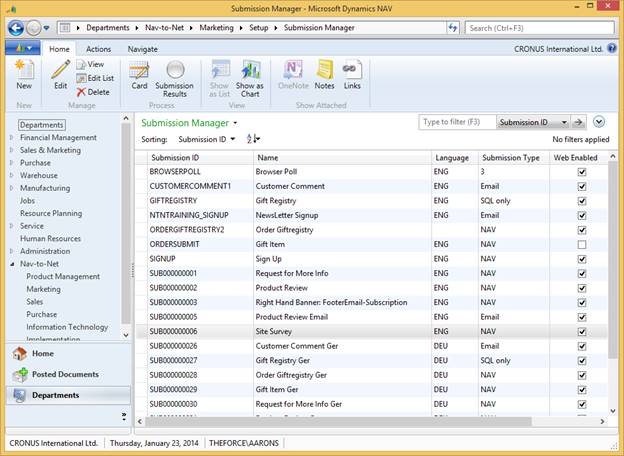
Figure 18 - 2 : Form Submission Management in NAV
In order to open the Submission Manager, navigate to the Submission Manager ( Departments } Nav-to-Net } Marketing } Setup } Submission Manager ). Select an existing Form and click Edit or View.

Figure 18 - 3 : Form Submission Page
20.1 General
The first Group on the Submission Generator defines the general options of the Web Form
Submission ID : This is the ID of your form. If no value is entered, it will be automatically generated based on the number series defined in the Nav-to-Net Setup form ('Submission Nos' under the Number Series tab).
Name : This is the name of your form, which you must enter. It is recommended that a 'friendly' value be used, one that instantly conveys the purpose of the form.
Language : Sets the language of this form. The selectable values are determined by the web languages that have been setup for Nav-to-Net.
Submission Type : This is where you define the method by which the form sends/saves the form information. The options are: Email, NAV, and SQL only.
Stylesheet Class : This is an optional field where a stylesheet class can be defined for the form. Of course, if a value is defined here, then you must have a corresponding entry in the stylesheet used by the web site.
Submission Text : Any text entered here is for internal use only, and is not used in the submission form on the website.
Display Submission Title : This is the text that will appear above your form. If you only intend on having a title appear above the form, then use this field. If you intend on having several (or more) lines of text, then use the Submission Title field instead.
Submission Title : If this field is populated, it will override the Display Submission Title value. In order to populate this field, you must allow the MLTB to be run on your machine.
Display Thank You Message : This is the text that will appear after the form has been submitted. Similar to the Submission Title, this field should only be used if your thank you message will be a single line of text, otherwise, populate the 'Thank You Message' field below this field.
Thank You Message : If this field is populated, it will override the Display Thank You Message value. In order to populate this field, you must allow the MLTB to be run on your machine.
Show Results : Check this box if you want the website to display the information the user filled out once the form has been submitted.
Reusable : Check this box if you wish to allow the form to be visible to the user once they have filled in and submitted the form. If unchecked, the form will only be visible and accessible to a user until the form has been submitted. For example, leave this checkbox unchecked for Survey forms, as you will want to make sure that all surveys submitted are from different users.
Web Enabled : Check this box to have the form visible on the website. While building the actual survey, you should keep this checkbox unchecked.
20.2 Submission Lines
The second Group on this page shows the fields used to define the questions used on the Web Form.
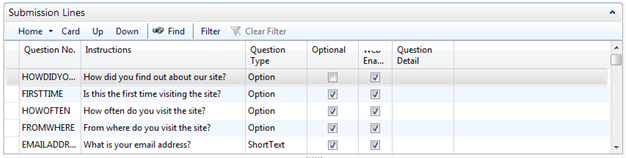
Figure 18 - 4 : Submission Lines
Question No.: This value represents the field name of your question. It will not be shown on the form.
Instructions:
The text that will be shown next to the field on the form in the Form Language defined above.
If the text will contain any HTML, or is to consist of more than one sentence further detail is provided
below.
Question Type:
Short Text : This option is for single line fields. This type should be used for fields such as Name, Address, Phone number, Email Address, etc.
![]()
Long Text : This option is for text boxes. Common uses include Comment boxes.

Score : This option allows you to display one of several types of 'scores', where a user can select a rating.
![]()
Option : This option allows you to display one of several options on the site. Options include checkboxes, dropdown list and radio buttons. The actual type to use on the site will be set later on.
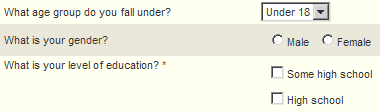
Divider : This option is actually not a question. This option will display a horizontal line, as opposed to a field and label, which can be useful for visually dividing up a large form.
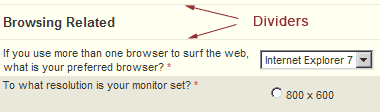
Section Header : This option, similar to the Divider option, displays text only, and is not a question. In the screenshot above, the words 'Browsing Related' is a Section Header.
Boolean : This option is used where a single checkbox will be displayed. An example might be an agreement type checkbox:

Optional: Defines if the question will be required or not.
Web Enabled: Defines if the question will be visible on the active Web Form.
20.2.1 Question Detail
Further Details of a Question can be provided in the Question Detail Page. This page is accessed from the ellipsis in the Question Detail field of the Submission Lines Group. The Submission Question Detail page is divided into four Groups.
The second Page Group, Text , is specific to questions that require information input (e.g. text boxes). The third Page Group is specific to questions that are Option types (e.g. radio buttons, checkboxes, dropdowns) which cover form elements that allow for one or more selections. The fourth Page Group is specific to Score type questions.
When setting up individual questions, values are populated only in one of the second, third or fourth Groups. Data that is filled in for the second, third and fourth sections that are not applicable to the question type will be ignored.
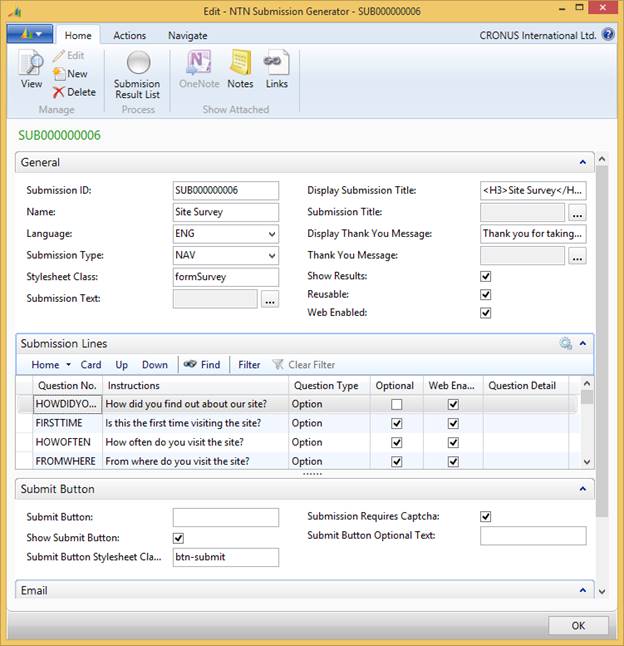
Figure 18 - 5 : Submission Question Detail
Question No. : This field will be pre-populated with the value set in the Form Submission Generator Page window. The value may be edited here as well.
Question Type
: This field will be pre-populated with the value set in the Form Submission Generator Page window. The value
may be edited here as well.
Note: Modifying the
Question Type
may require changing other values in this window.
Instructions : This field will be pre-populated with the value set in the Form Submission Generator Page window. The value may be edited here as well.
Instructions Override : This field, when populated, overrides the Instructions field value. Using the MLTB, this field can hold the value of the field label is longer than several words.
Optional : If checked, this question is optional.
Web Enabled : If not checked, the question will not be displayed on the website.
Presentation CSS : This field can be populated with a value that represents the CSS class name for this question. The class must be defined in the stylesheet used by the website. In the base product, this class is inserted into a table data section (<td class="class value">). This is an optional field.
Hover Message : Any text entered here will show as a tool tip when the cursor is placed over the fields to the right.
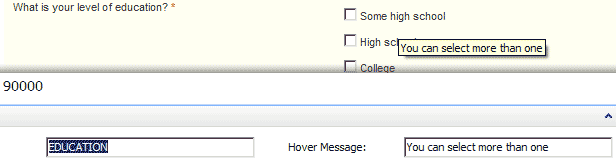
Bold Override : Placing a check in this checkbox will 'bold' the label next to the input field.

Indented : If you wish to have your question indented, check this box.

Color Override : To override the color of the question text, enter a value here. The value can be one of the universally accepted color names, or an HTML hex value (e.g. Green, or 006600). If using a hex value, you do not need to enter the # before the value.
Error Message : This feature is currently not in use, but has been added for possible future use. For now, please ignore it.
Validation Expression : This field allows you to enter a regular expression that is used to validate the characters entered into the field on the website. This value will override the text type entry in the next section.
20.2.2 Text
For fields that fall under the ShortText or LongText types, additional options can be set under this section.
Text Type
: Set the type of text that will be entered into the field on the website. Each of these types is validated
using a different basic regular expression.
For example, choosing the Email option will validate the characters entered, ensuring that a valid email
format is entered.
Min. Characters : This sets the minimum number of characters that must be entered. Enter a whole number only.
Max. Characters : This sets the maximum number of characters that must be entered. Enter a whole number only.
Default Value : In order to pre-populate the field with a value, enter the value here.
Long Text Rows : If the question is a LongText type, the number of rows is defined here, otherwise, leave blank.
Long Text Columns : If the question is a LongText type, the number of columns is defined here, otherwise, leave blank.
20.2.3 Options
Option Presentation Type : Select from one of the following presentation options:
RadioButtons : This will display you option list using radio buttons. When using this option, do not forget to also set the layout option in the field below it. This type should be used when only one answer is required.
![]()
CheckBoxes : This will present your option list with checkboxes next to them. When using this option, do not forget to also set the Option Layout Direction in the field below it. This type should be used when more than one answer can be selected.
Dropdown : This will present your option list in a dropdown format. This type should be used when only one answer is required.
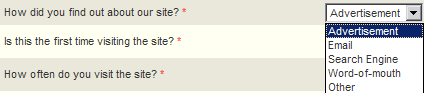
ListView : This will present your option list in a multi-line text area, which allows a user to select more than one answer by using the ctrl key while clicking on each answer.

Option Layout Direction : When the questions users either the RadioButton or Checkboxes Option Presentation Type, select the direction in which the option will be displayed here.
Option List
: The list of selectable options that will appear on the site is defined in this field. If the list of options
is short, the values can be entered in this feild, separated by a semi-colon (;).
If a longer list of options is required, then use the MLTB in the Option List Override field instead.
Option List Override
: This section uses the MLTB to enter the Options List. Text entered here will override any values entered in
the Option List field. The entries must be separated with a semi-colon (;).
Please note that HTML is not supported.
20.2.4 Score
When the question is a Score type question, the options are defined in this Group.
Score Presentation Type :
Select one of the following visual options for the score type:
RadioButton : Use this setting to display radio buttons next to a series of numbers. The numbers displayed will be determined by the value you set in the Score Max field.
![]()
Stars : Use this setting to display stars. When the stars are presented on the website, they will initially appear gray, and will become red as you hover over them. When clicked, they will turn red while the page is refreshed to allow for the rating to be saved.
![]()
Score Max : This setting will determine the number of elements shown for each of the score types, assuming that the Score Increment value is set to 1. For instance, setting this value to 5 will result in 5 stars being shown if Stars is the Score Presentation Type in use.
Score Increment : This setting should be set to 1 if Stars are in use, but can be set to any other whole number for RadioButtons. Please note that the value here must correspond to the value set in the Score Max field. For instance, if the increment value is set to 10, and you want to display 5 options (10, 20, 30, 40, and 50) then the Score Max value must be set to 50.

![]()
Score N/A included : If this checkbox is checked, then an N/A option will be shown at the end of the list of options. Please note that this applies only when the Score Presentation Type is set to RadioButton.

![]()
20.2.5 Upload File
When the question is an UploadFile type question, the options are defined in this Group.

Allow File Extensions: This setting should be set to 1 if Stars are in use, but can be set to any other whole number for RadioButtons. Please note that the formatting for the Allow File Extensions is EITHER Bmp|jpg|png Or .bmp|.jpg|.png.
If no file extensions are defined for the submission upload, it will use the list defined by the following language tag:
_SUBMISSIONFORM_DEFAULTUPLOADFILEREGULAREXPRESSION
Current value of this tag is:
jpg|gif|png
20.3 Submit Button

Submit Button Text : Defines the image to be used for the form submission button. Specify the full URL of the image. E.g. http://www.yoursite.com/images/submit.png
Submit Button Visible : If this is a standard standalone form, then make sure that this checkbox is checked. If this form is part of a larger form (e.g. functioning as an additional form element on an existing page), then leave this checkbox unchecked. If this option is checked, the Submit button defined in the Submit Button field will be displayed.
Submitted Stylesheet Class : Sets the class name for the submitted form. This is the class used when the option to display the results of the submitted form is enabled. If this field is populated, the value of this field must correspond to a class in the stylesheet used by the website.
Require Captcha : If you want to prevent automated responses to your forms, then check this box to have a Captcha image displayed below the form (and just above the submit button). This setting will prevent the form from being submitted unless the characters displayed in the Captcha image are correctly entered.
![]()
Submit Button Optional Text : In order to display text above the Submit Button, enter that copy in this field. Some examples for this text include disclaimers and reminders of what is being submitted.
20.4 Email
Send to Email List : Defines the email address of the form recipient.
Send to Email List Override : If the number of recipients for the submitted form is more than one, then define the recipients here. Separate the email addresses using a semi-colon (;).
Instruction after Submission : This value is used for the title text that appears after the form is submitted. This text is only displayed when the form being submitted is not a standard form (e.g. the form does not use a submit button, but is part of an existing page. The contents of the form are passed through the parent page when the primary page posting is performed.)
Instruction Override after Submission : This value, when populated, overrides the value of the Instruction after Submission text, and uses the MLTB to create longer text entries.
20.5 Submission Mapping
In order to view the submission form on the website, a mapping between the website and form needs to be created. Please note that when you create a submission form, there is no default relationship to any existing website.
Go to Departments } Nav-to-Net } Setup } Website List
Next, click on the Submission Page Mapping link at the top of the window.
![]()
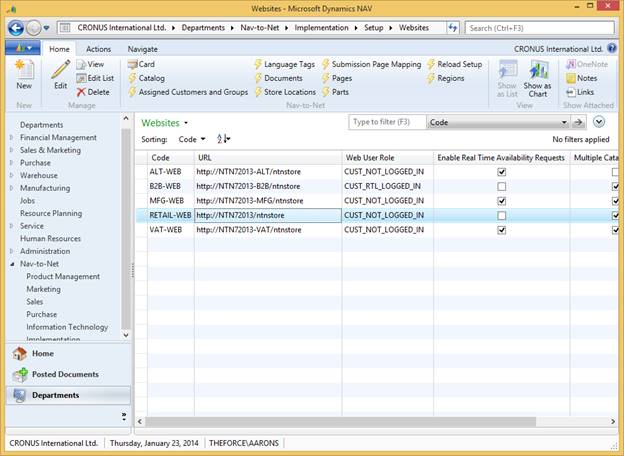
Figure 18 - 6 : Submission Page Mapping Selection for RETAIL-WEB Website

Figure 18 - 7 : Mapping of the Site Survey Form to the RETAIL-WEB Website
Page Name : Determine where on the web site your form will be shown and enter the name of the web page file, including the extension in the Page Name field.
Page Location : Enter the value associated with the location the form is to be displayed on the Web Page.
Submission : The No. value (primary key) of the Nav-to-Net Submission Form to be displayed on the web page.
Submission Name : Name of the Nav-to-Net Submission Form.
Start Date : The date the form will become active.
End Date
:
The date the form will become inactive.
Note: If the form is to remain active indefinitely, leave the
End Date
value
blank
.
Login : When TRUE, the form will be restricted to users that are logged into your site.
Web Enabled : Enables the form on the selected Website.
Language Code : Defines the display of the Submission Form for the user selected Website Language.
20.6 Viewing Submitted Form Data
There are a number of options available for viewing and collecting form submissions. The supported methods are: Email, saved to SQL, saved to NAV.
Viewing Email Submissions
If the form has been set to send submissions by email, then submitting the form on the website will send an email to the recipient defined (see Section 18.4 - Email for more information). If the email is not received submitting a form, check to see that other email functions are working on your website (e.g. forgot password).
Viewing Submissions in SQL
Open the contents of the following two tables in the SQL database used by the website:
- DVPSTORE_SUBMISSION_HEADER_LOG
- DVPSTORE_SUBMISSION_LINE_LOG
![]() Viewing NAV Submissions
Viewing NAV Submissions
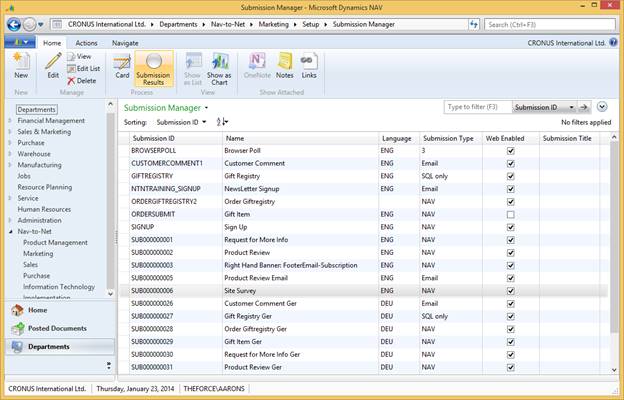
Figure 18 - 8 : Selecting a Submission Form to view Results On
If the form has been setup to save to NAV, view the results by opening the DVPNTN Submission Page List; go to Departments } Nav-to-Net } Setup } Submission Manager .
Select a submission form that was setup to save results to Dynamics NAV. Click on the Submission Result List link at the top of the window.

Figure 18 - 9 : Selecting a Submitted Form to Review Results Upon
Select a line and Click "View" or double-click any of the lines to view the details.
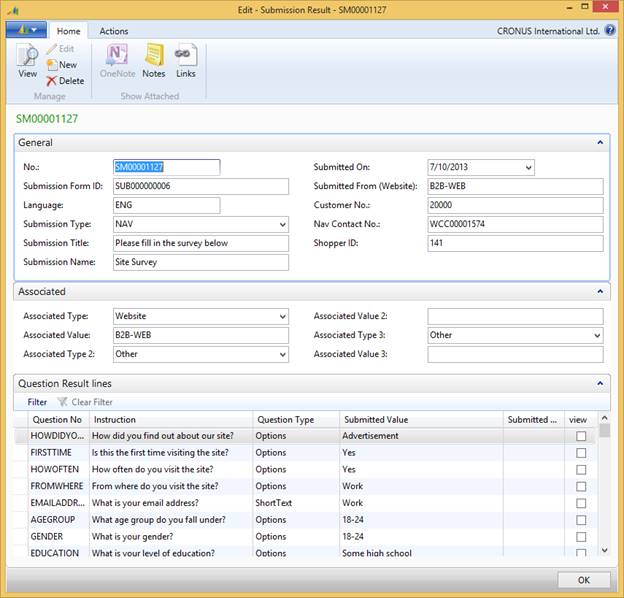
Figure 18 - 10 : Details of a NAV Submitted Form
Alternatively, if the form has been constructed by a Certified Nav-to-Net Implementation Partner to send submissions associated with one of the supported types (Customer or Order) then the submissions can be obtained through the related NAV Page. For example:
![]() Customer:
Customer:
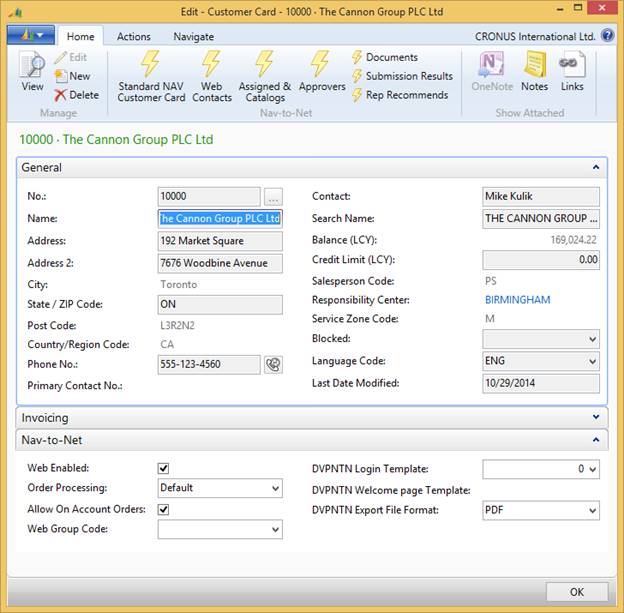
![]() Web Holding table
(List view):
Web Holding table
(List view):
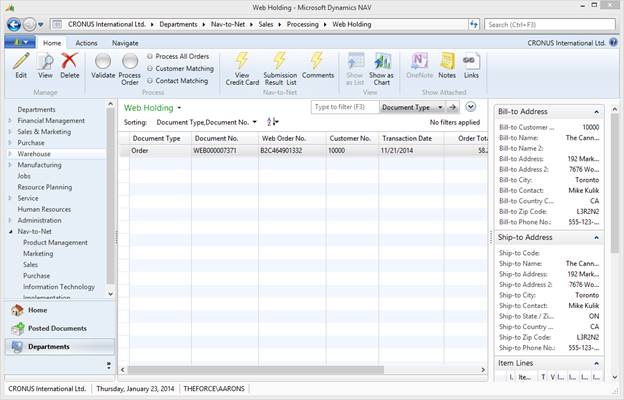
Figure 18 - 11 : Viewing Form Submitted Data related to an Order
Web Holding table (Record view):
Figure 18 - 12 : Viewing Form Submitted Data related to an Order
20.7 Adding a Form Submission Automatically to an NTN Page
A Submission Form can be mapped to any NTN Web Page without any need to change any web code.
1) Go to Departments -> Nav-to-Net -> Marketing -> Setup -> Pages. Create a NTN Web Page (see section 22 - Nav-to-Net Pages). Make note of the page name, such as "CONTACT-US"
2) Go to Departments -> Nav-to-Net -> Marketing -> Setup -> Submission Manager. Create a Submission Form. Make note of the Submission ID, such as "CONTACT-US-FORM"
3) Go to Departments -> Nav-to-Net -> Implementation -> Website. Select Submission Page Mapping from ribbon
4) Create a mapping where:
a. Type = Page
b. Page Name = the name of the page from Step 1 (CONTACT-US)
c. Page Location = "top" or "bottom". This will control if the submission form appears before or after the page content.
d. Submission ID = The Submission ID from Step 2 (CONTACT-US-FORM)
e. All other fields as per normal.
The submission form will now appear on that page.
21 Nav-to-Net Pages
Nav-to-Net Pages are an easy way to create static content pages without having to rely on a specific template.
To create a new web page with a URL that is independent from the Nav-to-Net Category structure, open Pages under Nav-to-Net Setup ( Departments } Nav-to-Net } Marketing } Setup } Pages ).
Figure 19 - 1 : Nav-to-Net Pages
The fields that define a Nav-to-Net Page are:
Page ID : Dynamics NAV Code field populated by a number series.
Page Name : The Page Name is required to be populated when creating a new page. Choose a name that adheres to appropriate standards for URLs as the Page Name will define the URL for that new page.
Website : The Nav-to-Net Website this page will belong to.
Template : If a particular custom template is to be used for a page, it can be defined here. By default, no template is necessary.
Security : This Boolean field, when TRUE will require that the website shopper be logged in in order to see the new Nav-to-Net Page. If FALSE, the Nav-to-Net page will be visible to all website users (in a B2C configuration).
Wen Enabled : This Boolean field, when TRUE will allow the page to be available on the website.
Document Management : Used to define the content of the Nav-to-Net Page.
The Document Management for Nav-to-Net Pages follows the standard across the rest of the Nav-to-Net Solution. Simply add HTML content to a Content Reference of EXTENDED DESCRIPTION (by default) - see Figure 4-13 for an example.
The URL of the new Nav-to-Net Page will include the Name of the Page. Typically the URL will include the string " domain /page.aspx?name= Page ", where domain is the formal domain name of the website and Page is the title of the Nav-to-Net Page.
Figure 19 - 3 : A new Nav-to-Net Page Titled "About-Us"
Figure 19 - 4 : Newly created Nav-to-Net Page with the URL "…/page.aspx?name=Sample"
22 Inventory Availability
22.1 Inventory Status: Dynamics NAV User Interface
The user can view the values used to determine web inventory on the Nav-to-Net tab of the Nav-to-Net Item card or the Nav-to-Net menu option on the Item Card. The Nav-to-Net Item Card is accessible from the Dynamics NAV Item Card. The General tab displays the Quantity on Hand, Qty. on Purch. Order, Qty. on Sales Order, and Qty. on Web Order fields.
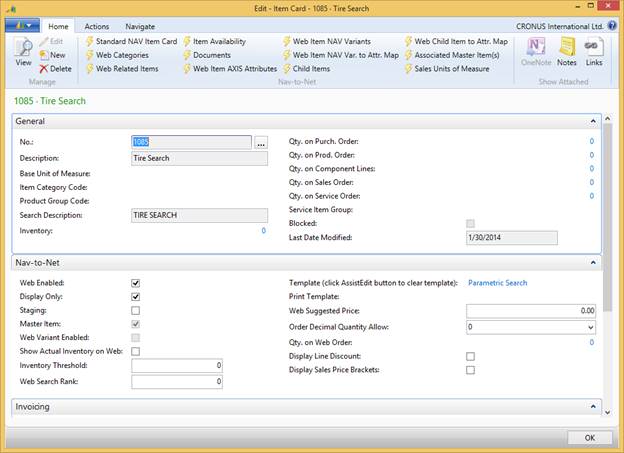 Figure 1-2
on page
11
Figure 1-2
on page
11
Show Actual Inventory: If this field is checked, the web inventory will be displayed as a quantity if it is below the Threshold Value. Each change to the web inventory, when it is below the threshold, will be synchronized to the website. If this field is unchecked, the actual number of items available is not shown.
Inventory Threshold: The value in this field sets the inventory threshold quantity. When the Show Actual Inventory field is checked, this value represents the point at which the web inventory is no longer synchronized to the website and the message "More than <threshold value> in stock" is displayed to the user. When the real time inventory field is not checked, the threshold value has multiple purposes:
1. If the web inventory drops to a value below the threshold, the availability status on the website is displayed as "limited" rather than as "available". (Should the web inventory drop to less than or equal to zero, the availability status is displayed as "backordered".) These values, while fixed in Dynamics NAV and SQL are in fact language tags on the site. This makes it easy to change the display to the user. For example, if you wanted the site to say "unavailable" instead of "backordered", the only change necessary is to change the language tag or label used to describe the status of "backordered" on the website. If you did not want to display a quantity of limited, but still wanted to use the threshold value, you could change the language used to describe the status of "limited" to "available.
2. If the quantity ordered by the user is greater than the threshold, the shopping cart queries Dynamics NAV to determine if there is sufficient stock to fulfill the order. In the case where the web inventory is 7 and the threshold value is 5, the status on the website is "available". If the user were to order 6, the status would remain as available. But if I were to order 8, the status would be unavailable.
To see the current web inventory last synchronized to the website, open that Item from the Nav-to-Net } Content } Item List ; select: Related Information } Item } Nav-to-Net } Item Availability .
 Figure
20
-
1
: Item Availability Table, Showing Availability
Figure
20
-
1
: Item Availability Table, Showing Availability
The Inventory Availability table stores the current web inventory and status for each web enabled item. Each time a value is changed, whether it be the Web Inventory quantity itself, the Status, the Threshold value or the Show Actual Inventory indicator, Dynamics NAV determines whether the record needs to be synchronized to SQL or not. In most cases, a change to this table would require a sync in order for the website to be up to date. We only need to sync the availability record for that item if the status actually changes. For example, if a threshold inventory value is 5 and web inventory is 20, a drop to 19 isn't going to change the status from "available". Therefore, the record does not need to be synchronized. By reviewing each change, the synchronizations to the website are kept to a minimum.
If the Web Enabled field or Threshold value or Show Actual Inventory field on the item card are modified, the record in this table is modified and synchronized to the website.
There are multiple functions in Dynamics NAV that alter inventory availability. Rather than modify multiple code units in Dynamics NAV, DVP has created code that calculates the web inventory and determines if a change to the item availability table is necessary. This code runs on a timer. Each time the code runs, it looks through a number of inventory records, starting where it left off the last time. The length of time between each tick of the timer and the number of records it looks at each time can be set by the user in Nav-to-Net Setup.
22.2 Inventory Status on Product Details page
The Product Details page displays the Inventory Status in either Show Actual Inventory Mode or Threshold Mode as follows:
|
Web Inventory |
Displayed on Product Details page |
|
> = threshold |
available |
|
> 0 but < threshold |
# left (where # is the actual inventory available) |
|
< = 0 |
Back Ordered |
Figure 20 - 2 : Show Actual Inventory Availability
Threshold Mode:
|
Web Inventory |
Inventory Status |
Standard tag value |
|
> = threshold |
Available |
Available |
|
> 0 but < threshold |
Limited |
Limited |
|
< = 0 |
Back Ordered |
Back Ordered |
Figure 20 - 3 : Threshold Availability
![]()
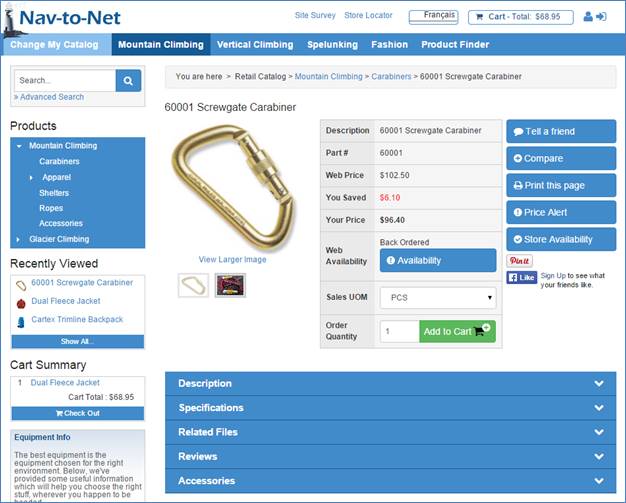
Figure 20 - 4 : Inventory Status Shown on Product Details Page: "Back Ordered"
22.3 Inventory Status in the Shopping Cart
Show Actual Inventory Mode:
The website never requests a Dynamics NAV inventory status for items configured in Show Actual Inventory mode. For these items, shopping cart Availability will be displayed as follows:
|
Qty Ordered vs. Web Inventory |
Inventory |
Inventory status |
Standard tag value (Availability) |
|
Qty < = Inventory |
> 0 |
Available |
Available |
|
Qty > Inventory |
> 0 |
Available |
Partial |
|
N/A |
< = 0 |
Back Ordered |
Back Ordered |
Figure 20 - 5 : Availability in Shopping Cart - Show Actual Inventory
Threshold Mode:
The website will place a request for an inventory status to Dynamics NAV in certain circumstances. The table below lists the possible use cases based on the three (3) values being compared (shopping cart item quantity ordered , item's threshold and inventory status ).
|
Use Case |
Qty Ordered vs. Item threshold |
Inventory Status |
Inventory Request to NAV? |
|
C1 |
Qty Ordered <= Item threshold |
Available |
No |
|
C2 |
Qty Ordered < Item threshold |
Limited |
Yes |
|
C3 |
Qty Ordered < Item threshold |
Back Ordered |
No |
|
C4 |
Qty Ordered > Item threshold |
Available |
Yes |
|
C5 |
Qty Ordered >= Item threshold |
Limited |
No |
|
C6 |
Qty Ordered >= Item threshold |
Back Ordered |
No |
Figure 20 - 6 : Availability Cases
The website displays the language tag associated with the interim value returned in the shopping cart.
If there is no timely response from Dynamics NAV, availability will be displayed in the shopping cart based on the existing availability status.

Figure 20 - 7 Availability Status in the Shopping Cart
22.4 Inventory Availability Synchronization
In the following circumstances inventory availability will synchronize automatically from Dynamics NAV to SQL:
1. An item is web enabled
2. The Show Actual Inventory flag on the item card is checked on
3. The Inventory Threshold value is changed on the item card
4. An Update Inventory Status report is run.
If item inventory status is changed (for example, from Available to Limited), the system waits for the timer. The timer checks 99 (this value is configurable in Nav-to-Net setup) records in the Inventory Availability table each time. If the item inventory status is changed (since the last time the inventory was compared), it will update the record in the Inventory Availability table, then synchronize the record to SQL.
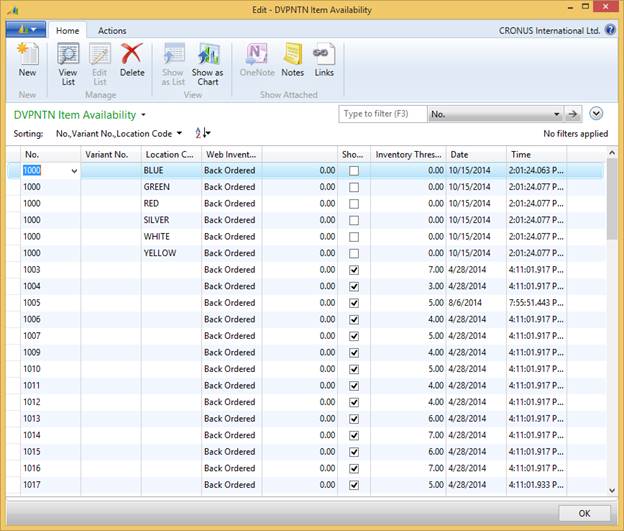
Figure 20 - 8 : Inventory Availability Table
The following tables illustrate the triggers for availability messages on the website when browsing or viewing items. Once items have been placed in a shopping cart, availability may be affected, depending upon the quantities ordered.
22.5 Show Actual Inventory
The website has the ability to show either an Inventory Status or an actual Inventory Value.
When "Show Actual Inventory on Web" feature is turned off ( Departments } Nav-to-Net } Product Management } Setup } Items (NTN) ) the value in the "Inventory Threshold" field will be used to determine which Inventory Status message to display.
|
Inventory Availability |
Message on Website |
|
Web inventory is less than or equal to 0 |
Back Ordered |
|
Web inventory is equal to or greater than 1 and is less than threshold |
Limited |
|
Web inventory is equal to or greater than threshold |
Available |
Figure 20 - 9 : Inventory Availability - Show Actual Inventory Off
If "Show Actual Inventory on Web" is checked, the value in the "Inventory Threshold" field will be used to determine when the actual inventory quantity will not be displayed, but rather a message of "Available".
Show Actual Inventory Checked
|
Inventory Availability |
Message on Website |
|
web inventory is less than or equal to 0 |
Back Ordered |
|
web inventory is equal to or greater than 1 and is less than threshold |
# left (where # is the actual inventory available) |
|
Web inventory is equal to or greater than threshold |
Available |
Figure 20 - 10 : Inventory Availability - Show Actual Inventory On
22.6 Configuring Inventory Availability
There are three primary areas of configuration for Inventory Availability.
Item: As described above there are several values against the Item that define Inventory availability for each specific Item.
Website: On the website level the configuration values define how Availability is displayed, if at all and how Location based availability behaves.
Nav-to-Net: On the entire solution level, the configuration values define how Inventory is synchronized between NAV and enabled websites.
22.6.1 Item
See Section 20.1 on page 225 for details.
22.6.2 Website
Display Inventory: On the Product Details section of the Item/Category Group of the Website Setup card is a checkmark to Display Inventory. When this checkmark is True, Inventory availability, either actual inventory availability value or inventory availability status will be displayed. When False, the Inventory Availability line on the Item Details Page will be hidden.
My Store Display: Nav-to-Net has the ability to display Inventory Availability by individual NAV Location. For more information on setting up the display of Inventory Availability by Location see Section 21.2 - Location Based Inventory Availability . On the My Location section of the Customer/Shopper Group of the Website Setup Card, My Store Display will enable or disable the ability for Website shoppers to select a specific Nav-to-Net Store Location to use for Inventory Availability.
None: No ability to select Location-specific availability will be presented to the user
User Initiated: The Location-specific availability will be shown after the user selects a particular Location. Notice the dropdown in Figure 20-11 with the right hand buttons.
Auto: The Location-specific availability will be shown immediately upon the load of the Product Details Page
![]()

Figure 20 - 11 : My Store Display: Auto
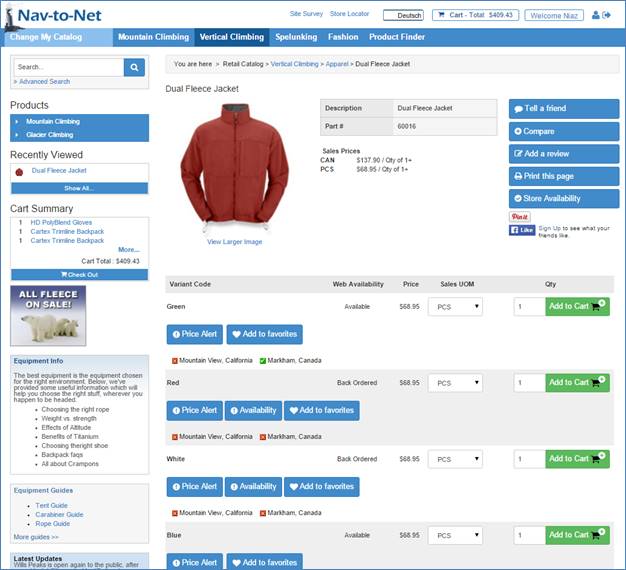
Figure 20 - 12 : My Store Display: User Initiated
Max Number of Locations: This Integer value dictates the number of Nav-to-Net Store Locations that a website shopper may select on the Store Locator Page.
Availability Source Type: When retrieving availability information, the website can present Inventory Availability from the synchronized Web Inventory Availability Table, or retrieve real-time data from NAV.
NAV: Every time a user views pages in Checkout or the View Cart Page, the website may request real-time inventory data from NAV.
SQL: Inventory availability in the View Cart and Checkout pages will not retrieve real-time inventory data. The Inventory values will be retrieved from the Nav-to-Net SQL database, as the rest of the website does.
Note: Most of the website's pages, Search Results, Item Details Pages, Category Listing Pages, etc., do not request Inventory Availability in real-time and will retrieve inventory availability from the Nav-to-Net SQL database.
22.6.3 Nav-to-Net Setup
Enable Locations in Inventory Calc.: Under the General Group of Nav-to-Net Setup there is an Inventory Section. Here you may enable the feature to separate Inventory Calculation by NAV Location.
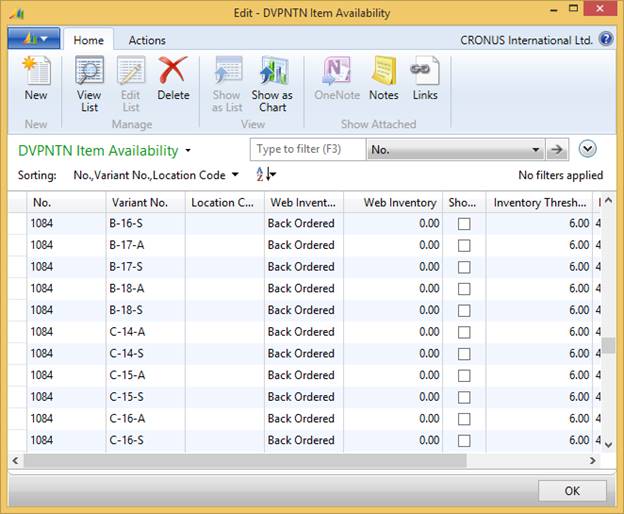
Figure 20 - 13 : Sample Variant Item without Inventory Including Location
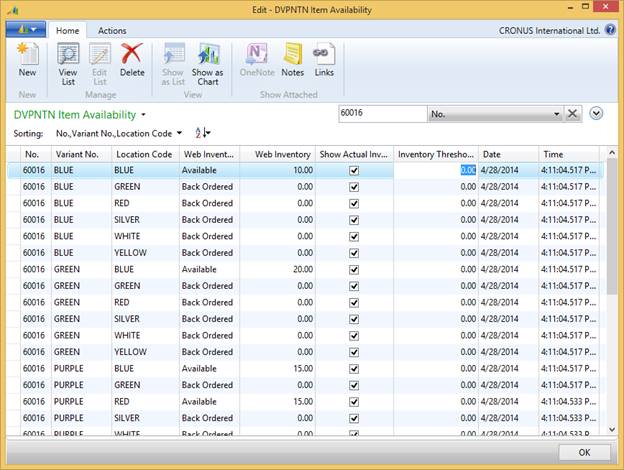
Figure 20 - 14 : Sample Variant Item with Inventory Including Location
Sync Inventory: In the Advanced Settings section of the Synchronization Group, Sync Inventory enables the synchronization out, from NAV, the Web Inventory Availability values to the Nav-to-Net SQL DB. Default setting is True.
Sync. Timer (s): The time period, in seconds, the NAS will use to "poll" inventory values. For more information, please contact your Nav-to-Net Implementation Partner.
Inventory Sync. Block Size: The number of Items, the NAS will "poll" for inventory information at each tick of the timer. For more information, please contact your Nav-to-Net Implementation Partner.
22.7 Inventory Status Validation Routine
Within the Item Availability NAV Page, on the Ribbon, there is a Validate Selected Inventory menu option. This is to be used when there is a need to validate the calculated web inventory values within NAV. The validation routine uses the same functions that are used to calculated the web inventory.
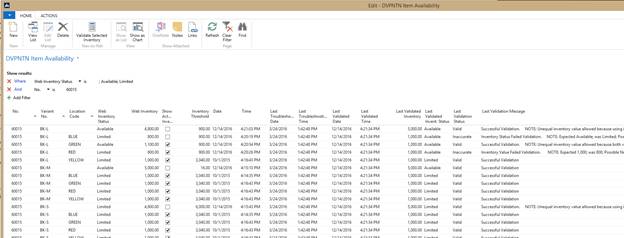
The routine populates the following fields:
Last Validated Date: This is the last date the Validate Selected Inventory Routine was executed.
Last Validated Time: This is the last time the Validate Selected Inventory Routine was executed.
Last Validated Inventory: This is the calculated inventory value the last time the Validate Selected Inventory Routine was executed.
Last Validated Invent. Status: This is the calculated inventory value the last time the Validate Selected Inventory Routine was executed.
Last Validation Status: This is the calculated inventory status the last time the Validate Selected Inventory Routine was executed.
Last Validation Message: This is a message to the NAV user as part of the comparison of the current web inventory levels against the last Validation levels. Possible Messages (and their meanings) are below:
Successful Validation: This means that Inventory Status AND the Inventory Values matched perfectly between the current Inventory and the Validation of the Inventory.
Successful Validation. NOTE: Unequal inventory value allowed because using inventory statuses (NOT using Real-Time Inventory): This is NOT considered a validation failure. This means that because real-time inventory is NOT in use AND and since the inventory status did not changed, then the website does not need to know of that change. (Excessive writing to tables, and excessive synchs otherwise). For example, the statuses were both Limited, but both values are still in the Limited range.
Successful Validation. NOTE: Unequal inventory value allowed because both values are under 0 OR both values are over the Inventory Threshold: This is NOT considered a validation failure. This means that because real-time inventory is in use AND the inventory status did not changed for Backordered or Available, then the website does not need to know of that change. (Excessive writing to tables, and excessive synchs otherwise). For example, the statuses were both Backordered, but both values are still in the Backordered range.
Inventory Status Failed Validation. NOTE: Expected %1; was %2; Possible NAS synch issues (inventory synch off; paused/disabled nas; nas service stopped...): This means the Inventory Statuses were mismatched. This can happen for a number of reasons, such as:
- NAS services stopped, was set to pause, set to disabled
- Inventory synchronization is turned off
- While possible, but less likely: Inventory change was too recent and the Inventory synch function has not addressed the change yet
Inventory Status Failed Validation. NOTE: Expected %1; was %2; Possibly fine; requires more time. (Synch cycle not completed; pending synchronization) This means the Inventory Statuses were mismatched. This can happen for a number of reasons, such as:
- Inventory change was too recent and the Inventory synch function has not addressed the change yet
- NAS services stopped, was set to pause, set to disabled
- Inventory synchronization is turned off
Inventory Value Failed Validation. NOTE: Expected %1; was %2; Possible NAS synch issues (inventory synch off; paused/disabled nas; nas service stopped...): This means the Inventory Values were mismatched. This can happen for a number of reasons, such as:
- NAS services stopped, was set to pause, set to disabled
- Inventory synchronization is turned off
- While possible, but less likely: Inventory change was too recent and the Inventory synch function has not addressed the change yet
Inventory Value Failed Validation. NOTE: Expected %1; was %2; Possibly fine; requires more time. (Synch cycle not completed; pending synchronization) : This means the Inventory Values were mismatched. This can happen for a number of reasons, such as:
- Inventory change was too recent and the Inventory synch function has not addressed the change yet
- NAS services stopped, was set to pause, set to disabled
- Inventory synchronization is turned off
Invalid Item: This means that the item referenced within the Inventory Synchronization table is no longer a valid item within the NAV Item Table.
Invalid Variant: This means that the variant for the item referenced within the Inventory Synchronization table is no longer a valid item within the NAV Item Table.
Invalid Location: This means that the location for the item referenced within the Inventory Synchronization table is no longer a valid item within the NAV Item Table.
22.8 Inventory Status Troubleshooting Date/Time
Troubleshooting Date and Times can be enabled by setting the Value of Enable Inventory Troubleshooting Date within the Nav-to-Net Setup Card. Under normal circumstances this setting should be NOT checked. When the above setting is checked, the NAS will enter the date and time within the Last Troubleshooting Date and Last Troubleshooting Time fields within the NTN Item Availability Table.
23 Nav-to-Net Store Locations
Nav-to-Net Store Locations allow for site administrators to display information about physical store locations on the website and allow users to search for these locations geographically. Nav-to-Net Store Locations may be associated to Standard NAV Locations for Inventory Availability purposes.
Figure 21 - 1 : Nav-to-Net Store Locations on the Website
To manage Nav-to-Net Store Locations navigate to the Store Location List Page in the RTC ( Departments } Nav-to-Net } Setup } Store Locations ).
Figure 21 - 2 : Nav-to-Net Store Location List Page
Click Edit or New to modify or create a new Nav-to-Net Store Location.
Figure 21 - 3 : Nav-to-Net Store Location Page
No. : Primary Key. This value is auto-populated by a No. Series upon record creation.
Website Code : The Nav-to-Net Website this Store Location will be associated with.
Location Type : Nav-to-Net Locations may be one of three types
Pickup - typically used to define physical locations that are pick-up only and have no retail front
Store - typically used to define physical locations that can service retail customers
Dealership - typically used to define physical locations that service B2B customers
*Please note, these location types are for descriptive purposes only and may be repurposed to any website requirement.
Name: Name displayed on the website for this Nav-to-Net Store Location.
Address: Address Line One displayed on the website for this Nav-to-Net Store Location.
Address 2: Address Line Two displayed on the website for this Nav-to-Net Store Location.
City: City displayed on the website for this Nav-to-Net Store Location.
Country: The Country displayed on the website for this Nav-to-Net Store Location. This will need to be a Web Enabled Country in order to be searchable on the website.
State / Province: The State or Province displayed on the website for this Nav-to-Net Store Location. This will need to be a State / Province related to a Web Enabled Country in order to be searchable on the website.
Zip Code: This will be the Zip / Postal Code displayed on the website for this Nav-to-Net Location.
Phone: This will be the Phone Number displayed on the website for this Nav-to-Net Location.
Fax: This will be the Fax Number displayed on the website for this Nav-to-Net Location.
Email: This will be the Email Address displayed on the website for this Nav-to-Net Location.
Contact: This will be the Contact Name displayed on the website for this Nav-to-Net Location.
GPS Coordinate Latitude: This will be the GPS Coordinate Latitude of the Nav-to-Net Location. This field is intended to be used for a custom social / Bing / Apple Maps application.
GPS Coordinate Longitude: This will be the GPS Coordinate Longitude of the Nav-to-Net Location. This field is intended to be used for a custom Google / Bing / Apple Maps application.
Website URL: This will be the Email Address displayed on the website for this Nav-to-Net Location.
Web Enabled: When set to TRUE, this Nav-to-Net Store Location will be visible on the website.
NAV Location Code: Setting this field will associate a Nav-to-Net Store Location with a NAV Location Code. This Nav-to-Net Store Location will then be able to be used by the Website Shopper to determine Item Availability as well as select for Pickup in Checkout.
23.1 Nav-to-Net Store Location Document Management
In addition to using the simple text fields above to populate information about the Nav-to-Net Store Location, Nav-to-Net Document Management can be used to create HTML content. This content may be managed in multiple languages and hold extended HTML and imagery, unlike the simple text fields above.
Text Content
Nav-to-Net Store Location Document Managed Text Content includes
Location Hours of Operation
Location Description
Location Direction
Location Map Link
Location Name
Image Content
Nav-to-Net Store Location Document Managed Image Content includes
Location Image
Location Logo
Location Map Image
23.2 Location Based Inventory Availability
Nav-to-Net is able to show inventory availability as an aggregate of all inventory, i.e. a sum of Quantity on Hand for all Locations, or show inventory availability at each Location individually. This feature is enabled in Nav-to-Net Setup, see section 20.6.3 on page 236 for more information.
To allow a Website Shopper to select a Location to view Inventory Availability, the NAV Location must be Web Enabled and related to a Nav-to-Net Store Location. On the Locations (NAV) Card, select the Navigate Tab and click the NAV Locations button.
Figure 21 - 4 : Location s (NAV) List
On the Nav-to-Net NAV Location List Card the NAV user may select which standard NAV Locations will be Web Enabled, making them available to the website for use.
On the Nav-to-Net Store Locations Card, select a NAV Location to associate with the Nav-to-Net Store Location.
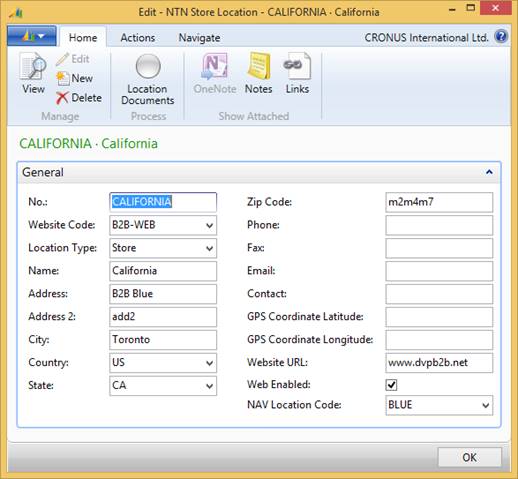
Figure 21 - 5 : The "RED" NAV Location is associated with the Hamburg, Germany Office Nav-to-Net Store Location
In the example shown above, the RED NAV Location is selected and associated with the Hamburg, Germany Office Nav-to-Net Store Location. When the Website Shopper selects the Hamburg, Germany Office, the Website will present the Inventory Availability in the RED NAV Location.
24 Vendor Portal
The Nav-to-Net Vendor Portal gives Dynamics NAV Vendors a resource to build product content, descriptions, images, etc. as well as build request for quotes and view open Purchase Orders.
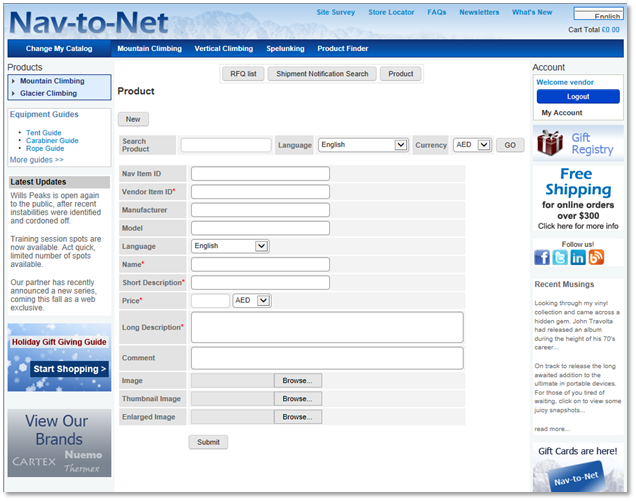
Figure 22 - 1 : Interface for upload Item Content via the Vendor Portal
24.1 Setting up a Vendor
Similar to Customer access to Nav-to-Net, a Nav-to-Net Web Contact will need to be associated with a Vendor so that Vendor may log into the Website.
In the Role Tailored Client, the Vendor List may be found by navigating to Departments } Nav-to-Net } Purchase } Vendor Portal Setup } Vendors . Select a Vendor and click the View button. This will display the Nav-to-Net Vendor Card.
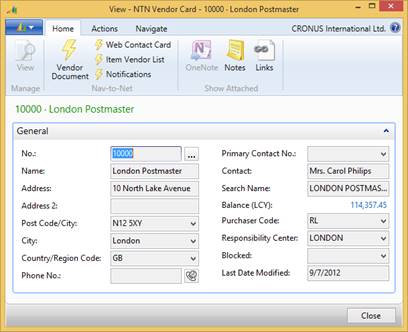
Figure 22 - 2 : Nav-to-Net Vendor Card
The Nav-to-Net Web Contacts associated with this Vendor may be opened by clicking the Web Contact Card button.
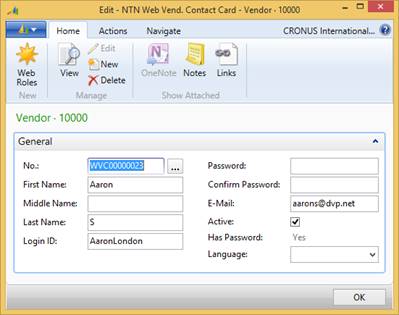
Figure 22 - 3 : Nav-to-Net Web Contact associated with a NAV Vendor
From here a NAV user may create, modify or delete Web Contacts in the same manner as a Customer associated Web Contact.
24.1.1 Permissions
There are several Nav-to-Net Permissions that are specific to Nav-to-Net Vendors. It is recommended that these be added to any role that is used for Nav-to-Net Vendor Web Contacts.
Permission Code Permission Description
- VENDOR_ITEM_UPDATE Ability to update vendor item
- VENDOR_PUR_ORDER Ability to view purchase order
- VENDOR_REPORTS Ability to view vendor reports
- VENDOR_RESPONSE Ability to view and modify RFQ by vendor
Logging into the Nav-to-Net Website with a correctly built Vendor Web Contact will display a new option in the menu list under "My Account", titled Vendor Portal.
24.2 Shipment Notification
As a Vendor, a Website User may populate expected receipt dates of Items currently Purchase Orders that have yet to be received.
Logged in as a Vendor Web Contact, a Nav-to-Net Website user will be presented with Shipment Notification Search button after navigating to the Vendor Portal. Clicking this will present the interface to search for an open PO. Nav-to-Net will only present Purchase Orders associated with the logged in Vendor.
![]()
![]()
![]()
![]()
![]()
![]()
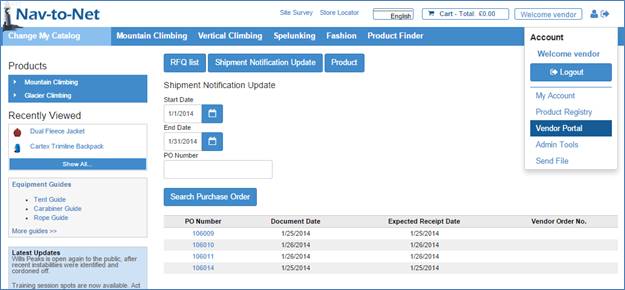
Figure 22 - 4 : Searching for Purchase Orders to Update
When logged in as Vendor, go to Vendor Portal in the user menu, click Shipment Notification Update.
Enter a date range, click Search Purchase Order to view Purchase Orders from that period.
Or enter a PO Number to bring up that Purchase Order.
Searching for and selecting an existing PO will allow the Vendor to update the Expected Receipt Date as well
as the Vendor Item No. and the Total Qty. Shipped.
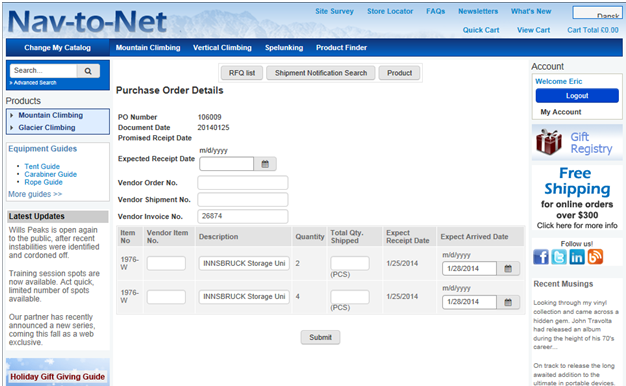
Figure 22 - 5 : A Vendor Updating Expected Receipt Dates for a NAV Company
With a particular Purchase Order selected, the logged in Vendor may update several pieces of information on the Order, which will then be updated on the Purchase Order in NAV.
- Purchase Order Header
o Expected Receipt Date
o Vendor Order No.
o Vendor Shipment No.
o Vendor Invoice No.
- Purchase Order Lines
o Vendor Item No.
o Total Qty. Shipped
o Expected Arrival Date
The Website user may request to update any of these pieces of information by entering new values on the Purchase Order Details Page and clicking Submit. In an example below, the user updates the Expected Arrival Date of one the Purchase Order Lines.
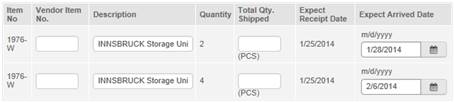
Figure 22 - 6 : Example Update of an Expected Arrival Date
After the user clicks the Submit button on the Website, the request is sent into NAV and held in the Vendor Portal section of Nav-to-Net ( Departments } Nav-to-Net } Vendor Portal } Shipment Notification ).
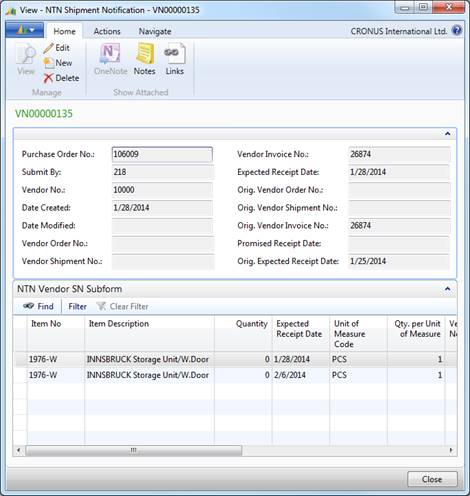
Figure 22 - 7 : Nav-to-Net Shipment Notification Update
At this point the NAV User may manually update the corresponding Purchase Order, or manage the order through their standard NAV business process. Alternatively, a customization to the NAV implementation may be investigated with the NAV Partner to automate the insertion of data provided by the Vendor.
24.3 RFQ

Figure 22 - 8 : Nav-to-Net RFQ List in Vendor Portal
Figure 22 - 9 : Nav-to-Net RFQ
Figure 22 - 10 : Nav-to-Net RFQ List on the Website
Figure 22 - 11 : Nav-to-Net RFQ Details on the Website
Figure 22 - 12 : Nav-to-Net Vendor RFQ Response
24.4 Product
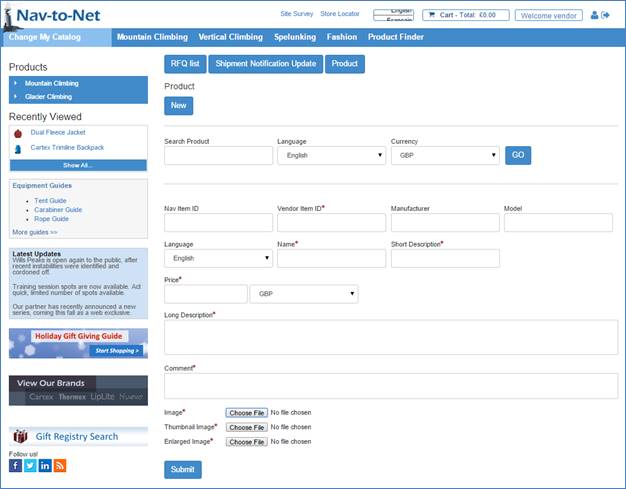
Figure 22 - 13 : Nav-to-Net Vendor Product Update
25 Payment Processors
25.1 Setup Mapping
ChargeLogic
|
NTN Attribute |
API Attribute |
|
Store Number |
Store No |
|
Partner |
Application No |
|
Partner Password |
API Key |
Authorize.NET
|
NTN Attribute |
API Attribute |
|
Partner |
API Login ID |
|
Partner Password |
Transaction key |
PayPal PayFlowPro
|
NTN Attribute |
API Attribute |
|
UserName |
User |
|
Vendor |
Vendor |
|
Partner |
Partner |
|
Password |
Partner Password |
26 Persistent Cart
Note: The persistent cart behaves as intended when a user logs out and logs back in. A "stale" or abandoned cart is defined as one that has not been saved via a log out option. Items added to a stale cart will not be restored in another session. This is especially true when the same web user account is used simultaneously on two different devices or browsers.
27 Bill Pay Online
The Bill Payment Online feature within Nav-to-Net allows for customers to view and pay invoices with their credit cards.
Setup: The setup of Credit Cards for checkout is used by the Bill Payment feature.
Permissions:
Bill_Payment_Online Permission: This permission allows the Bill Payment Feature to be seen within the "My Account" Drop-down. This permission also allows the web user to submit Bill Payments.
Allow_Part_Bill_Pay Permission: This allows the web user to pay a partial amount of any invoice. The partial amount is passed into NAV along with the bill payment information.
Below is an example of making a Bill Payment Online. NOTE that the web user below has both permission outlined above. For invoice 00-9, the web user choose to pay a partial amount of 30000GBP
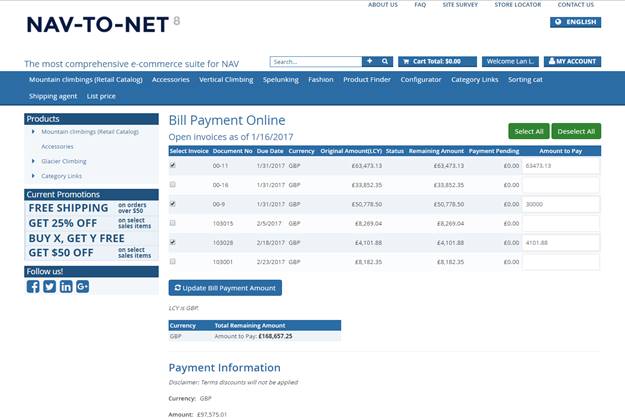
To view the submitted Bill Payments within NAV, go to Nav-to-Net -> Sales -> Web Bill Payment Holding as shown below.
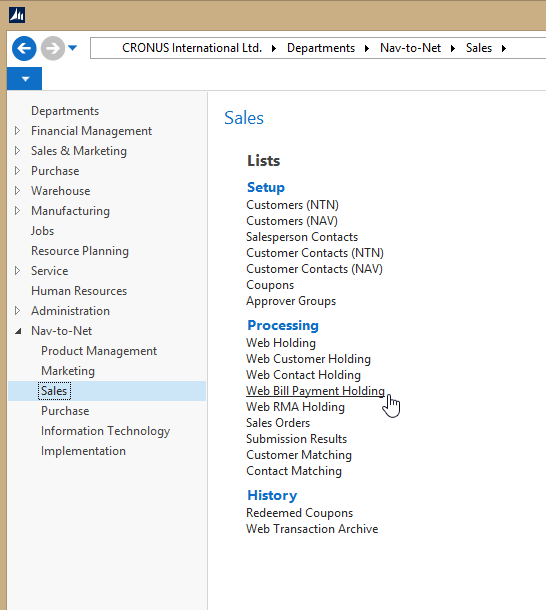
Below is the Bill Payment Card associated with the web example above. Note the specific payment amount within the Payment Amount Column.
While in this example, the Credit Card Number is shown (encrypted), this is just a setting that is used for for troubleshooting purposes. In production, this would be turned off to ensure PCI compliancy.
NOTE: This is no mechanism to push the Bill Payments to the Ledgers. It is anticipated that your NAV VAR will manage the transfer of the data from the NAV NTN Bill Payment Tables to the appropriate tables and with your custom business logic/workflows.
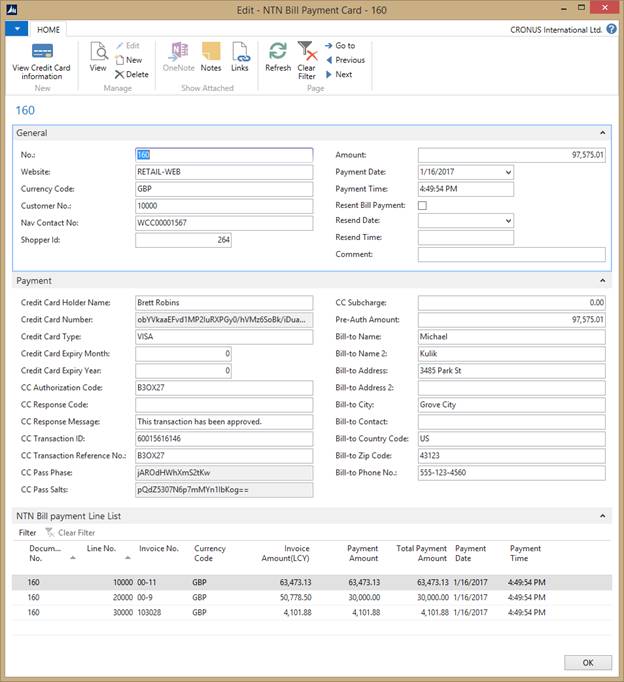
When a payment has been made on the website, and is sitting within the Bill Payment Holding Tables, BUT has not been processed into the production NAV tables (ie Ledger Entry Tables), the website presents these payments as pending. There is validation on the website to include these pending payments to help ensure that the web user does not overpay a specific invoice.
28
29 Region and Language Selection Setup
The Nav-to-Net language and region selection is grouped into a single element on the website. This drop down selection allows the website user to change the language the website is presented in or the region that the user is shopping from.
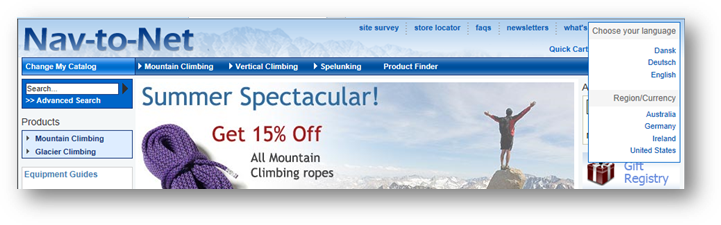
Figure 25 - 1 : Nav-to-Net Language and Region Selection shown on the right of the web page header
29.1 Setting up and Enabling Languages
In order to allow the website to display its content in a particular language, that language must be defined as part of Standard NAV and enabled in Nav-to-Net.
Nav-to-Net will not rely on the Language definitions of standard NAV ( Departments } Administration } Application Setup } General } Languages , see Dynamics NAV documentation for more information), but best practice will be to define these Language records on the same three character ISO language codes.
Set up the Languages in use by the website under Departments } Nav-to-Net } Setup } Languages (DVPNTN) .
29.1.1 Language (DVPNTN) Setup
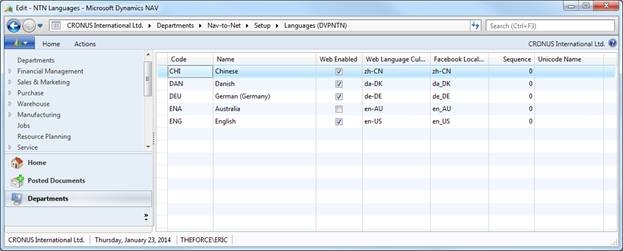
Figure 25 - 2 : Languages (DVPNTN)
-
Code
Standard NAV Code value for the DVPNTN Language
-
Name
Descriptive Name for the Language
-
Web Enabled
Defines what languages are accessible on the website
-
Web Language Culture Code
Microsoft defined Language Culture Code used by the web server to properly display currency and language
formatting
-
Facebook Local Code
Facebook defined Language Culture Code used by the web server to properly display currency and language
formatting
-
Sequence
The order in which the languages are displayed in the Language Selection element on the website
-
Unicode Name
The name of the language displayed on the website, if a different display name is required using an extended
character set
e.g.
中国的
for Chinese, or Français for French
Once defined these languages may then be applied to the definition of the DVPNTN Website
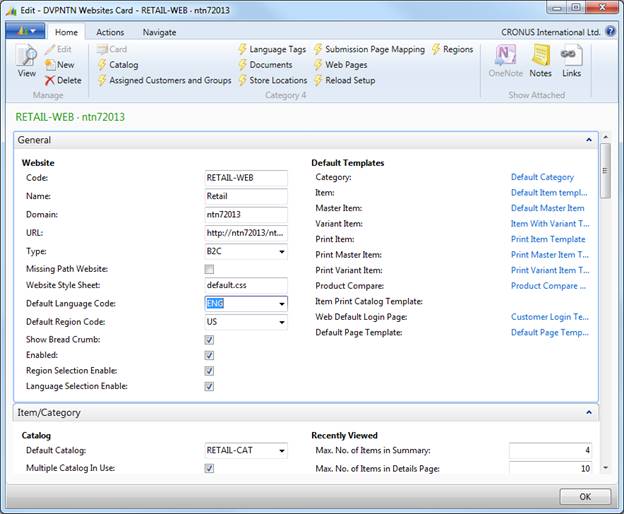
Figure 25 - 3 : DVPNTN Website with Default Language Defined
A Default Language Code is required for the website to operate correctly.
Setting blog to TRUE will allow the user to see the Language Selection element on the website.
29.2 Setting up and Enabling Currencies
Separate from standard NAV Currencies, Nav-to-Net relies on DVPNTN Currency definitions. This data is related to and expands upon the standard NAV currencies. This relationship allows both for leveraging standard NAV currency and exchange rate information as well as expanding the behavior to support web formatting and presentation conventions.
29.2.1 Currency Code (DVPNTN) Setup
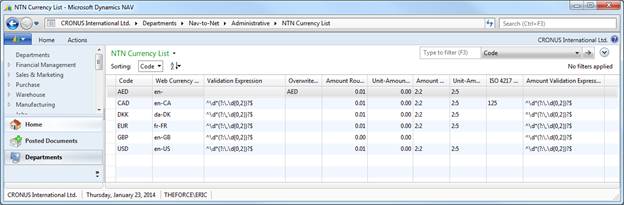
Figure 25 - 4 : DVPNTN Currency Setup
-
Code
This value should reflect the standard three character ISO currency code
This field is a look up to the Standard NAV Currency Table
Note:
For the currency to be used as the website default, corresponding to the NAV LCY Code, this value must be
identical to the standard NAV LCY Code (
Departments
}
Administration
}
Application Setup
}
Financial Management
}
Finance
}
General Ledger Setup
)
-
Web Currency Culture Code
The correct Microsoft IIS Currency Culture Code that corresponds to the currency
See
Appendix A
-
Validation Expression
The correct regular expression that validates and defines the presentation of the price and financial values
is required
-
Overwrite Currency Symbol
The value to be used for display of the currency symbol on the website should the Microsoft IIS Currency
Culture Code displays an incorrect or inappropriate currency symbol.
-
Amount Rounding Precision
This is a flow field from the NAV Currency Table
The number of significant digits to use when rounding values for the Shopping Cart
e.g.:
0.01 Round to two decimals
0.05 Round to a number divisible by 0.05
1.00 Round to a whole number (no decimals - divisible by 1.00)
10.00 Round to a whole number (no decimals - divisible by 10.00)
-
Unit-Amount Rounding Precision
This is a flow field from the NAV Currency Table
The number of significant digits to use when rounding values for the Item Price
e.g.:
0.01 Round to two decimals
0.05 Round to a number divisible by 0.05
1.00 Round to a whole number (no decimals - divisible by 1.00)
10.00 Round to a whole number (no decimals - divisible by 10.00)
-
Amount Decimal Places
This is a flow field from the NAV Currency Table
Specifies the number of decimal places the program will display, using a minimum and maximum separated by a
colon. See Application Help for Microsoft Dynamics NAV: Tables, Reports, Batch Jobs, and Windows
}
Finance Tables, Reports Batch Jobs and Windows
}
Tables
}
Currency
}
List of Fields in the Table
}
Amount Decimal Places Field
-
Unit-Amount Decimal Places
This is a flow field from the NAV Currency Table
Specifies the number of decimal places the program will display, using a minimum and maximum separated by a
colon. See Application Help for Microsoft Dynamics NAV: Tables, Reports, Batch Jobs, and Windows
}
Finance Tables, Reports Batch Jobs and Windows
}
Tables
}
Currency
}
List of Fields in the Table
}
Unit-Amount Decimal Places Field
-
ISO 4217 Currency Char 3
Three character currency code, ISO Standard
See
Appendix B
Note: best practice will use the ISO Standard Currency Code for the Code value as well
Note: This is only required as part of 3
rd
Party Integration
-
Currency Amount Validation Expression
The correct regular expression that validates and defines the presentation of the price and financial values
is required
Important Note:
Because Nav-to-Net relies on the Standard NAV Currency Table and changes to that table to not trigger
modifications of the DVPNTN Currency Table, any changes to the Standard NAV Currencies will require a
subsequent force synchronization of the DVPNTN Currency Table
29.2.2 Nav-to-Net Setup Defaults
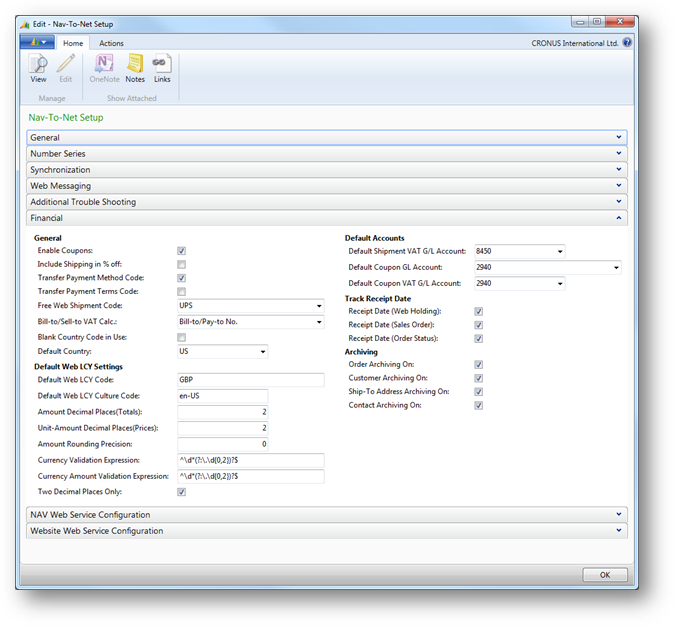
Figure 25 - 5 : The following fields are required for correct currency and financial behavior on the website
With regards to Currency configuration the following fields will need to be set up correctly in the Nav-to-Net
Administration:
-
Default Web LCY Code
This value must be the same as the standard NAV LCY Code (
Departments
}
Administration
}
Application Setup
}
Financial Management
}
Finance
}
General Ledger Setup
)
Note: Best practice is to use the ISO Standard Currency Code for this and the NAV LCY Code
-
Default Web LCY Culture Code
The correct Microsoft ISS Currency Culture code that corresponds to the Default Web LCY Code is required
-
Amount Decimal Places (Totals)
The amount of decimal places to present on the website for Cart and Total values
-
Unit-Amount Decimal Places (Prices):
The amount of decimal places to present on the website for Price values
-
Amount Rounding Precision:
The amount of decimal places to use when rounding amount values
-
Currency Validation Expression
The correct regular expression that validates and defines the presentation of the price and financial values
is required
-
Currency Amount Validation Expression
The correct regular expression that validates and defines the presentation of the price and financial values
is required
-
Two Decimal Places Only
Override, site-wide, the number of decimal places for all values and set to 2
Note: These fields will replicate the Standard NAV General Ledger Setup and Standard NAV Currency information,
however, not all implementations of NAV require this data, while the website does. As such these values must
be maintained separately.
29.3 Setting up and Enabling Countries
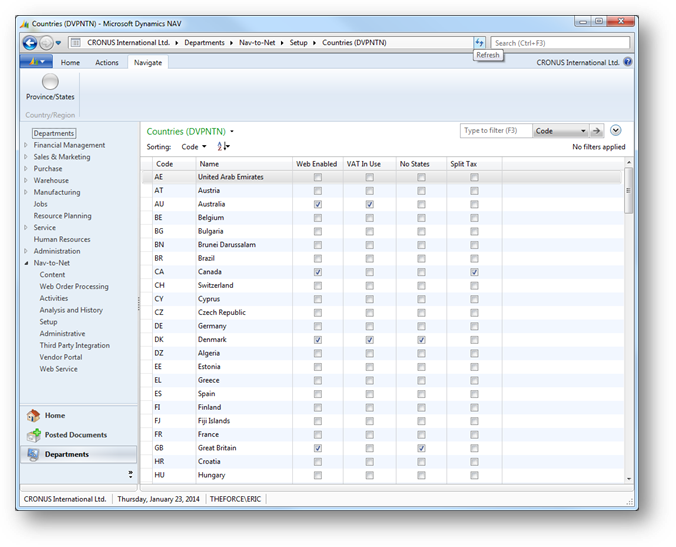
Figure 25 - 6 : The DVPNTN Country Page
Unlike currencies, the countries in use in standard NAV must be defined in standard NAV Country/Region Table must be defined. Nav-to-Net, therefore, leverages the standard NAV Country/Region data.
Set up any countries that are to be accessible on the website, for example in checkout, using the standard NAV pages ( Administration } Application } Setup } General } Countries/Regions )
Once done, use the DVPNTN Countries Page to expose the necessary Countries to the Website. ( Departments } Nav-to-Net } Setup } Countries (DVPNTN) ).
Nav-to-Net related fields added to this Table are:
-
Web Enabled
Allows the Country to be visible on the website
-
VAT in Use
If the Website is defined as a VAT Enabled Website, some countries can be excluded from this Tax Calculation
by setting VAT in Use to FALSE. This will only be used when a website shopper is creating a new address;
existing addresses in NAV will use the VAT Business Posting Group, either on the Customer record or the
Ship-to Address record.
-
No States
When TRUE, this allows the website shopper to select a country without requiring the selection of a State or
Province
-
Split Tax
When the applicable Tax Area Code or VAT Business Posting Group has multiple applicable Jurisdictions, all of
the tax details for those jurisdictions will be displayed separately on the website. This does not affect the
calculation of the tax, only this display for the website shopper.
e.g. in Ontario, there are Federal and Provincial tax rates. This Split Tax function will separate the display
of HST and GST as opposed to a single value in the Cart Subtotal.
29.3.1 Assigning DVPNTN States / Provinces
Once a Country is set up and Web Enabled, associated States should be defined. For the purposes of the website, the States are analogous to Counties and Provinces.
If the No States value for a Web Enabled Country is FALSE, States will need to be defined in order for a user to select that Country in Checkout.

Figure 25 - 7 : DVPNTN States / Provinces Page
-
Code
Code value to be used in NAV
-
Name
Name of the State to be displayed on the website
Select a Country in the DVPNTN Country Page and select Province/States Navigation to define the States to be
used by the Website for that Country.
29.4 Setting up and Enabling Regions
Region selection on the website allows a website shopper to localize the currencies and taxes to their preferred locality.
All of the currency, pricing and tax information, both North American tax and VAT, is displayed on the website for a non-logged in user, based off of a template customer record in NAV. In order for NAV to generate pricing and tax values, a Customer record is required, therefor for Nav-to-Net will require a customer record to display those same values. In the case of a non-logged in user or a new shopper, a template customer record is used. No orders are assigned to this customer and no ledger entries are create against this customer record, it is used solely as a template for pricing and tax values for the website.
29.4.1 Building a Customer Template
Set up a Customer record that will be used as a template Customer for the website. Under a B2C website, this template will effectively be the Customer record in NAV that the new shopper will be behaving as.
Fields on this Customer record that will be important to the behavior of the website are:
- Bill-to Customer No.
- Customer Price Group
- Customer Disc. Group
- Include Line Discount
- Prices Including VAT
- Tax Area Code
- Tax Liable
- Currency Code
Recommend setup for a Default Customer Template:
-
Bill-to Customer No.
(
blank
)
-
Customer Price Group
typical retail price group group
-
Customer Disc. Group
typical retail pricing discount group
-
Include Line Discount
(
TRUE
)
-
Prices Including VAT
(
TRUE
) if operating a VAT website
-
Tax Area Code
(
blank
)
Note this will be defined be the website shopper during checkout, relying on the Web Tax Detail Setup
-
Tax Liable
(
TRUE
)
-
Currency Code
(
blank
)
Note: when the Currency Code is
blank
the NAV LCY Currency is used
29.4.2 Build a Region
The Region will relate these Template Customers to the website and allow for a presentation element for the website user to select from.
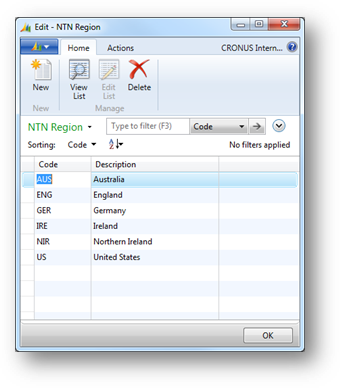
Figure 25 - 8 : DVPNTN Regions
-
Code
Code value of the Region
-
Description
Description (visible on the website) of the Region
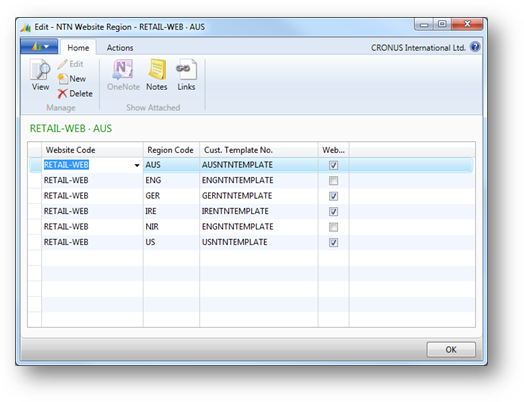
Figure 25 - 9 : DVPNTN Website Region Relationships
The website region setup is available at Departments } Nav-to-Net } Setup } Website } Regions .
-
Website Code
The website the Region is associated with
-
Region Code
The Code Value of the Region
-
Cust. Template No.
The Customer record holding the template to be "shopped as" on the website
-
Web Enabled
Enable the Region setup to be exposed to the website
29.4.3 Website Defaults
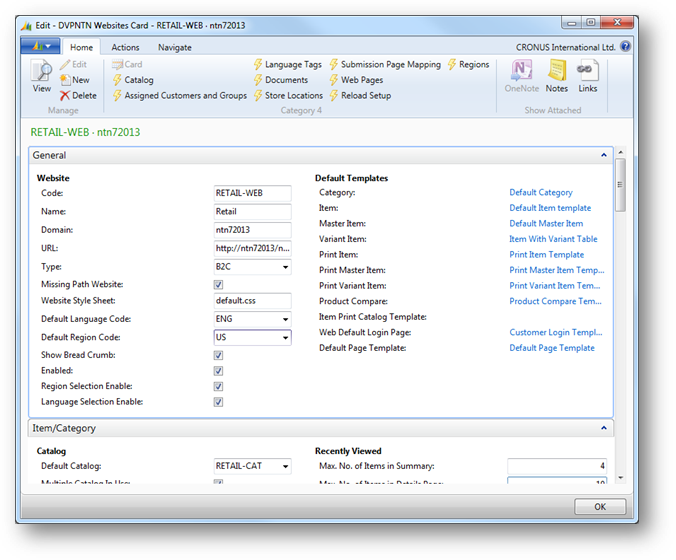
Figure 25 - 10 : Website Defaults for Region Selection
-
Default Region Code
This Region will be the pre-selected Region when users first arrive at the website. They will effectively be
shopping as the Template Customer associated to this Region
-
Region Selection Enable
Turn on or off the ability to choose Regions on the website
29.5 Changing the Date format on the website
The example below is assuming changing a date format from US to AU.
Update the Web Language Culture Code value (set to 'en-AU' as shown below):
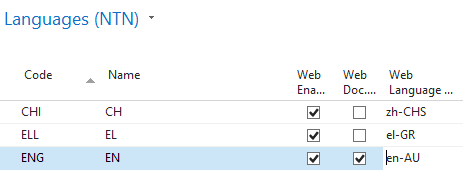
Next, on the web server, go to Control Panel and then open Regions:

Make sure that the Format and the short date settings are set as shown above. Next, click on the Location tab and make sure that the dropdown is set to Australia:
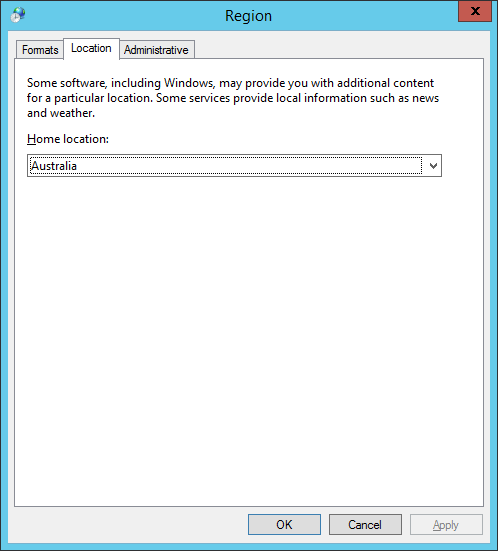
Next, click on the Administrative tab and set the system locale to English (Australia) as shown below.
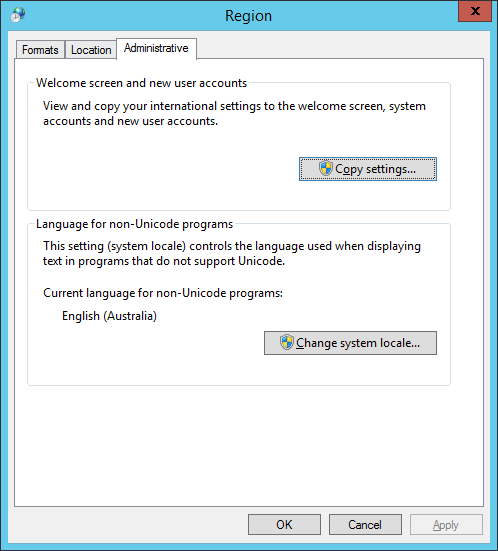
Once these changes are made, restart IIS.
29.6 Appendix A
29.6.1 List of Culture Codes
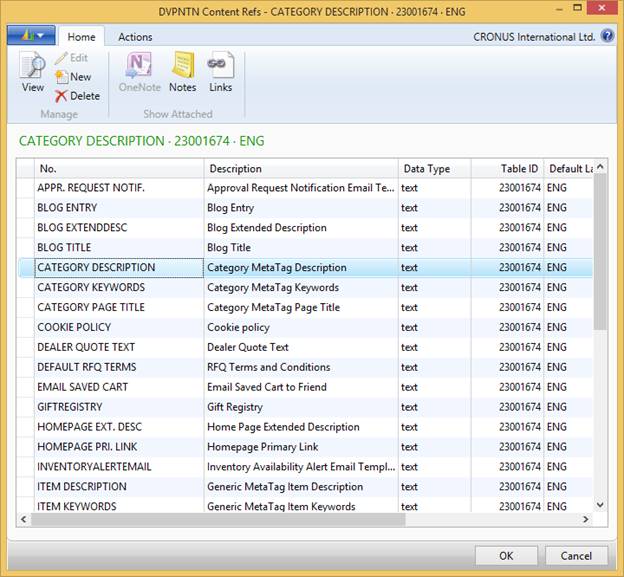
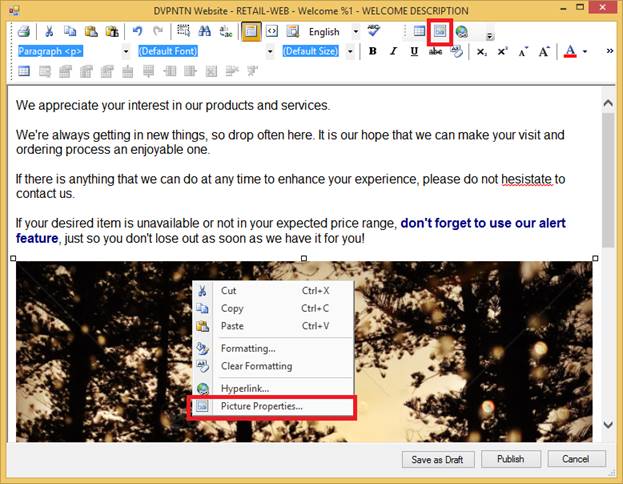
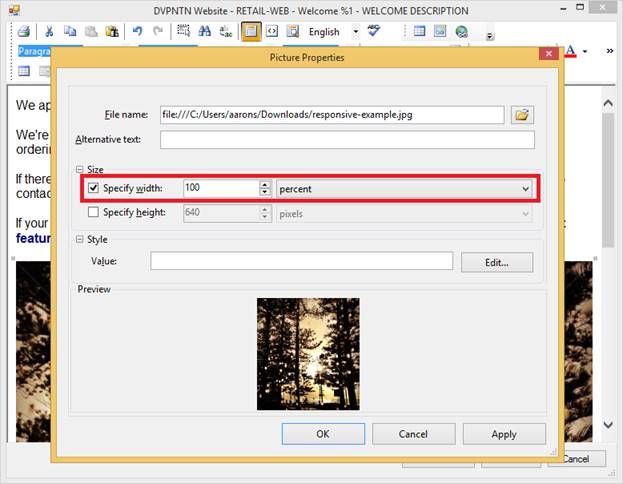
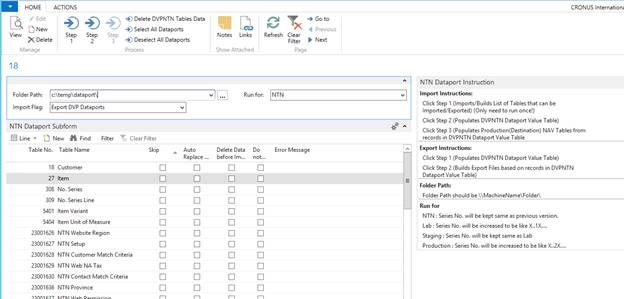
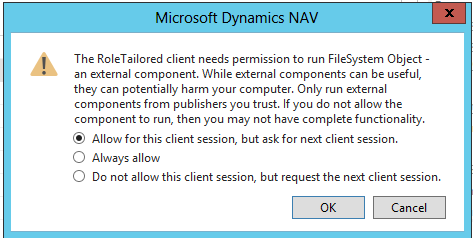
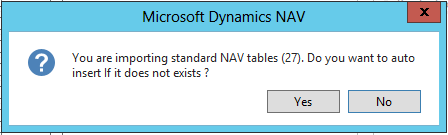
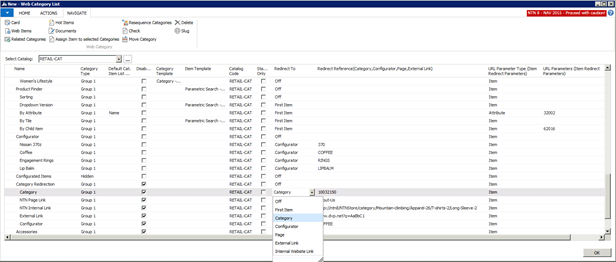

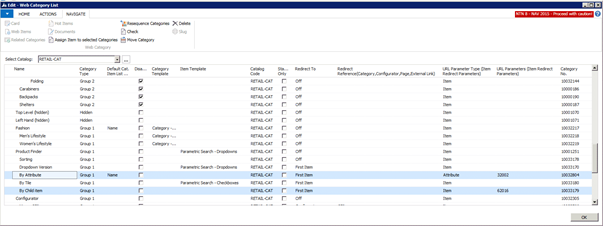
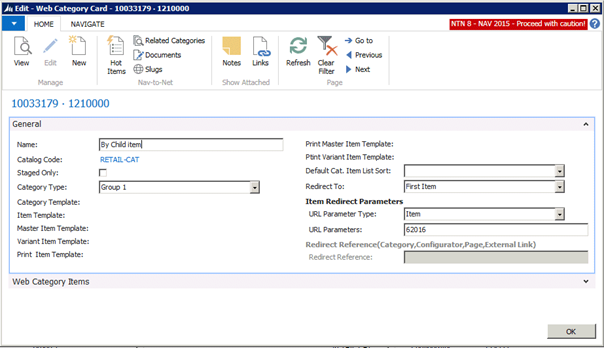
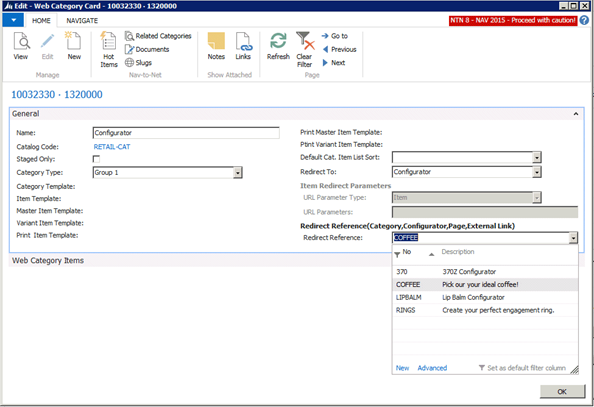

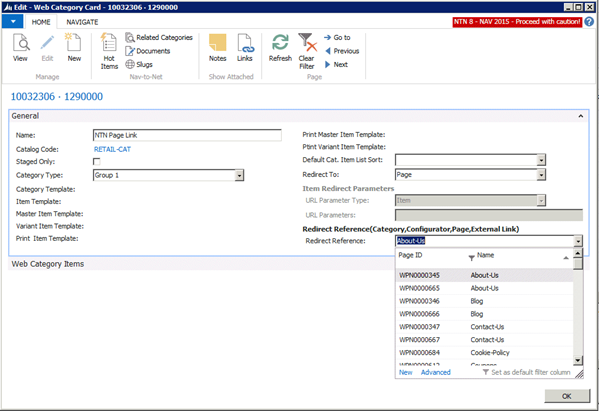
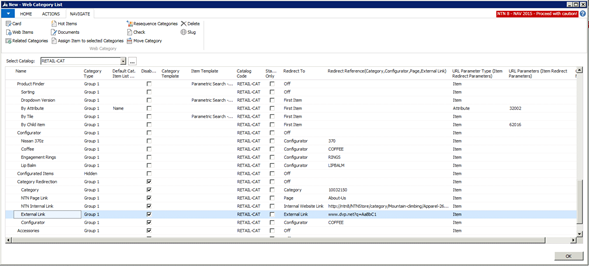
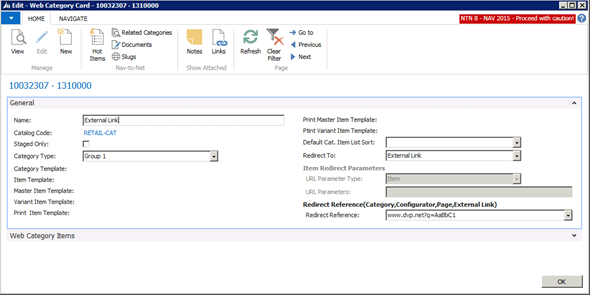
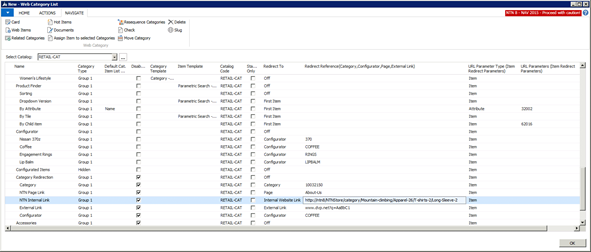
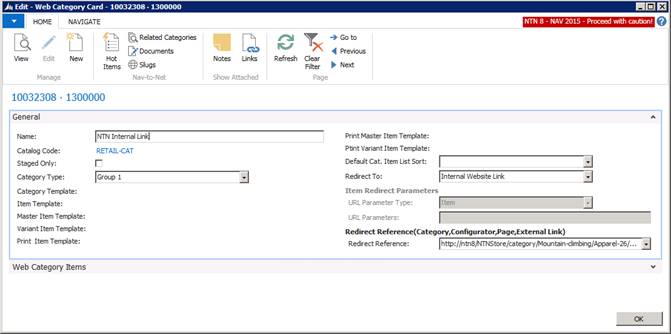
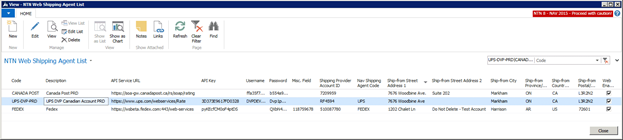
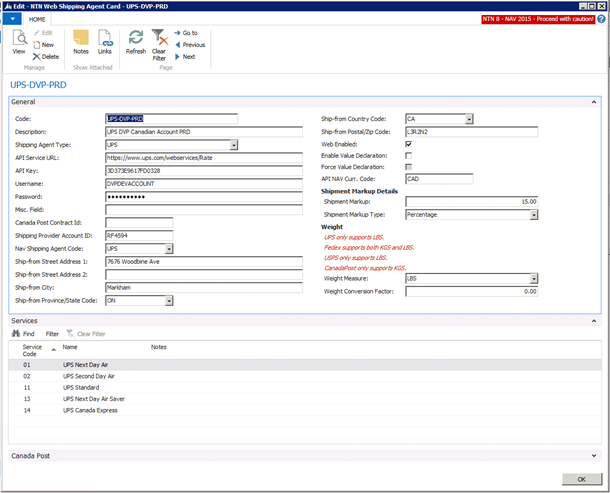
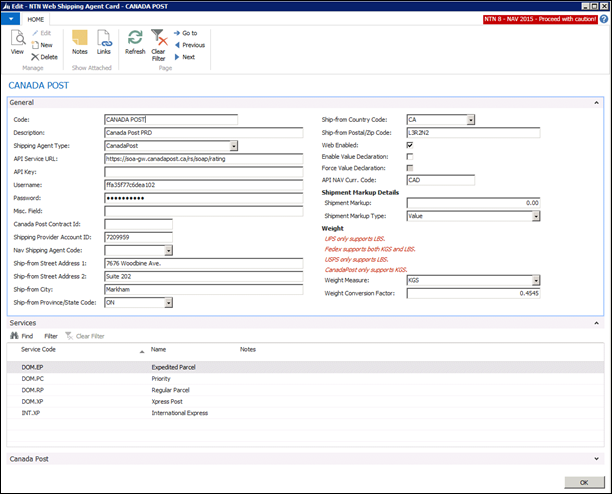
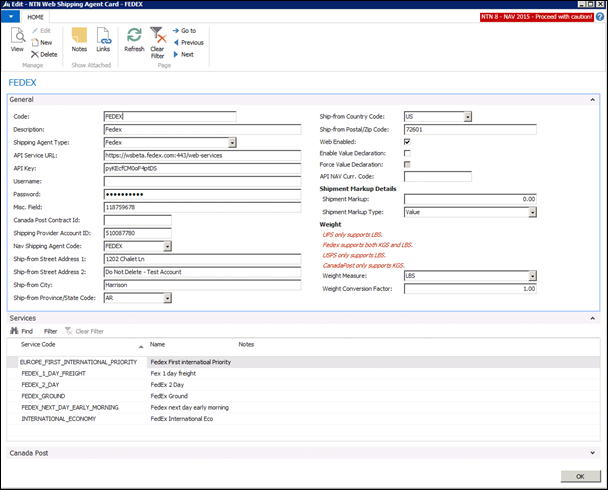
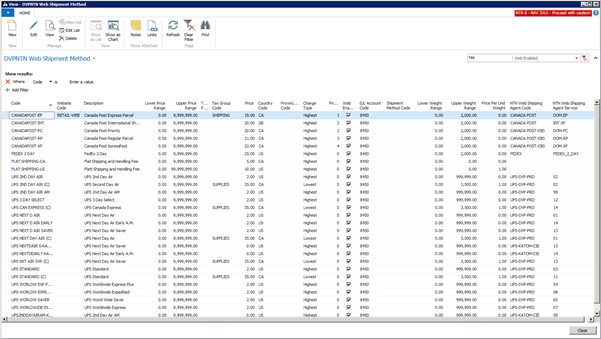
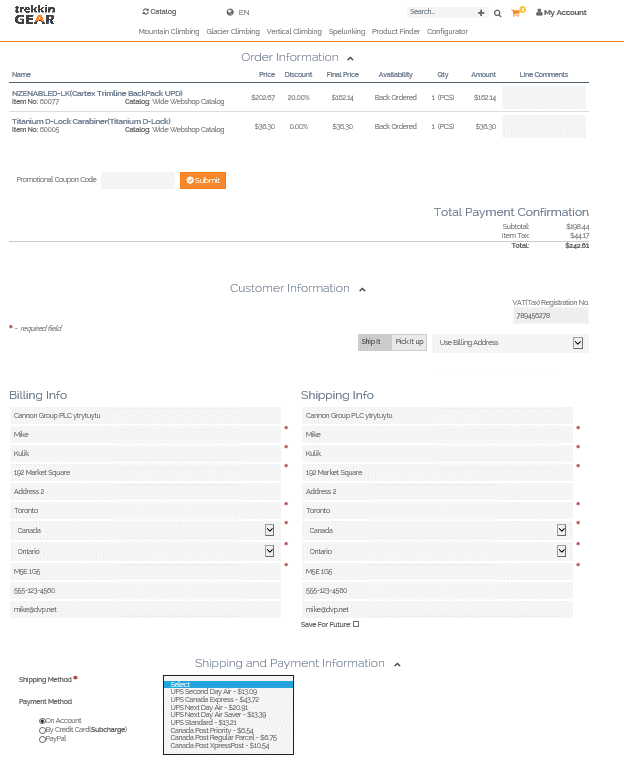
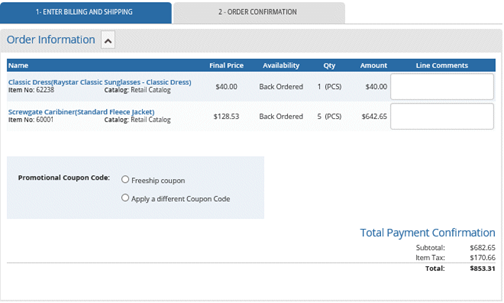
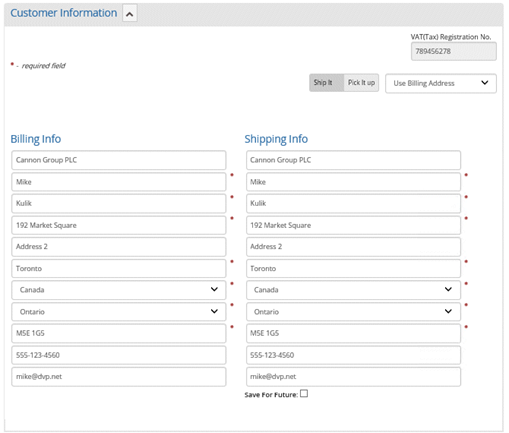
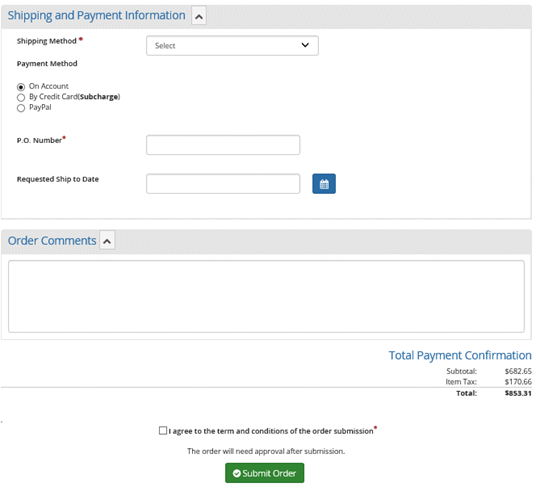
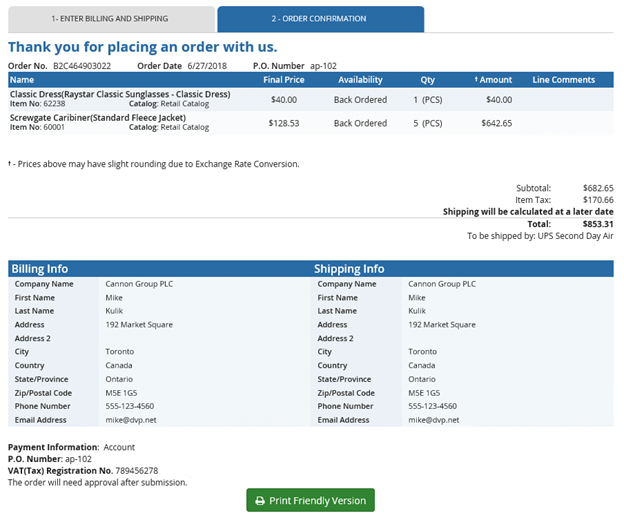
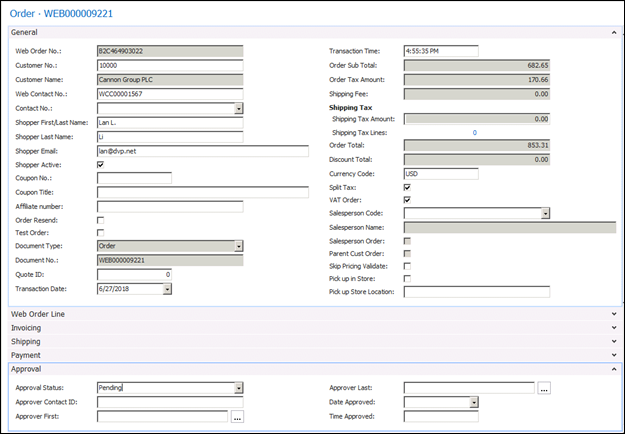
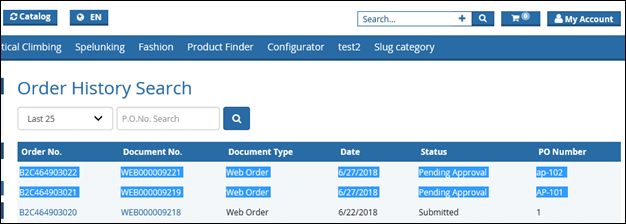
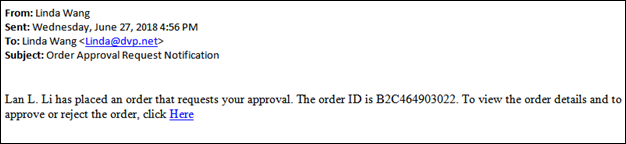
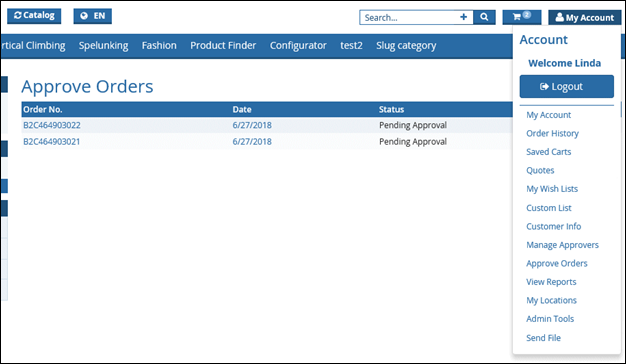
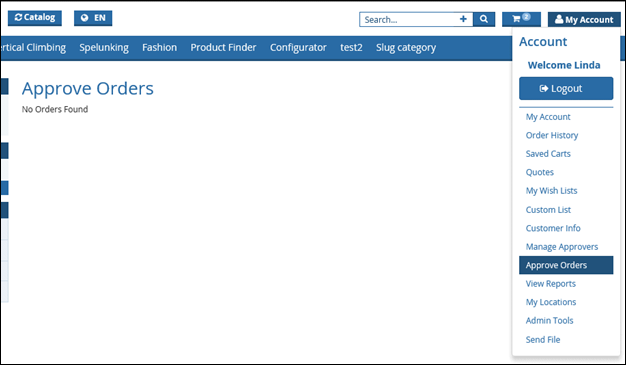
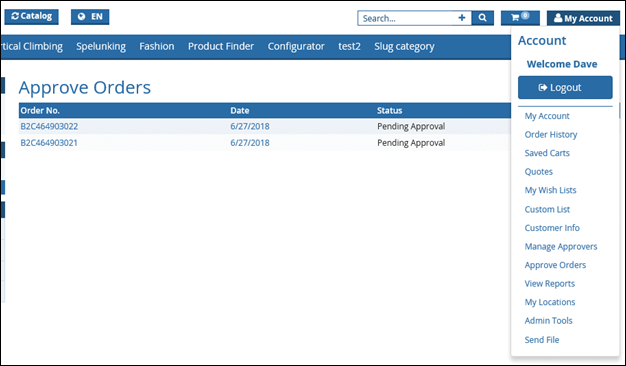
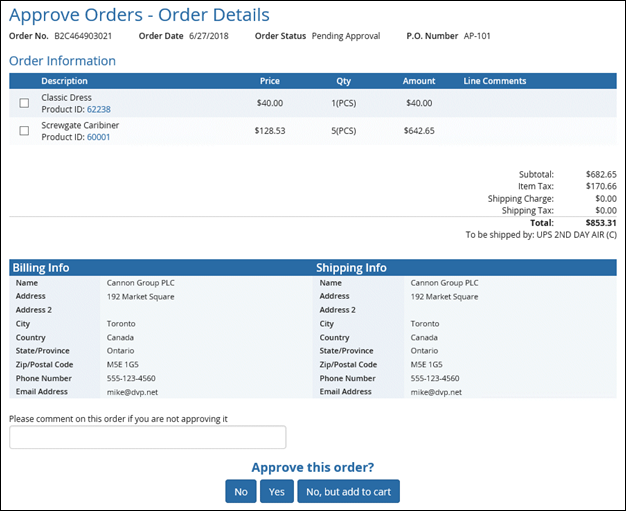
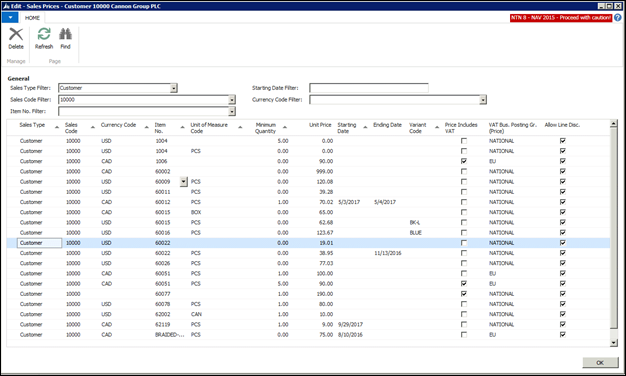

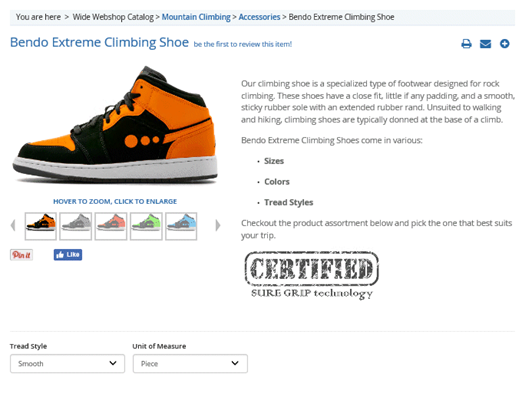
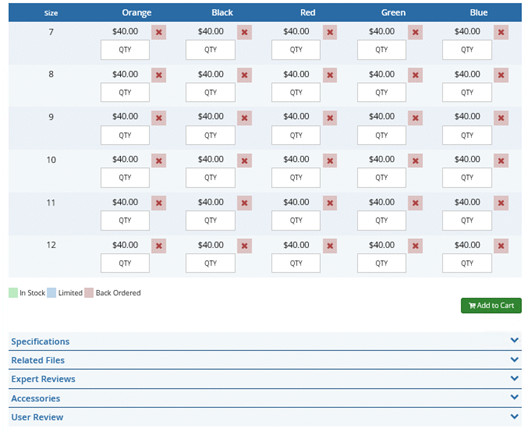

